Introduction
This guide uses screenshots and descriptions to walk you through creating a Simple Landing-to-Bronze data integration pattern with Azure Synapse Analytics and MetaKraftwerk. The pattern will be able to generate Synapse notebooks that read CSV data from a landing zone, transform it and finally load it into a bronze layer in Delta format. The example assumes that you have a Medallion architecture. If you have a different architecture or layer structure, that's fine; the example is for illustrative purposes only.
Goal
By the end of this tutorial, you will:
- Create a Pattern in MetaKraftwerk (MKW) for Landing to Bronze.
- Configure the Instances in MKW.
- Run a Synapse notebook to:
- Read CSV from Landing.
- Compute HASH_KEY from key columns.
- Compute HASH_VALUE from descriptive columns.
- Write data as Delta format to Bronze.
Prerequisites
Access to MetaKraftwerk and a Project workspace.
Azure Synapse workspace and a Spark pool.
Access to ADLS Gen2 ("Storage Blob Data Contributor" role).
Sample landing data:
Download csv_landing_data_for_synapse_tutorial.zipSample Instances for Metakraftwerk:
Download instances_for_synapse_tutorial.zipSample Pattern file for Metakraftwerk:
Download bronze_dv_prep_support_live.zipSample Notebooks for Synapse:
Download SYNAPSE_DEMO_NOTEBOOKS.zipSample Pipeline (
Download synapse_pipelines.zipbronze_dv_prep) and Bronze Master Pipeline with For Each activity (PL_LDG_2_BRONZE) for Synapse:
Part 1 — Create a Pattern in MetaKraftwerk
Patterns are a set of templates and dynamic metadata expressions that define how data structures and transformations are created. They include the logic needed to generate schemas, code, ETL objects (Pipelines, Notebooks etc.) and configurations. Patterns are reusable and applicable across different sources and scenarios.
Note
For more information on patterns, see What is a pattern.
1. Create the Pattern
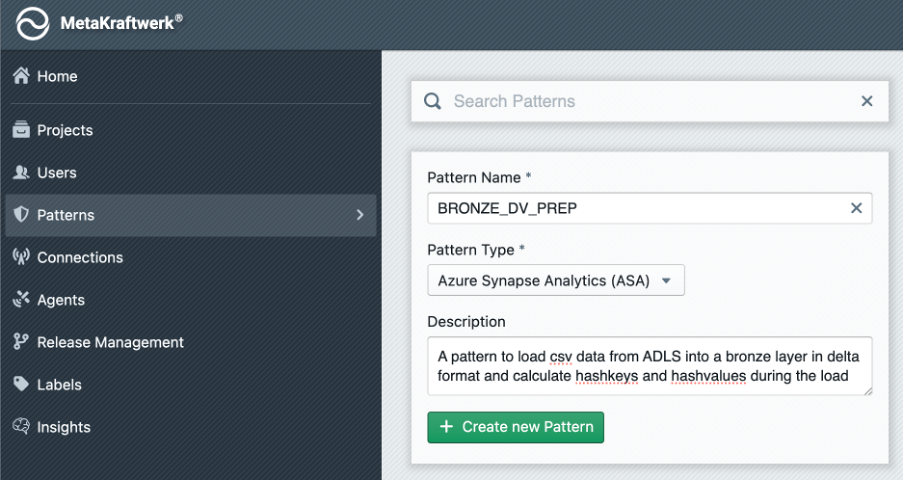
To start with the development, we first have to create a new pattern in MetaKraftwerk:
- Go to Home → Patterns → + Create new Pattern .
- Set the Name to:
BRONZE_DV_PREP - Set the Pattern Type to: Azure Synapse Analytics(ASA)
- Optional Description: “A pattern to load csv data from ADLS into a bronze layer in delta format and calculate hashkeys and hashvalues during the load”
2. Add Pattern to Project
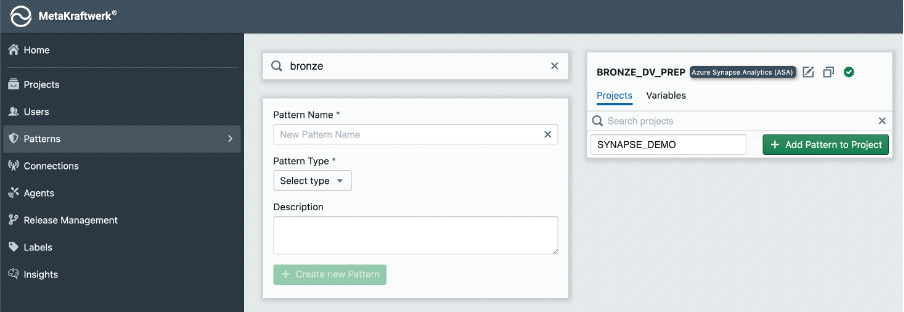
The pattern will not be visible to users and developers unless you add it to a project:
- Click on the Patterns Section in the sidebar → Search for your newly created pattern
BRONZE_DV_PREP→ Choose projectSYNAPSE_DEMO→ Click + Add Pattern to Project .
3. Create Pattern Variable
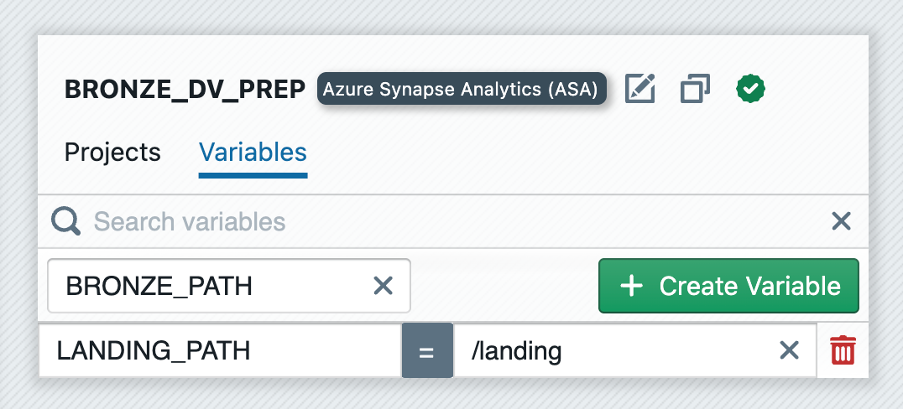
A pattern can have one or more variables that can be used to parameterize the pattern. The value of these variables can be set individually for each instance folder. When an instance is built, the folder's value is then used. In our example, we want to use variables to parameterize the landing and bronze paths.
- Switch to
Variablesin your pattern → Click + Create Variable → Set variable name toLANDING_PATHand the value to/landing.
4. Define Functional Roles
Within the Pattern, Functional Roles must be defined. These Functional Roles represent the different types of fields or parameters that can be configured for each instance. To create functional roles in MetaKraftwerk, follow the following steps using the provided screenshot as a guide:
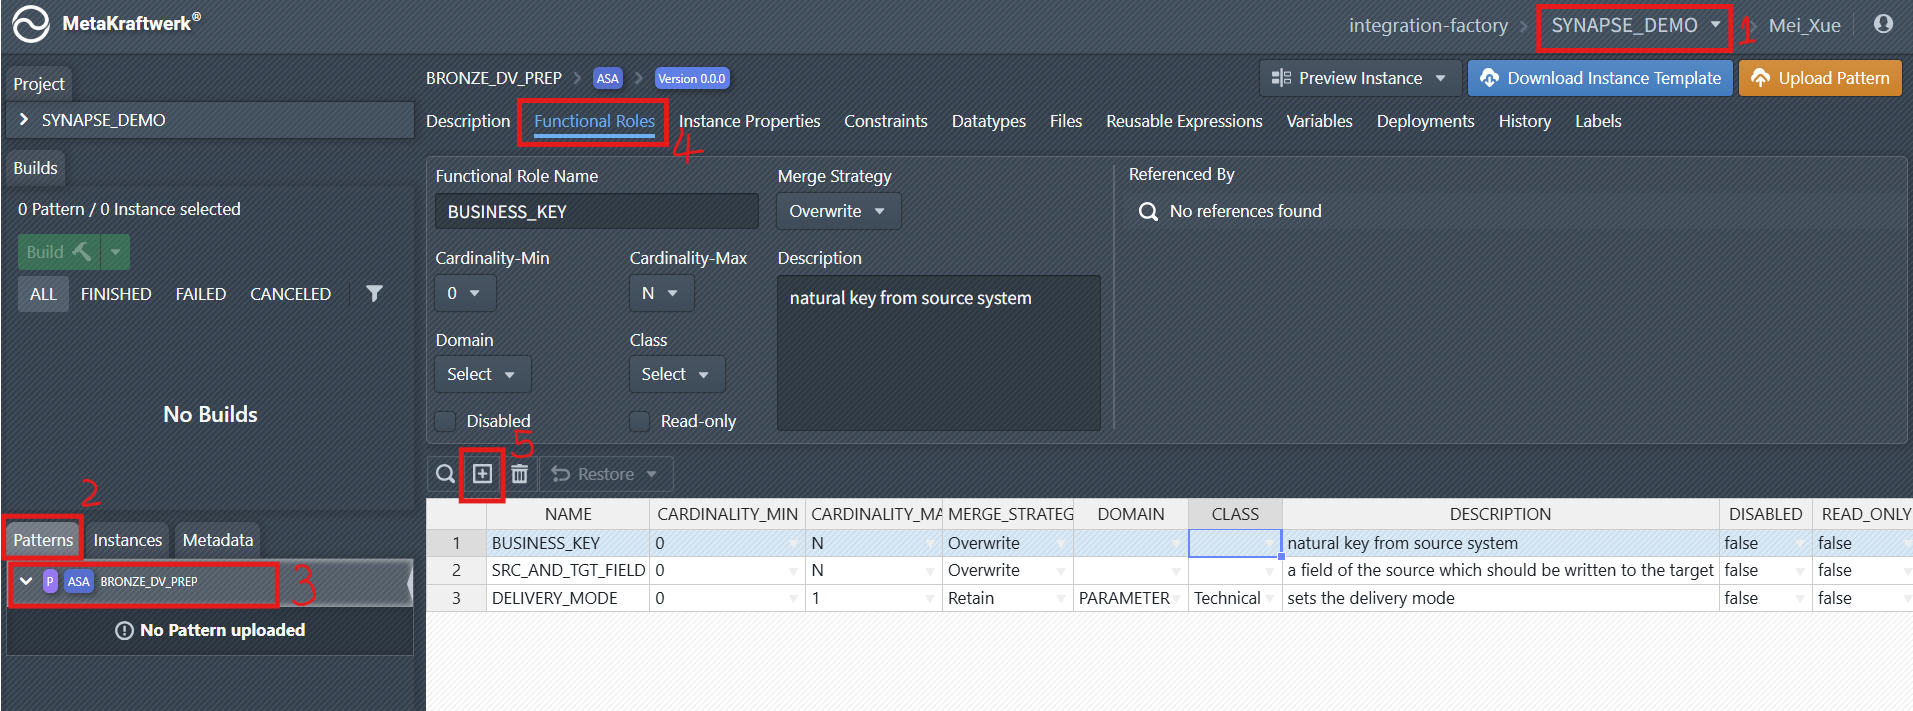
Select the Project: In the top-right corner of the MetaKraftwerk interface, use the project dropdown menu to select your target project (e.g.,
SYNAPSE_DEMOas shown).Navigate to the
PatternsSection: On the left-hand sidebar, click on thePatternstab. This displays all patterns available for the selected project.Select the relevant Pattern:
From the list of patterns (under the Patterns tab), choose the specific pattern where you want to create functional roles. In the screenshot, this is theBRONZE_DV_PREPpattern.Open the
Functional RolesTab: In the detail view of the selected pattern (BRONZE_DV_PREP), click on theFunctional Rolestab. This tab is where you define and manage functional roles for the pattern.Add New Functional Roles: In the
Functional Rolestab, click the plus sign icon to start creating a new functional role. Add the following roles:
- BUSINESS_KEY
- SRC_AND_TGT_FIELD
- DELIVERY_MODE
Configure the properties of the new functional role:
- Cardinality: How many values are allowed (e.g., 0..1, 0..N).
- Merge Strategy: How values are handled when merging (e.g., Overwrite, Add New, Retain).
- Domain/Class: (Optional) For further categorization or validation.
- Description: Explains the purpose of each role.
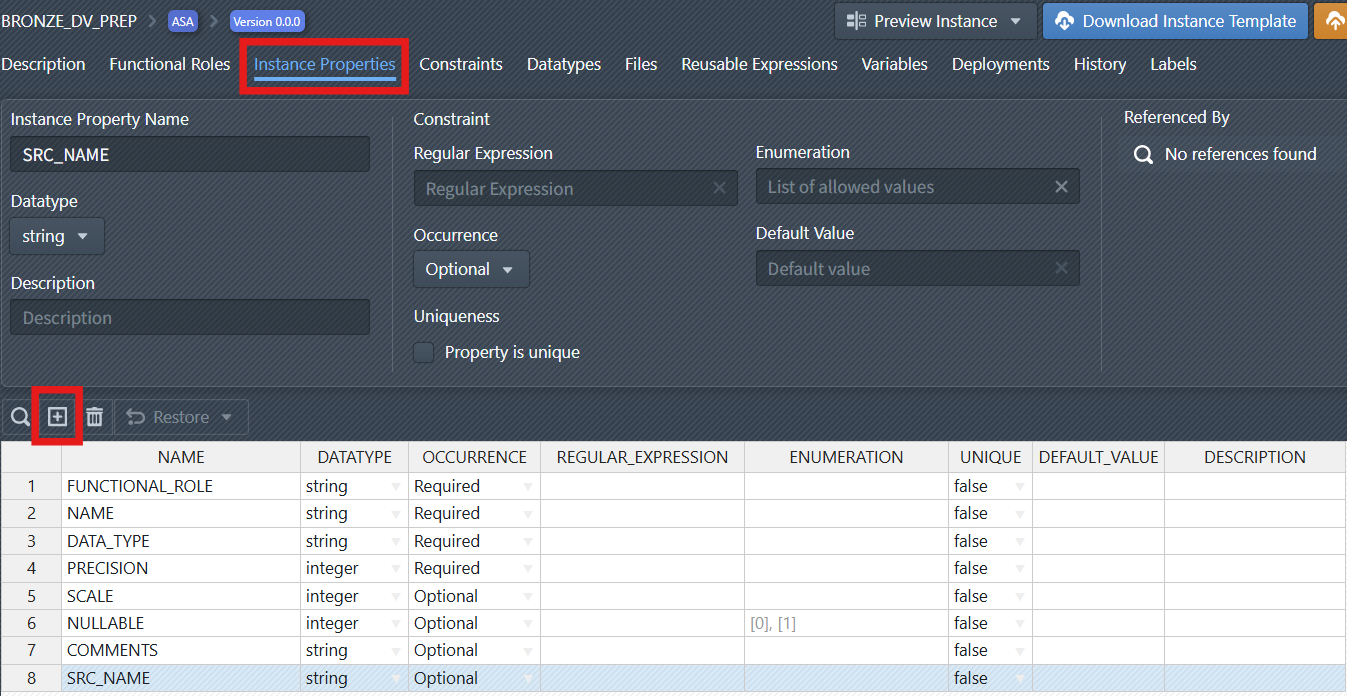
5. Add Instance Properties
Now you have to define Instance properties such as:
- FUNCTIONAL_ROLE (the role of the field)
- NAME (field name)
- DATA_TYPE (data type, e.g., string, integer)
- PRECISION, SCALE (for numeric fields)
- NULLABLE (whether the field can be null)
- COMMENTS (description)
- SRC_NAME (Field name in the source system)
These properties allow for flexible and precise configuration of how data is processed and mapped. Some of the above properties are already part of your pattern as default properties. But some of the above (e.g. COMMENTS and SRC_NAME) must be created.
Create a New Property: Click the plus sign icon ![]() to create a new instance property. You have to change the name of the instance property to a value such as
to create a new instance property. You have to change the name of the instance property to a value such as SRC_NAME. You can leave all other settings for the instance property for now.
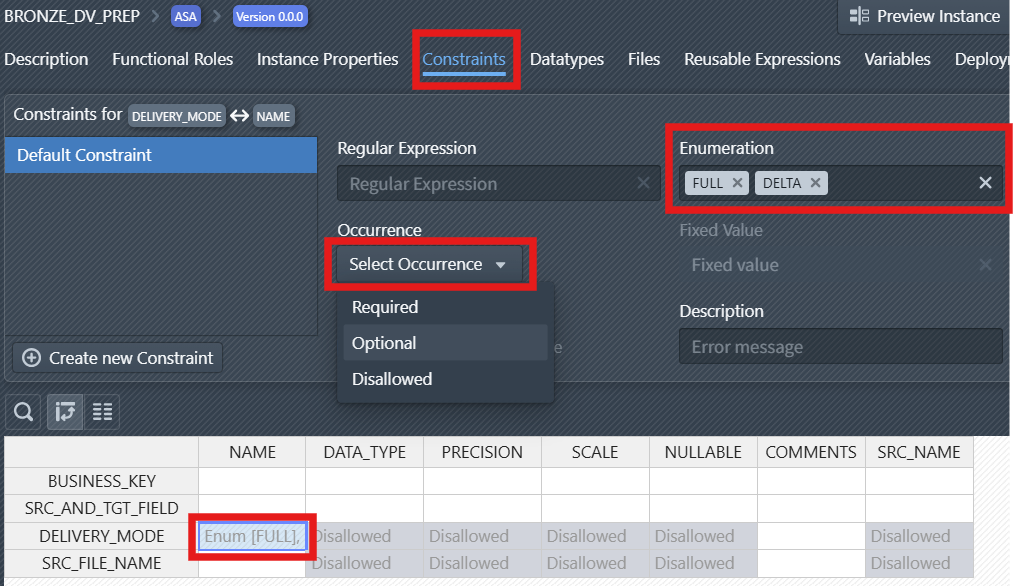
6. Set Constraints
Constraints can be set on roles and properties to enforce data quality and business rules. For example, certain fields or data types can be disallowed for specific roles, ensuring only valid configurations are used.
Select the Constraints tab to access constraint configuration options.
Set Occurrence Behavior: Use the "Select Occurrence" dropdown to define if a property of a Role is:
Required(must be present),Optional(may be present), orDisallowed(must not be present).
Define Enumeration Values: In the Enumeration field, specify the allowed values for the constrained item. In the screenshot, FULL and DELTA are added as valid options for the NAME of DELIVERY_MODE.
Tip
If you have defined a constraint for a combination of functional role and instance property and want to apply it to other roles or properties, you can just select the constraint in the table below, press Ctrl+C to copy the constraint, then go to another cell and press Ctrl+V to paste the constraint.
Part 2 — Create Instances of the Pattern in MKW
Instances are a set of metadata. They belong to a pattern and thus have the metadata schema which is defined by the pattern. Each instance contains the configuration required to generate operational code.
Note
For a practical walkthrough of the Instance Metadata, watch the video in the What is Instance Metadata.
1. Download and Customize Instances
Download sample Instances ( instances_for_synapse_tutorial.zip ) and extract them.
Then, customize the column such as PATTERN to match the corresponding pattern name in MetaKraftwerk exactly. If you already have named your Pattern exactly
BRONZE_DV_PREPthen you could just leave the values as they are for now.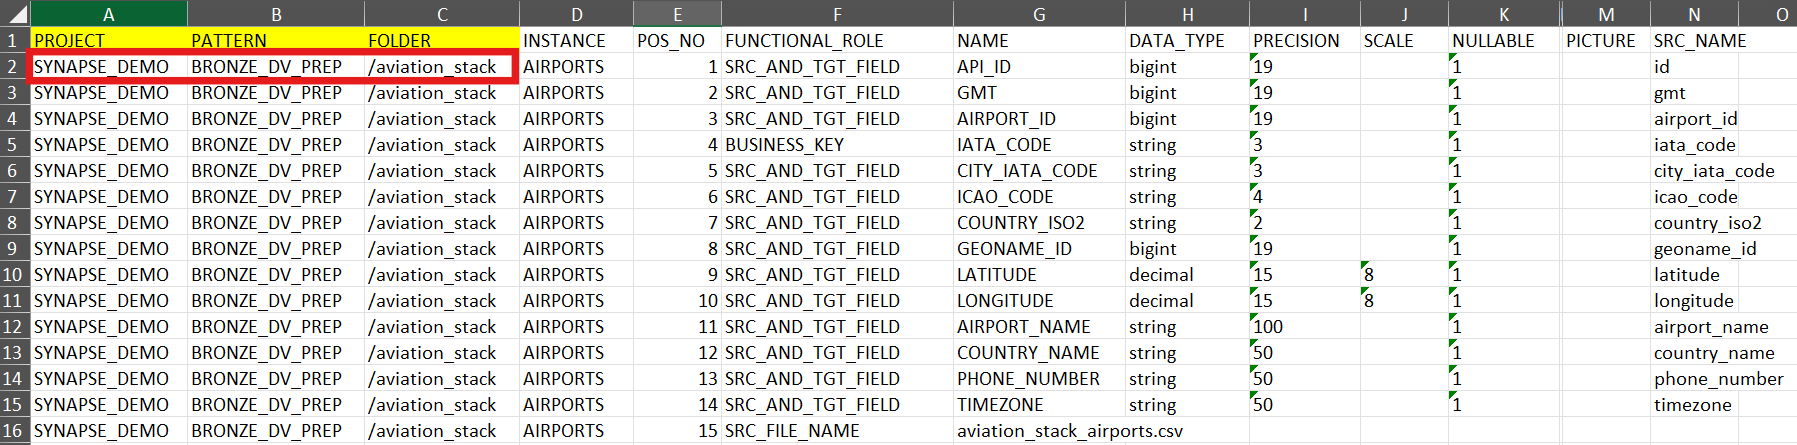
2. Create a Folder in MetaKraftwerk
To organize instances it is a good idea to create folders for them (e.g. one folder per source system or business domain).
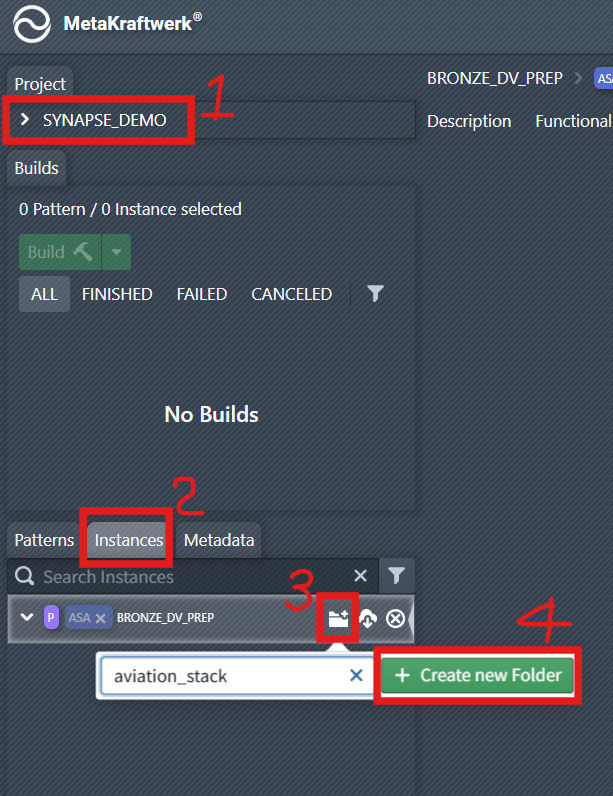
Go to the
Instancestab.Click the folder creation icon and enter the folder name (e.g.,
aviation_stack), then click + Create new Folder .
3. Upload Instances
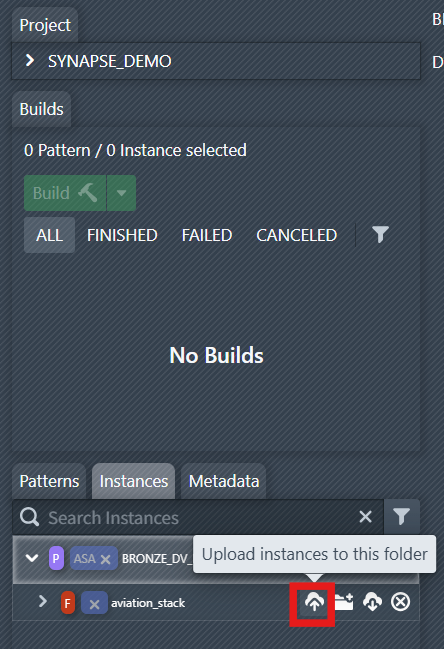
Now we have to upload the instance metadata to the folder we just created. This will create some instances under this folder, each with its metadata.
Select the folder, click the upload icon to upload the customized instances into this folder.
After successfully uploading the instances, you can view and edit them as shown in the screenshot.

Part 3 — Synapse: Prepare and Create a Notebook
1. Create Storage account and assign role to your Synapse Workspace
- Open the Azure Portal: Create a Storage Account (e.g.
adls2synapseintf). - To assign the
Storage Blob Data Contributorrole to the system-assigned Managed Identity of your Synapse Workspace, proceed as follows: Navigate to the Azure Storage Accountadls2synapseintfthat your Synapse Workspace should access. - Open Access Control (IAM) in the left menu.
- Assign roles: Click on
+ Addand then onAdd role assignment. - Select role: Search for the role
Storage Blob Data Contributorand select it. - Add member: In the "Members" section, select the
Managed identityoption.- Now search for the Synapse Workspace – for system-assigned Managed Identities, the name usually corresponds to the name of the workspace.
- Select the corresponding entry.
- Review and assign the assignment: Click on
Review + assignto assign the role. After completing these steps, the system-assigned Managed Identity of your Synapse Workspace has permission to access Blob Storage.
2. Create the Blob Storage Container and Nested Directories
Navigate to your Azure Storage account
adls2synapseintfin the Azure portal.Under
Data Storge, selectContainers.Click
+ Add Containerand name the containertutorialcontainer→ Choose an access level (e.g., "Private" for secure access) → Create.Navigate into the newly created tutorialcontainer
tutorialcontainer.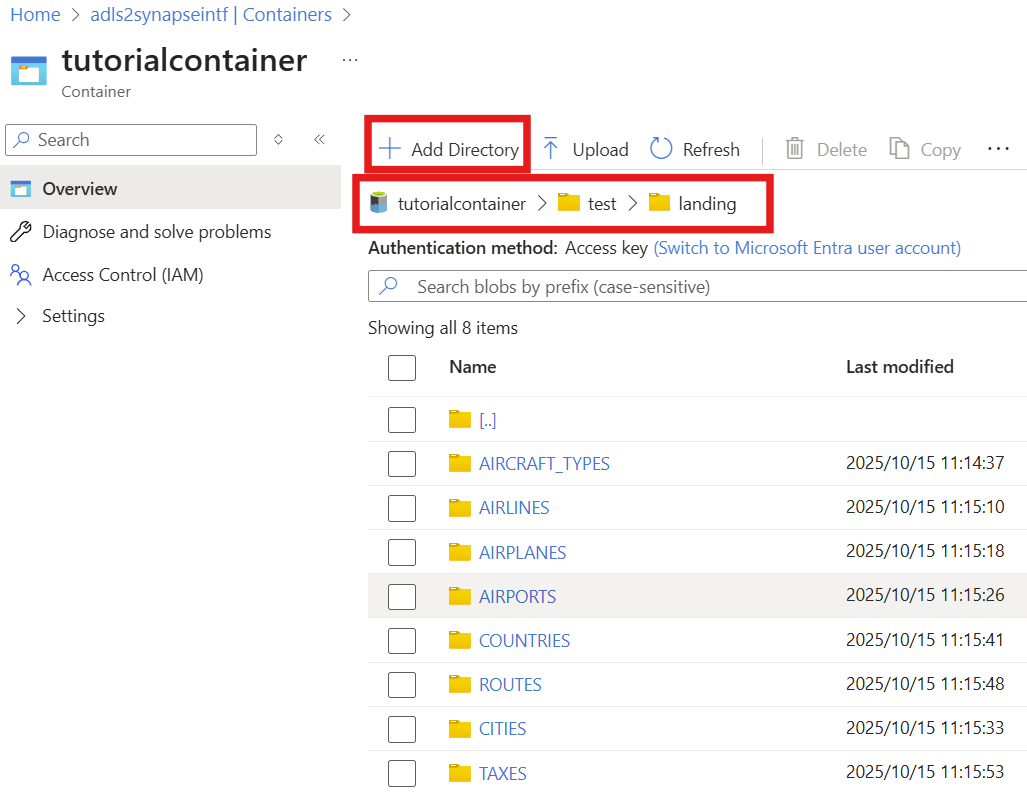
Click
+ Add Directory(from the top menu) and name the directorytest→ Save.Enter the test directory, then use
+ Add Directoryagain to create thelandingandbronzedirectory → Save.Enter the
landingdirectory, then use+ Add Directoryonce more to create the directories (e.g.,AIRPORTS, see the screenshot on the right) → Save.
3. Upload the CSV Files
- Download Sample data( csv_landing_data_for_synapse_tutorial.zip ) and extract them.
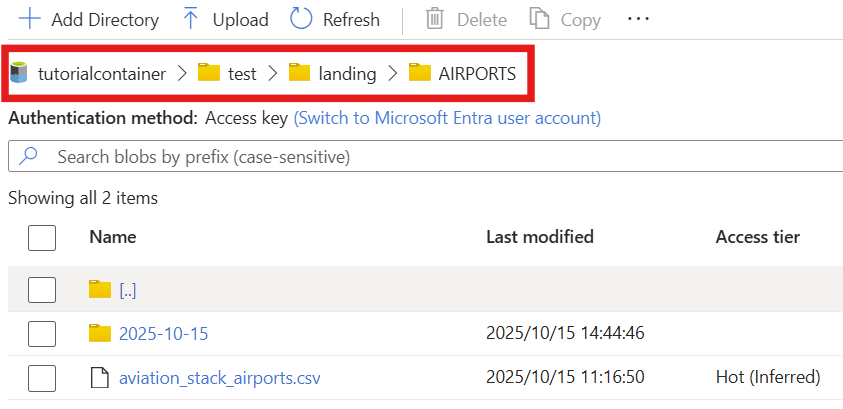
- Upload each extracted file to the corresponding folder you created earlier, e.g., upload
aviation_stack_airports.csvto the foldertutorialcontainer/test/landing/AIRPORTSortutorialcontainer/test/landing/AIRPORTS/2025-10-15.
4. Create a Folder in Synapse Workspace
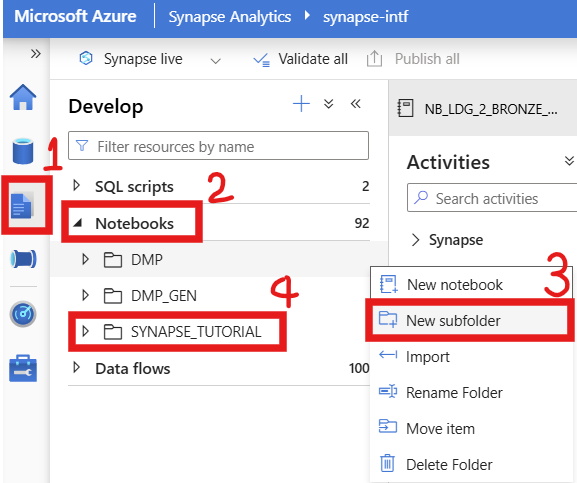
Open Synapse Workspace → Develop → Notebooks → Create a New subfolder named
SYNAPSE_TUTORIAL.In Synapse Workspace → Integrate → Pipelines → Create a Folder also named
SYNAPSE_TUTORIAL.
5. Import a sample notebook
We've created a blank sample notebook that you can import into Synapse. Alternatively, you can create a new one yourself.
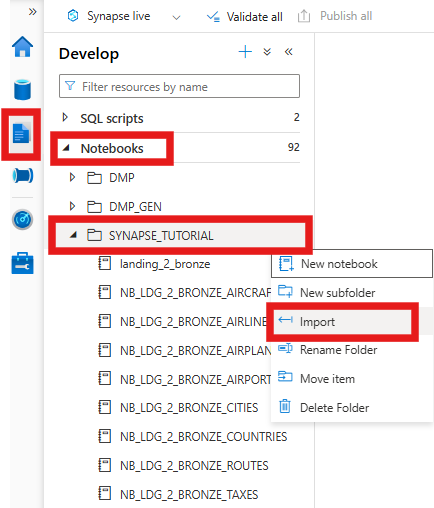
- Download sample notebook ( SYNAPSE_DEMO_NOTEBOOKS.zip ) and extract it from the ZIP.
- Import or copy-paste the Notebook into the
SYNAPSE_TUTORIALfolder in Synapse, rename a notebook tolanding_2_bronze.
Note:
You can also see a complete list of downloads in Prerequisites.
6. Check or adjust the uploaded notebook
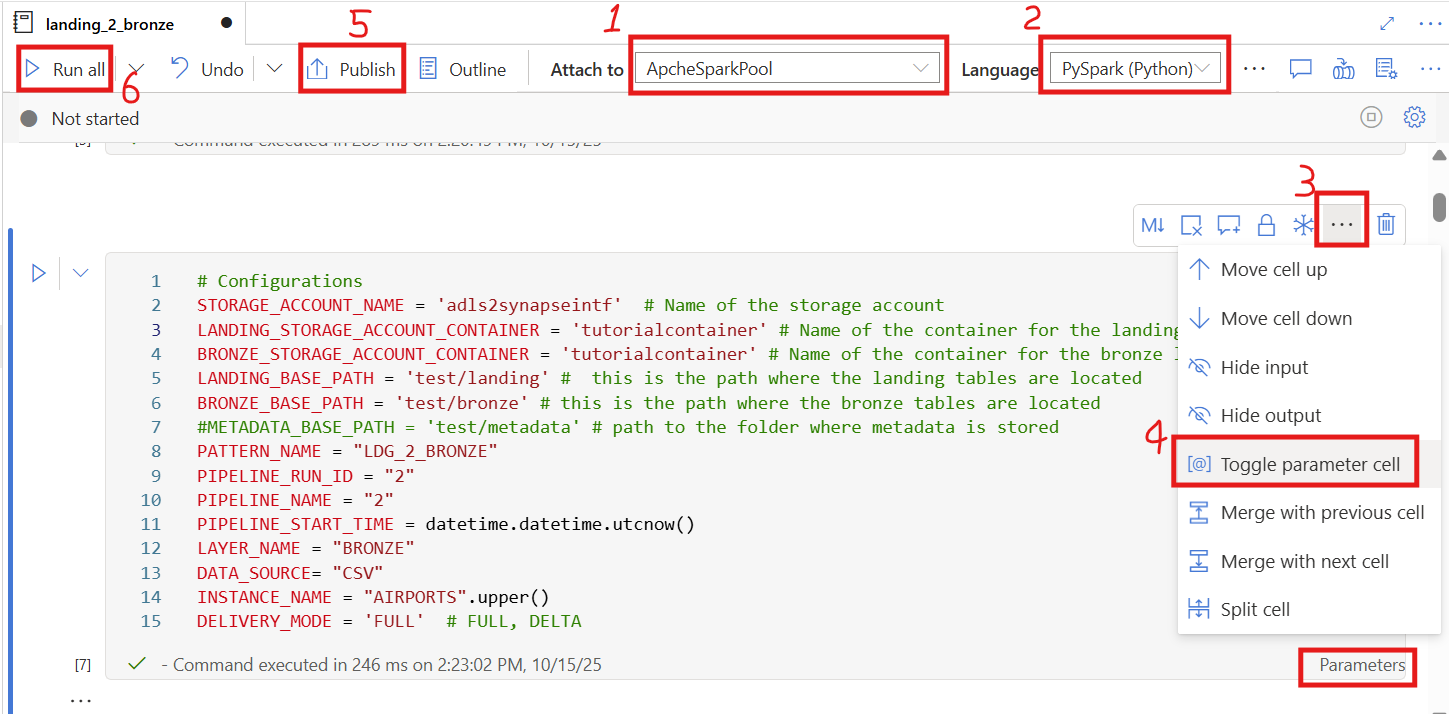
Attach to your Spark pool:
Make sure the notebook is attached to the Spark pool you created (e.g.,ApacheSparkPool).Select the language:
ChoosePySpark (Python)as the notebook language.Verify and update configurations:
In the code block labeled# Configurations, ensure that all parameters (such asSTORAGE_ACCOUNT_NAME,LANDING_STORAGE_ACCOUNT_CONTAINER,LANDING_BASE_PATH) exactly match your own Blob Storage settings.⚠️ Even an extra space or typo can cause the notebook to fail.
Enable parameter cell (if needed):
Check whether the wordParametersappears at the bottom-right corner of the cell# Configurations.If it does not appear, click the three dots
…on the top-right of the cell.Then select
Toggle parameter cellfrom the dropdown menu (as shown in the image).Publish:
You can click Publish to save and deploy your notebook.Run the notebook:
Finally, click Run all to test the notebook and make sure it executes successfully.
Part 4 — Synapse: Create a Pipeline and Download support files
To export a support file from Synapse, a pipeline must be created. In our case, the pipeline contains a notebook activity that references our sample notebook. This exports the notebook as a dependency in the support file. We will later upload the support file to MetaKraftwerk in the pattern to create a basic structure for the objects.
The pipeline orchestrates the execution of a Synapse Notebook and provides all necessary parameters for processing. It ensures that the notebook runs with the correct configuration, resource management, and error handling. The pipeline is fully parameterized, meaning it can be reused for different environments or Salesforce objects.
1. Download sample pipelines
- Download sample pipelines ( synapse_pipelines.zip ) and extract them.
2. Create new Pipeline
In Azure Synapse, create a new pipeline named
bronze_dv_prep, click the{}(Code View) icon.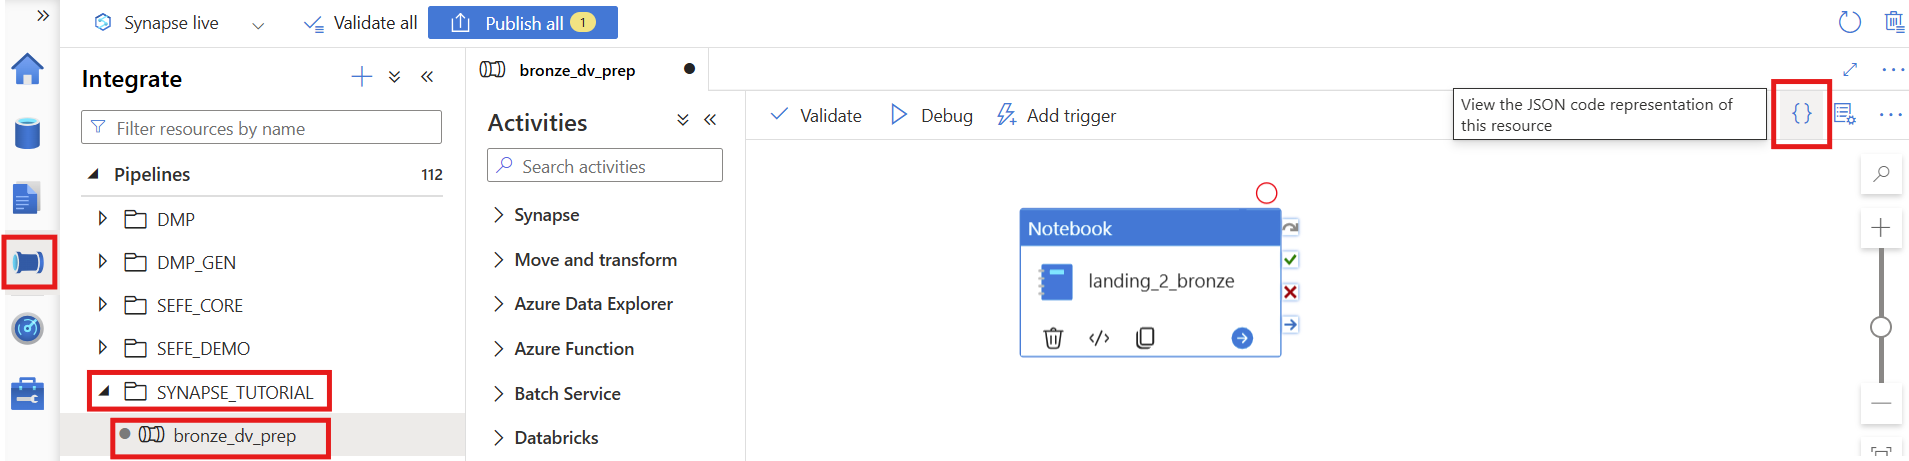
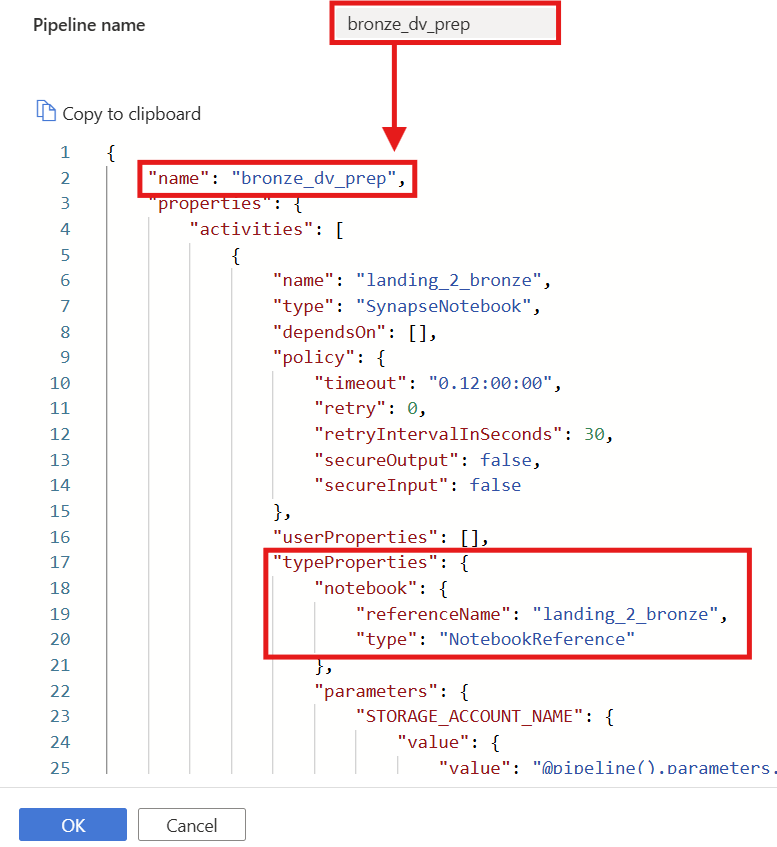
Copy the JSON content from the downloaded sample file (
bronze_dv_prep.json) and paste it into the code editor.Click OK to apply.
Note:
- The pipeline name in the JSON must match the pipeline name you created.
- Under "typeProperties", the "referenceName" for the notebook must match your actual notebook name (e.g.,
landing_2_bronze) - If an error occurs when saving, check that all names and parameter mappings are consistent.
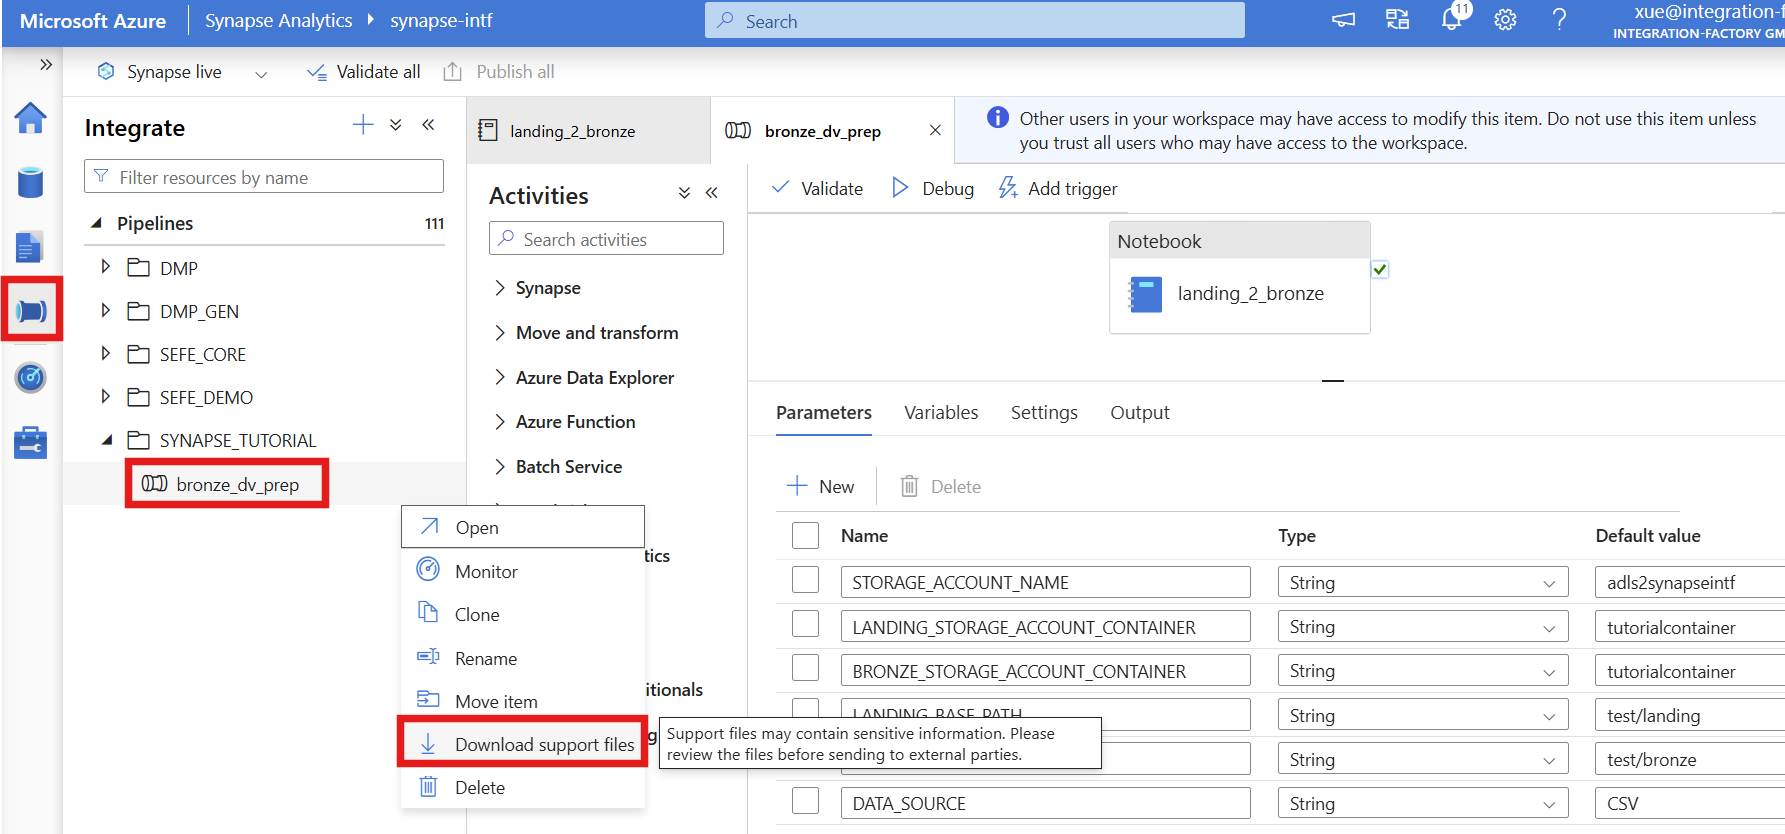
3. Download support files
- Please publish and commit your pipeline
- Now download the support files for the pipeline — these can be uploaded in Metakraftwerk into your pattern
Part 5 — Upload & Develop Pattern in MKW
Now that you have created the support files in Synapse, it is time to upload this metadata to MetaKraftwerk. The support files can be uploaded via the menu by selecting Upload Pattern. You have to select your pattern in the sidebar to see the menu.
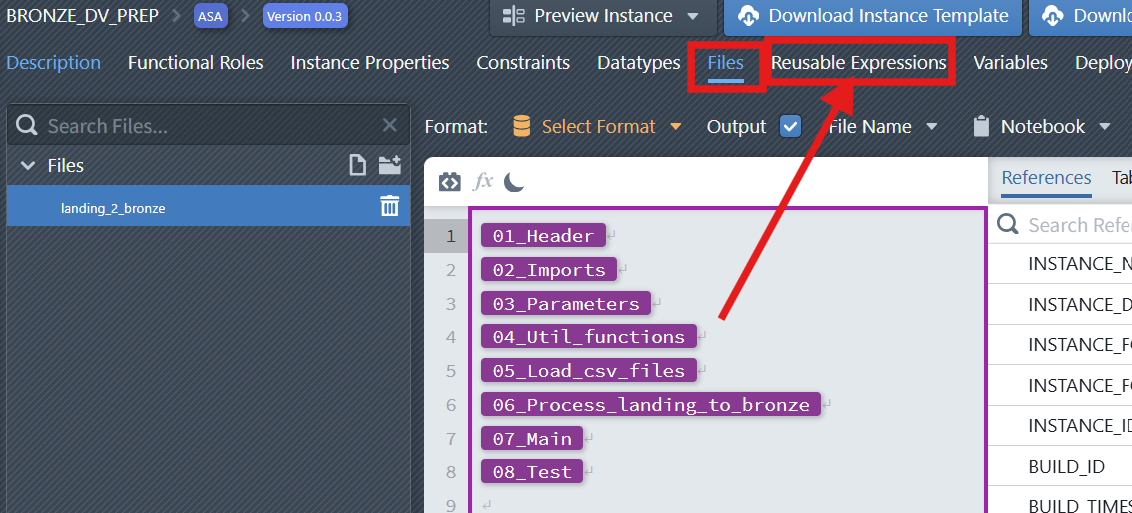
A Notebook file in MetaKraftwerk is not static; it can be dynamically defined by combining multiple metadata expressions and reusable expressions. These reusable expressions are modular code or logic blocks that can be flexibly assembled to create complex files tailored to your specific requirements.
The parameters or column information for each Pattern can be configured using the Functional Roles Filter and Instance Property settings. By applying these filters, you can precisely control which parameters or columns are included in your Notebook and how they are mapped.
When you create a new instance of a Pattern, MetaKraftwerk automatically generates a new Notebook for that instance, populated with its own specific values. This ensures that each instance operates with the correct configuration and data, supporting scalable and repeatable integration processes.
Summary of Key Steps:
- Upload support files via the menu
Upload Pattern. - Define Notebook files by combining multiple reusable expressions.
- Configure parameters/columns using
Functional Roles FilterandInstance Property. - Each Pattern instance will generate a new Notebook with its own values. This approach provides flexibility, reusability, and automation for managing complex data integration scenarios in MetaKraftwerk.
1. Upload Pipeline Support File
The first step will be to upload our exported support files to the pattern in MetaKraftwerk. Please click on the pattern in the sidebar. Then click on Upload Pattern .

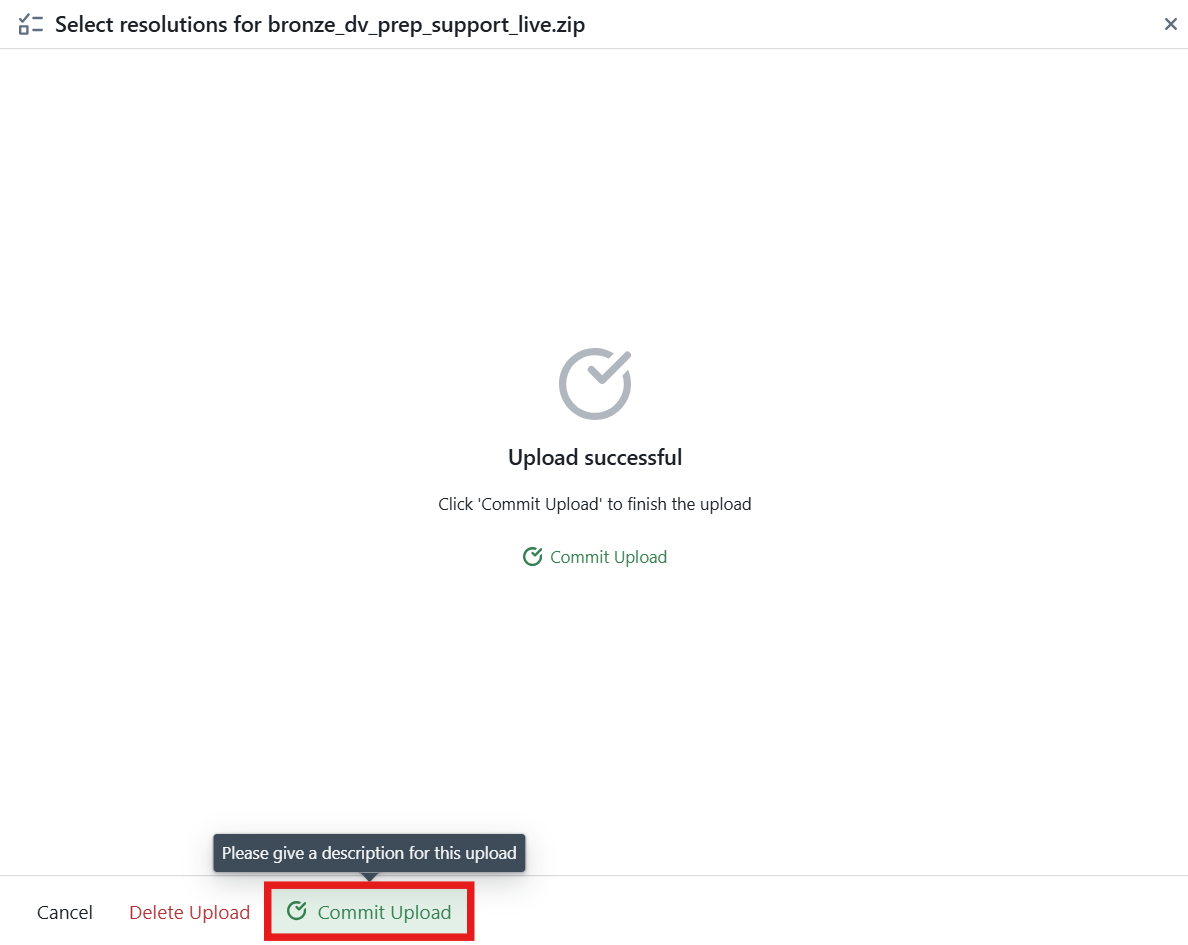
Here you can upload the pipeline support files that you downloaded in Part 4. These files represent a base pattern — meaning they are not yet parameterized. You will need to configure them step by step to turn this pattern into a dynamic one, capable of generating the appropriate notebooks for different instances.
Alternatively, you can download a preconfigured Sample Pattern file and upload it directly into Metakraftwerk ( Download bronze_dv_prep_support_live.zip ). After that, you can simply select the instances and build them.
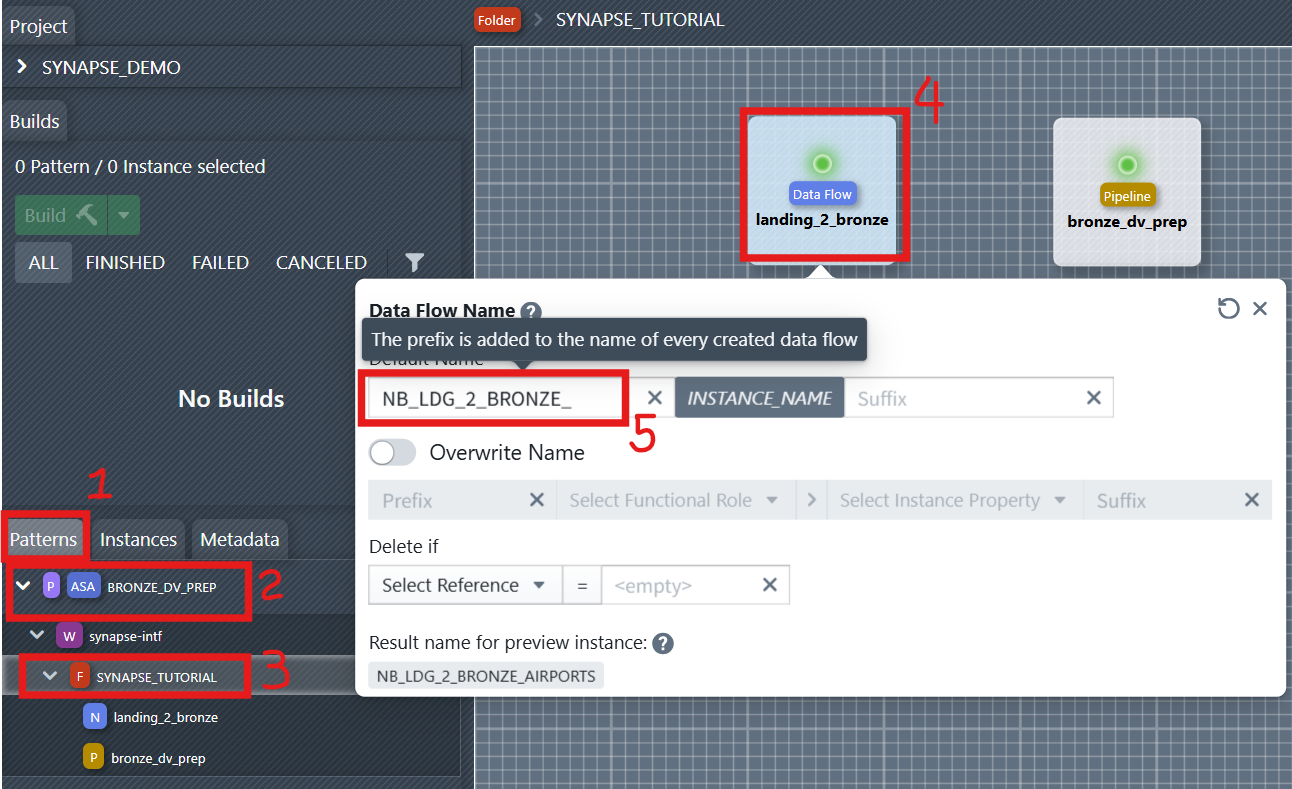
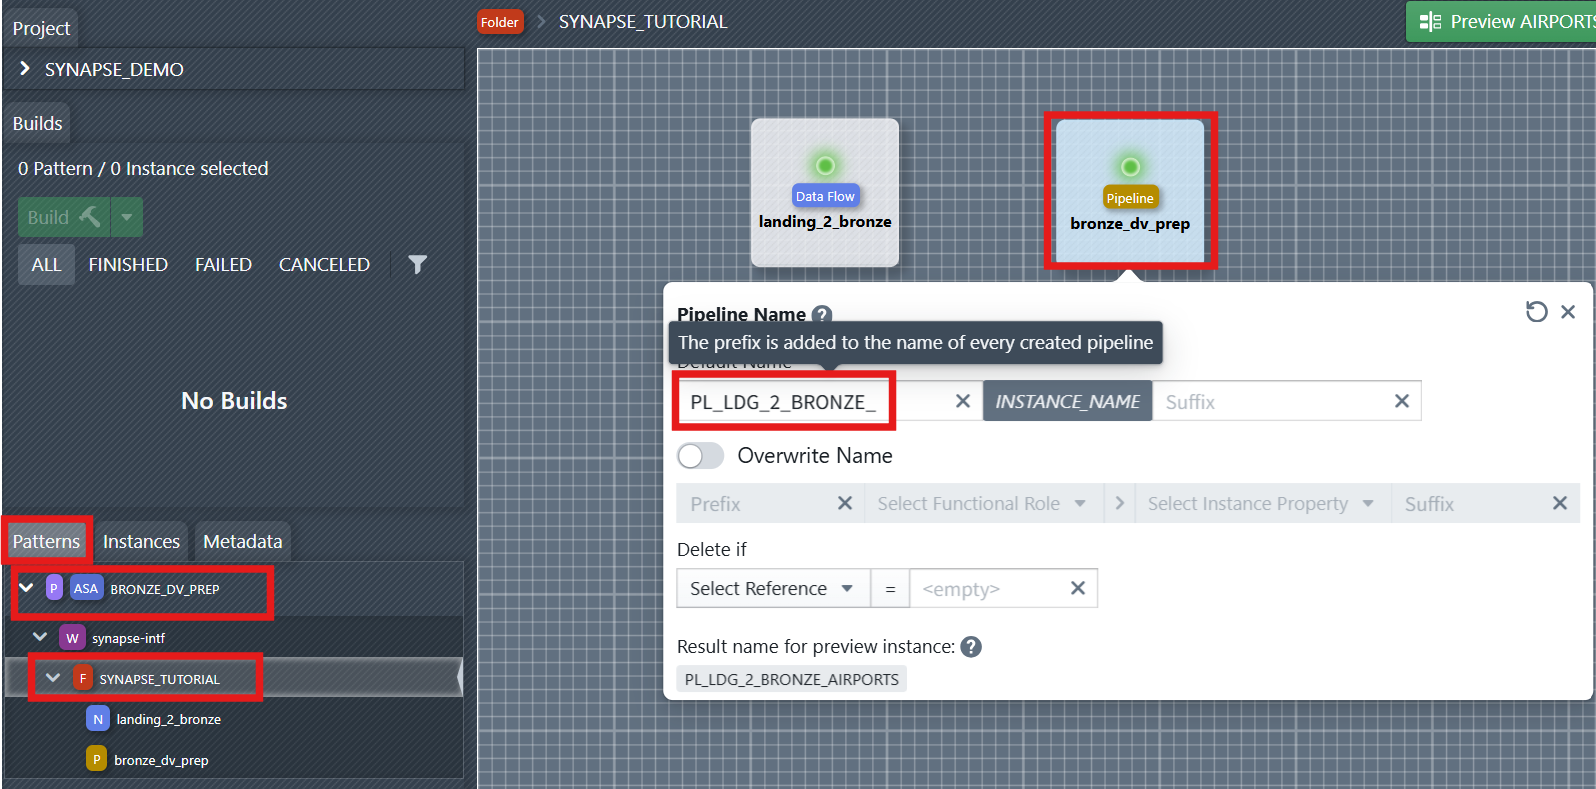
2. Define Names for Dataflow and Pipeline
For notebooks and pipelines to be generated, the name of the new objects must be defined. This can be done using the naming editor. To open it, you first have to select the folder containing the objects in the sidebar on the left—in this case, the SYNAPSE_TUTORIAL folder. Then you click on one of the objects to open the naming editor. In the editor, you can now define a naming rule consisting of a prefix, instance name, and suffix. The prefix and suffix can be changed by the developer. The name of the instance for which the object is being created is entered in INSTANCE_NAME during object creation.
Assign clear, consistent names to your Dataflow (Notebook) and Pipeline components. This helps maintain traceability. For example, name the Dataflow: NB_LDG_2_BRONZE_INSTANCE_NAME, Pipeline: PL_LDG_2_BRONZE_INSTANCE_NAME.
You can later reference the naming rule of the data flow and pipeline in files or reusable expressions. You will see it in the right side of the file editor under References > Names.
3. Configure the Notebook File (Parameterization & Reusable Expressions)
More information about file templates:
- For a practical walkthrough of the File Editor, watch the video in the File Editor. It explains how to navigate the editor, use dynamic metadata, and build custom file templates(SQL script and Notebook) efficiently.
- For the core concepts of the File Editor and a detailed step-by-step walkthrough with screenshots demonstrating how to create a DDL Template for a database table, see the page Files Templates.
Use reusable expressions to simplify logic and enable modular design.
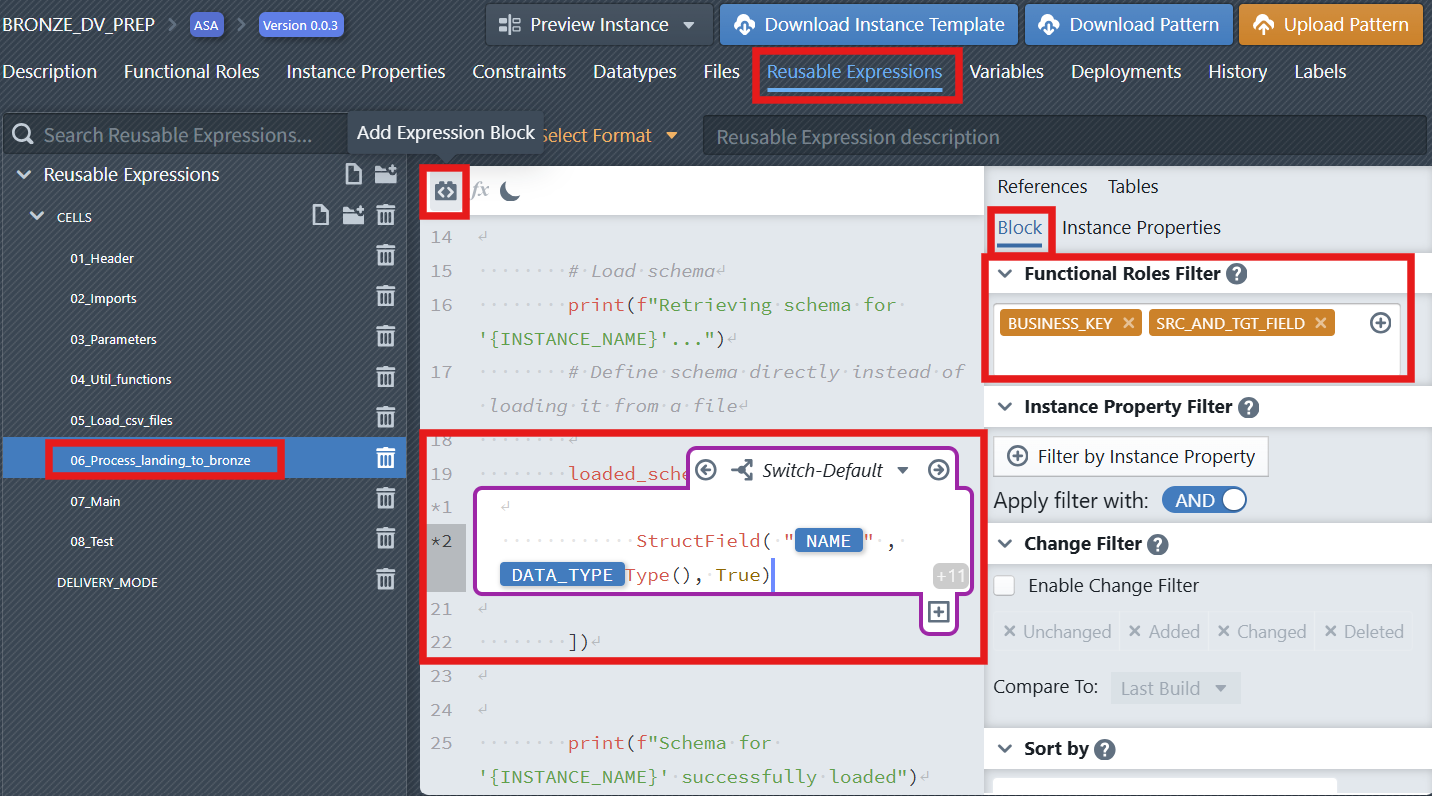
Add blocks in your notebook to parameterize certain attributes (e.g., table schema). Configure parameters and columns using Functional Roles Filter and Instance Property to ensure dynamic substitution during notebook generation.
- Click the Add Expression Block icon
 in the editor toolbar to insert a new expression block.
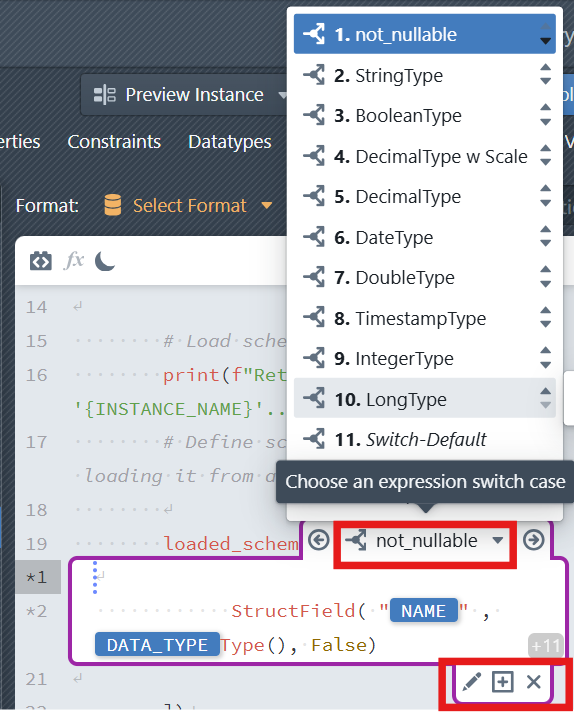
 - In addition to the two default cases, developers can create additional cases. In the column expression block, click the plus sign icon below the expression block (Create new Switch Case). It will only be visible, when you place the cursor inside the block, so that the block becomes active (purple border is visible). The case must first be given a name. Next, a condition must be defined that must apply to a metadata row so that the case is applied to that row. The condition consists of an instance property, a comparison operator (=, !=, <, >, <=, >=), and a value. Additional conditions can be added and combined using OR/AND. After defining the conditions, click + Create new Switch Case to create the case. The case then appears in the editor.
- Click the Add Expression Block icon
In Synapse Notebook, each cell can start with a special format indicator depending on its content type. For example:
%code– Standard code cell for Python or SQL code blocks%markdown– Descriptive documentation or comments%parameters– Defines dynamic configuration variables. The%parameterskeyword is used when a notebook cell contains global configuration variables or pipeline parameters that need to be passed dynamically during instance generation.WARNING
Each notebook file can contain only one
%parameterscell.
4. Adjust File Settings
Now after we have implemented the notebook, we have to do the following:
- Check that the
Outputcheckbox is selected for our notebook file, otherwise the file will not be part of the build results - Define
Notebookas the type of the file. - Define a dynamic naming rule for the notebook file (e.g., NB_LDG_2_BRONZE_
INSTANCE_NAME.json). Click on theFile Namebutton to open the naming editor of the file (see screenshot below). Make sure to activate theDynamic Namecheckbox.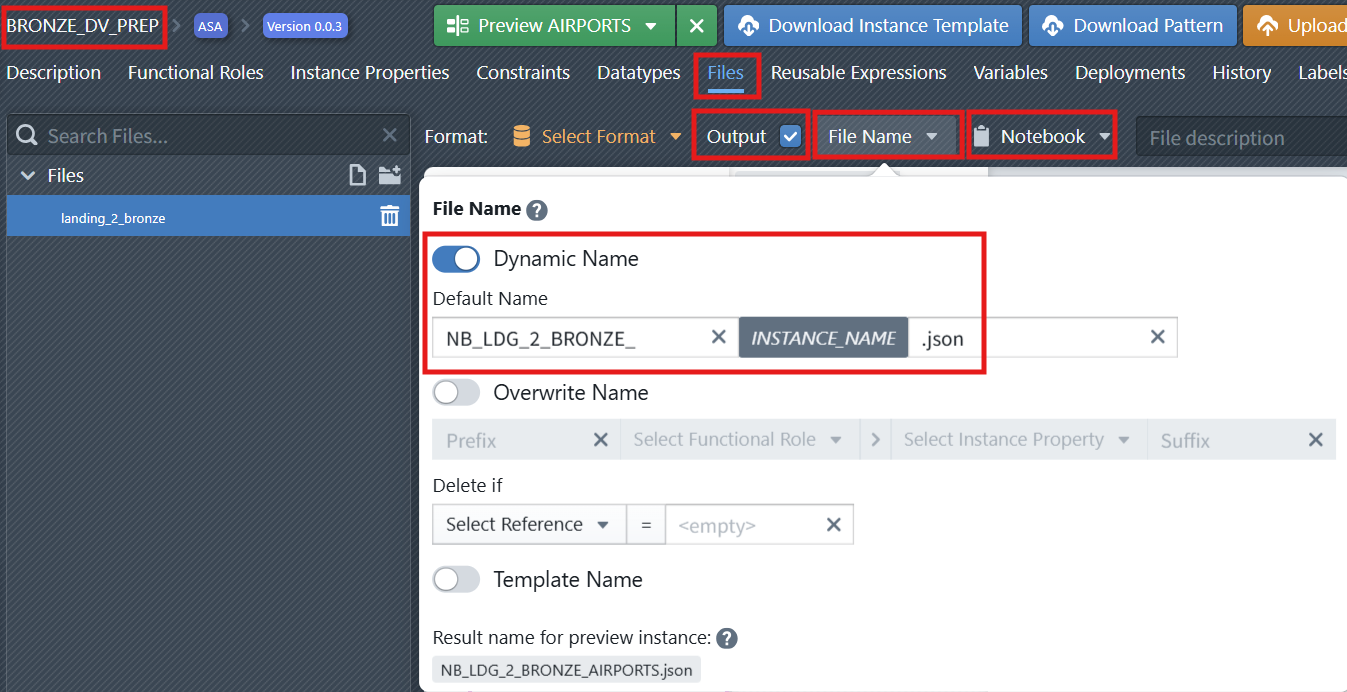
5. Preview the Generated Notebook
The Preview feature allows you to generate and inspect the code of a selected instance before deploying it to a target platform. This helps validate the logic, review script details, and test the outcome in a controlled way.
To preview an instance:
In the File Editor, choose the file you want to inspect.
At the top-right of the interface, click the
Preview Instancedropdown.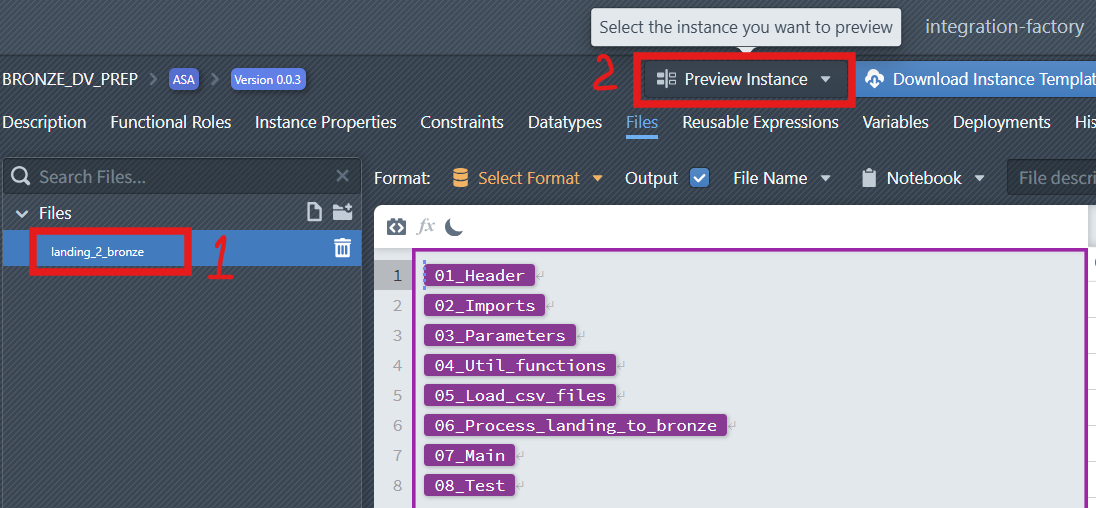
From the list, select the Instance you want to preview.
The system will generate the corresponding preview, which is displayed on the right-hand side of the editor.
From here, you can see and copy the previewed code and use it on the target platform (e.g., for testing or validation purposes) without committing the pattern.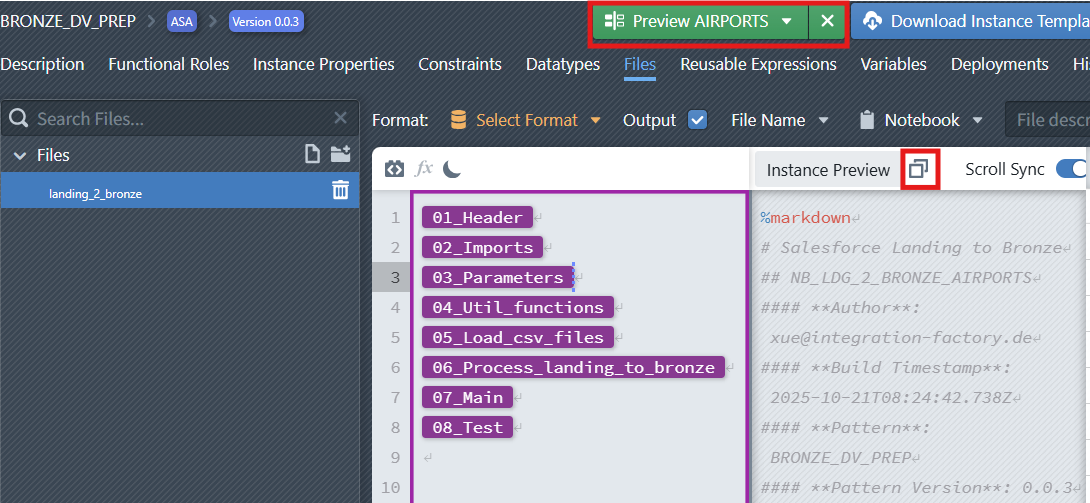
Part 6 — Build the Instances and Deploy to Synapse
After instance data has been created and validated, it is possible to generate process instances from a pattern and the instance metadata.
MetaKraftwerk creates Synapse Notebooks and Pipelines as a product of pattern and instance metadata. This process is called a Build in this context. Key Steps:
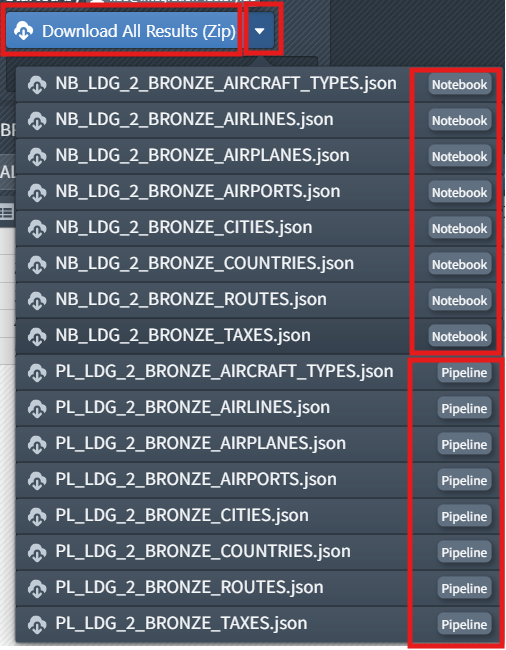
- Build the Instances
- Download build results
- Import the Noteboooks into Synapse
More information about Builds:
- For information on how to start a new build, see the page Start of a new build.
- For information on how to download build results, see the page Download of the build results.

Part 7 — Create a Master Pipeline in Synapse
When working with multiple data ingestion or transformation notebooks (such as the Landing to Bronze layer), running each manually can be inefficient. A master pipeline solves this problem by:
- Centralizing configuration and parameters.
- Automatically distributing notebook execution.
- Supporting parallelism for improved performance.
- Scaling dynamically when new notebooks are added.
Create a master pipeline (PL_LDG_2_BRONZE) that orchestrates the execution of multiple Bronze notebooks in parallel.
This pipeline is dynamic and parameterized:
- It receives global parameters (storage account, container names, base paths, data source, …).
- It builds a list of Bronze notebook names (
BRONZE_LIST) and iterates over them with a ForEach activity. - The ForEach runs the notebooks in parallel (controlled by
batchCount) and passes pipeline parameters into each notebook invocation. - Designed for scalability, modular control, and reuse across environments.
1. Download sample pipelines
- Download sample pipelines ( synapse_pipelines.zip ) and extract them.
2. Create new Pipeline
In Azure Synapse, create a new pipeline named
PL_LDG_2_BRONZE, click the{}(Code View) icon.Copy the JSON content from the downloaded sample file (
PL_LDG_2_BRONZE.json) and paste it into the code editor.Click OK to apply.
3. Pipeline Structure
- Global Parameters:
The pipeline defines several global parameters that are passed to every Bronze notebook:
| Parameter | Description | Example |
|---|---|---|
STORAGE_ACCOUNT_NAME | Name of the Synapse storage account | adls2synapseintf |
LANDING_STORAGE_ACCOUNT_CONTAINER | Container name for landing data | tutorialcontainer |
BRONZE_STORAGE_ACCOUNT_CONTAINER | Container name for bronze data | tutorialcontainer |
LANDING_BASE_PATH | Path to the landing zone | test/landing |
BRONZE_BASE_PATH | Path to the bronze zone | test/bronze |
DATA_SOURCE | Data source type | CSV |
These parameters ensure that all notebooks use consistent paths and configurations.
- Variables:
A variable namedBRONZE_LISTis created to store the names of all Bronze notebooks to execute:
"variables": {
  "BRONZE_LIST": {
    "type": "Array"
  }
}
This variable is initialized using a Set Variable activity:
"value": [
  "NB_LDG_2_BRONZE_AIRCRAFT_TYPES",
  "NB_LDG_2_BRONZE_AIRLINES",
  "NB_LDG_2_BRONZE_AIRPLANES",
  "NB_LDG_2_BRONZE_AIRPORTS",
  "NB_LDG_2_BRONZE_CITIES",
  "NB_LDG_2_BRONZE_COUNTRIES",
  "NB_LDG_2_BRONZE_ROUTES",
  "NB_LDG_2_BRONZE_TAXES"
]
Each element in the list represents the name of a Bronze notebook in Synapse.
ForEach Activity: Executing Notebooks in Parallel
The
ForEach_Bronze_Notebooksactivity iterates through the list of Bronze notebooks and executes them in parallel.
"type": "ForEach",
"typeProperties": {
  "items": {
    "value": "@variables('BRONZE_LIST')",
    "type": "Expression"
  },
  "batchCount": 12
}items: Refers to theBRONZE_LISTvariable.batchCount: Defines how many notebooks run in parallel (12in this example).
Each iteration triggers a Synapse Notebook activity:
"type": "SynapseNotebook",
"typeProperties": {
  "notebook": {
    "referenceName": {
      "value": "@item()",
      "type": "Expression"
    },
    "type": "NotebookReference"
  },
  "parameters": {
    "STORAGE_ACCOUNT_NAME": "@pipeline().parameters.STORAGE_ACCOUNT_NAME",
    "LANDING_STORAGE_ACCOUNT_CONTAINER": "@pipeline().parameters.LANDING_STORAGE_ACCOUNT_CONTAINER",
    "BRONZE_STORAGE_ACCOUNT_CONTAINER": "@pipeline().parameters.BRONZE_STORAGE_ACCOUNT_CONTAINER",
    "LANDING_BASE_PATH": "@pipeline().parameters.LANDING_BASE_PATH",
    "BRONZE_BASE_PATH": "@pipeline().parameters.BRONZE_BASE_PATH",
    "PIPELINE_RUN_ID": "@pipeline().RunId",
    "PIPELINE_NAME": "@pipeline().Pipeline"
  },
  "sparkPool": {
    "referenceName": "ApcheSparkPool",
    "type": "BigDataPoolReference"
  },
  "executorSize": "Small",
  "driverSize": "Small"
}
This ensures that each notebook receives the same global parameters for consistent execution.
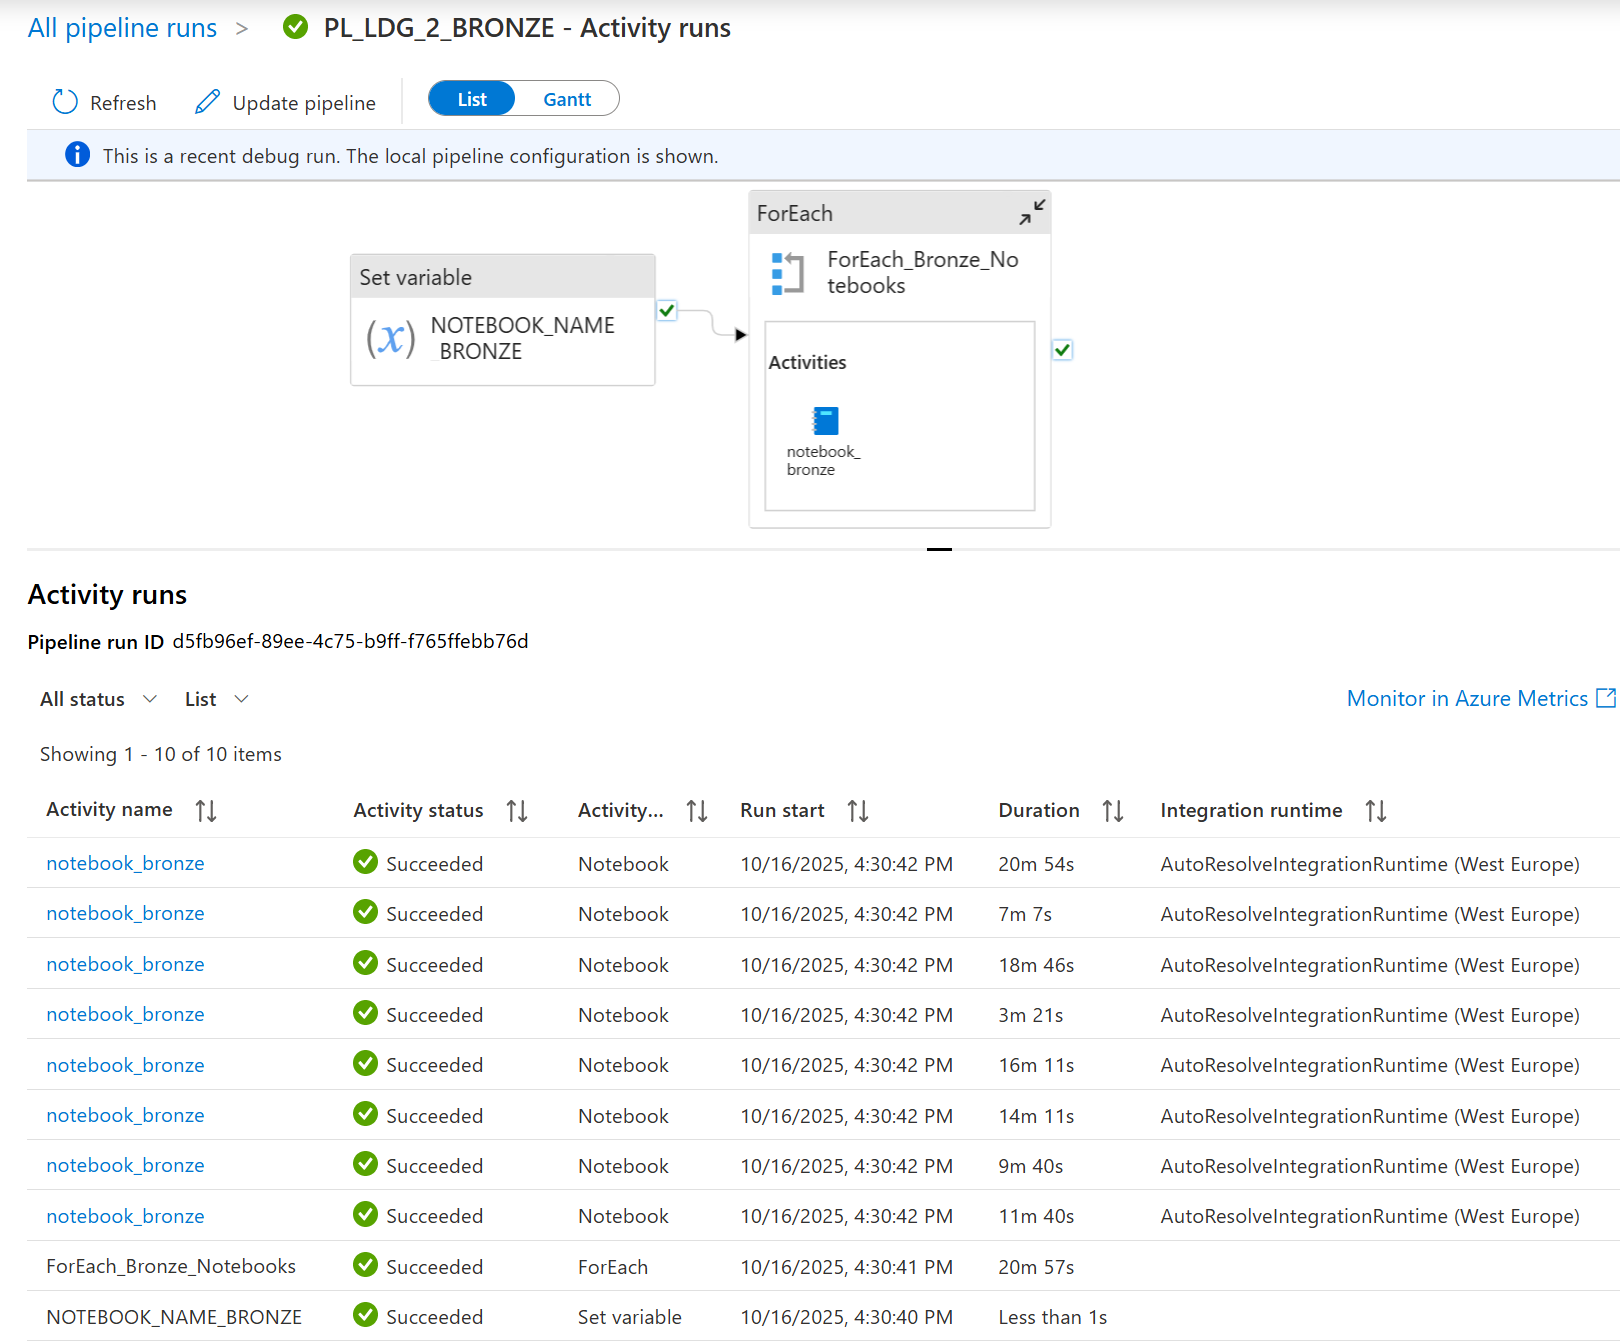
Part 8 — Test the Master Pipeline
You can Debug or trigger your pipeline to test the pipeline. This screenshot shows the activity run results after you’ve debugged the pipeline PL_LDG_2_BRONZE.
All activities show ✅Succeeded. This means your entire pipeline logic worked without errors—from setting variables to running multiple notebooks in a loop.
Next steps:
- Deploy the pipeline to your production environment.
- Use “Add Trigger” to automate the pipeline (e.g., schedule it to run daily, or trigger it when new data arrives).
In short, a fully successful debug run like this confirms your pipeline is ready for automated, production-grade use.