 MetaKraftwerk
How to develop File Templates
File templates are the foundation for generating files (DDL, SQL, scripts, configurations etc.) from a pattern plus instance metadata. The File Editor in MetaKraftwerk mixes static text with dynamic expression blocks and metadata references so templates can be parameterized and reused.
This page explains the core concepts of the File Editor and provides a detailed step-by-step walkthrough with screenshots demonstrating how to create a DDL Template for a database table.
More information about file templates:
- For a practical walkthrough of the File Editor, watch the video in the File Editor. It explains how to navigate the editor, use dynamic metadata, and build custom file templates(SQL script and Notebook) efficiently.
- Files Reference
Understanding the File Editor
The File Editor combines static text with dynamic expression blocks that access instance metadata, variables and reusable expressions. These components are used to create a file template. The file template is part of a pattern; a pattern can have one or more such file templates. You can find all file templates for a pattern in the Files section of a pattern.
First, think of the file editor as a normal text editor. You can enter, delete, select, copy and paste text. This text is initially static, meaning that it is output exactly as it was entered in the editor.
However, the actual purpose of the file editor is not to create static text, but to dynamically generate text from metadata. In this context metadata refers to instance metadata, i.e. self-contained sets of metadata for an entity, table or data object. MetaKraftwerk creates a separate file for each individual instance using the template. Metadata from the respective instance is inserted into the template at the locations where instance properties, reusable expressions or variables are set. Static text is thus combined with metadata to create the final file content. The following diagram illustrates this process, which takes place during a build.

An important part of the File Editor are expression blocks. Expression blocks allow you to access instance metadata by defining which rows of an instance should be used (i.e. filtering) and which columns/values of the row (i.e. which instance properties) should be used in the text. To do this, a placeholder for an instance property can be inserted within the block in the file editor. Static text can be entered around these blue placeholders to create a partial expression. When generating the file, the following procedure is used:
- A dynamic substring is inserted at the location of a block in the text.
- To determine the substring, all rows of the instance metadata that match the filter in the block settings are selected.
- The subset is sorted according to the sort settings.
- The partial expression is determined for each row of the subset.
- All partial expressions are concatenated using the concatenation expression.
- Optional prefix and suffix expressions are added and indentation settings are applied.
- The resulting overall expression is inserted.
Expression blocks can be inserted anywhere in the file editor. Multiple expression blocks can be used within the same file template. It is also possible to nest expression blocks and thus define complex expressions.
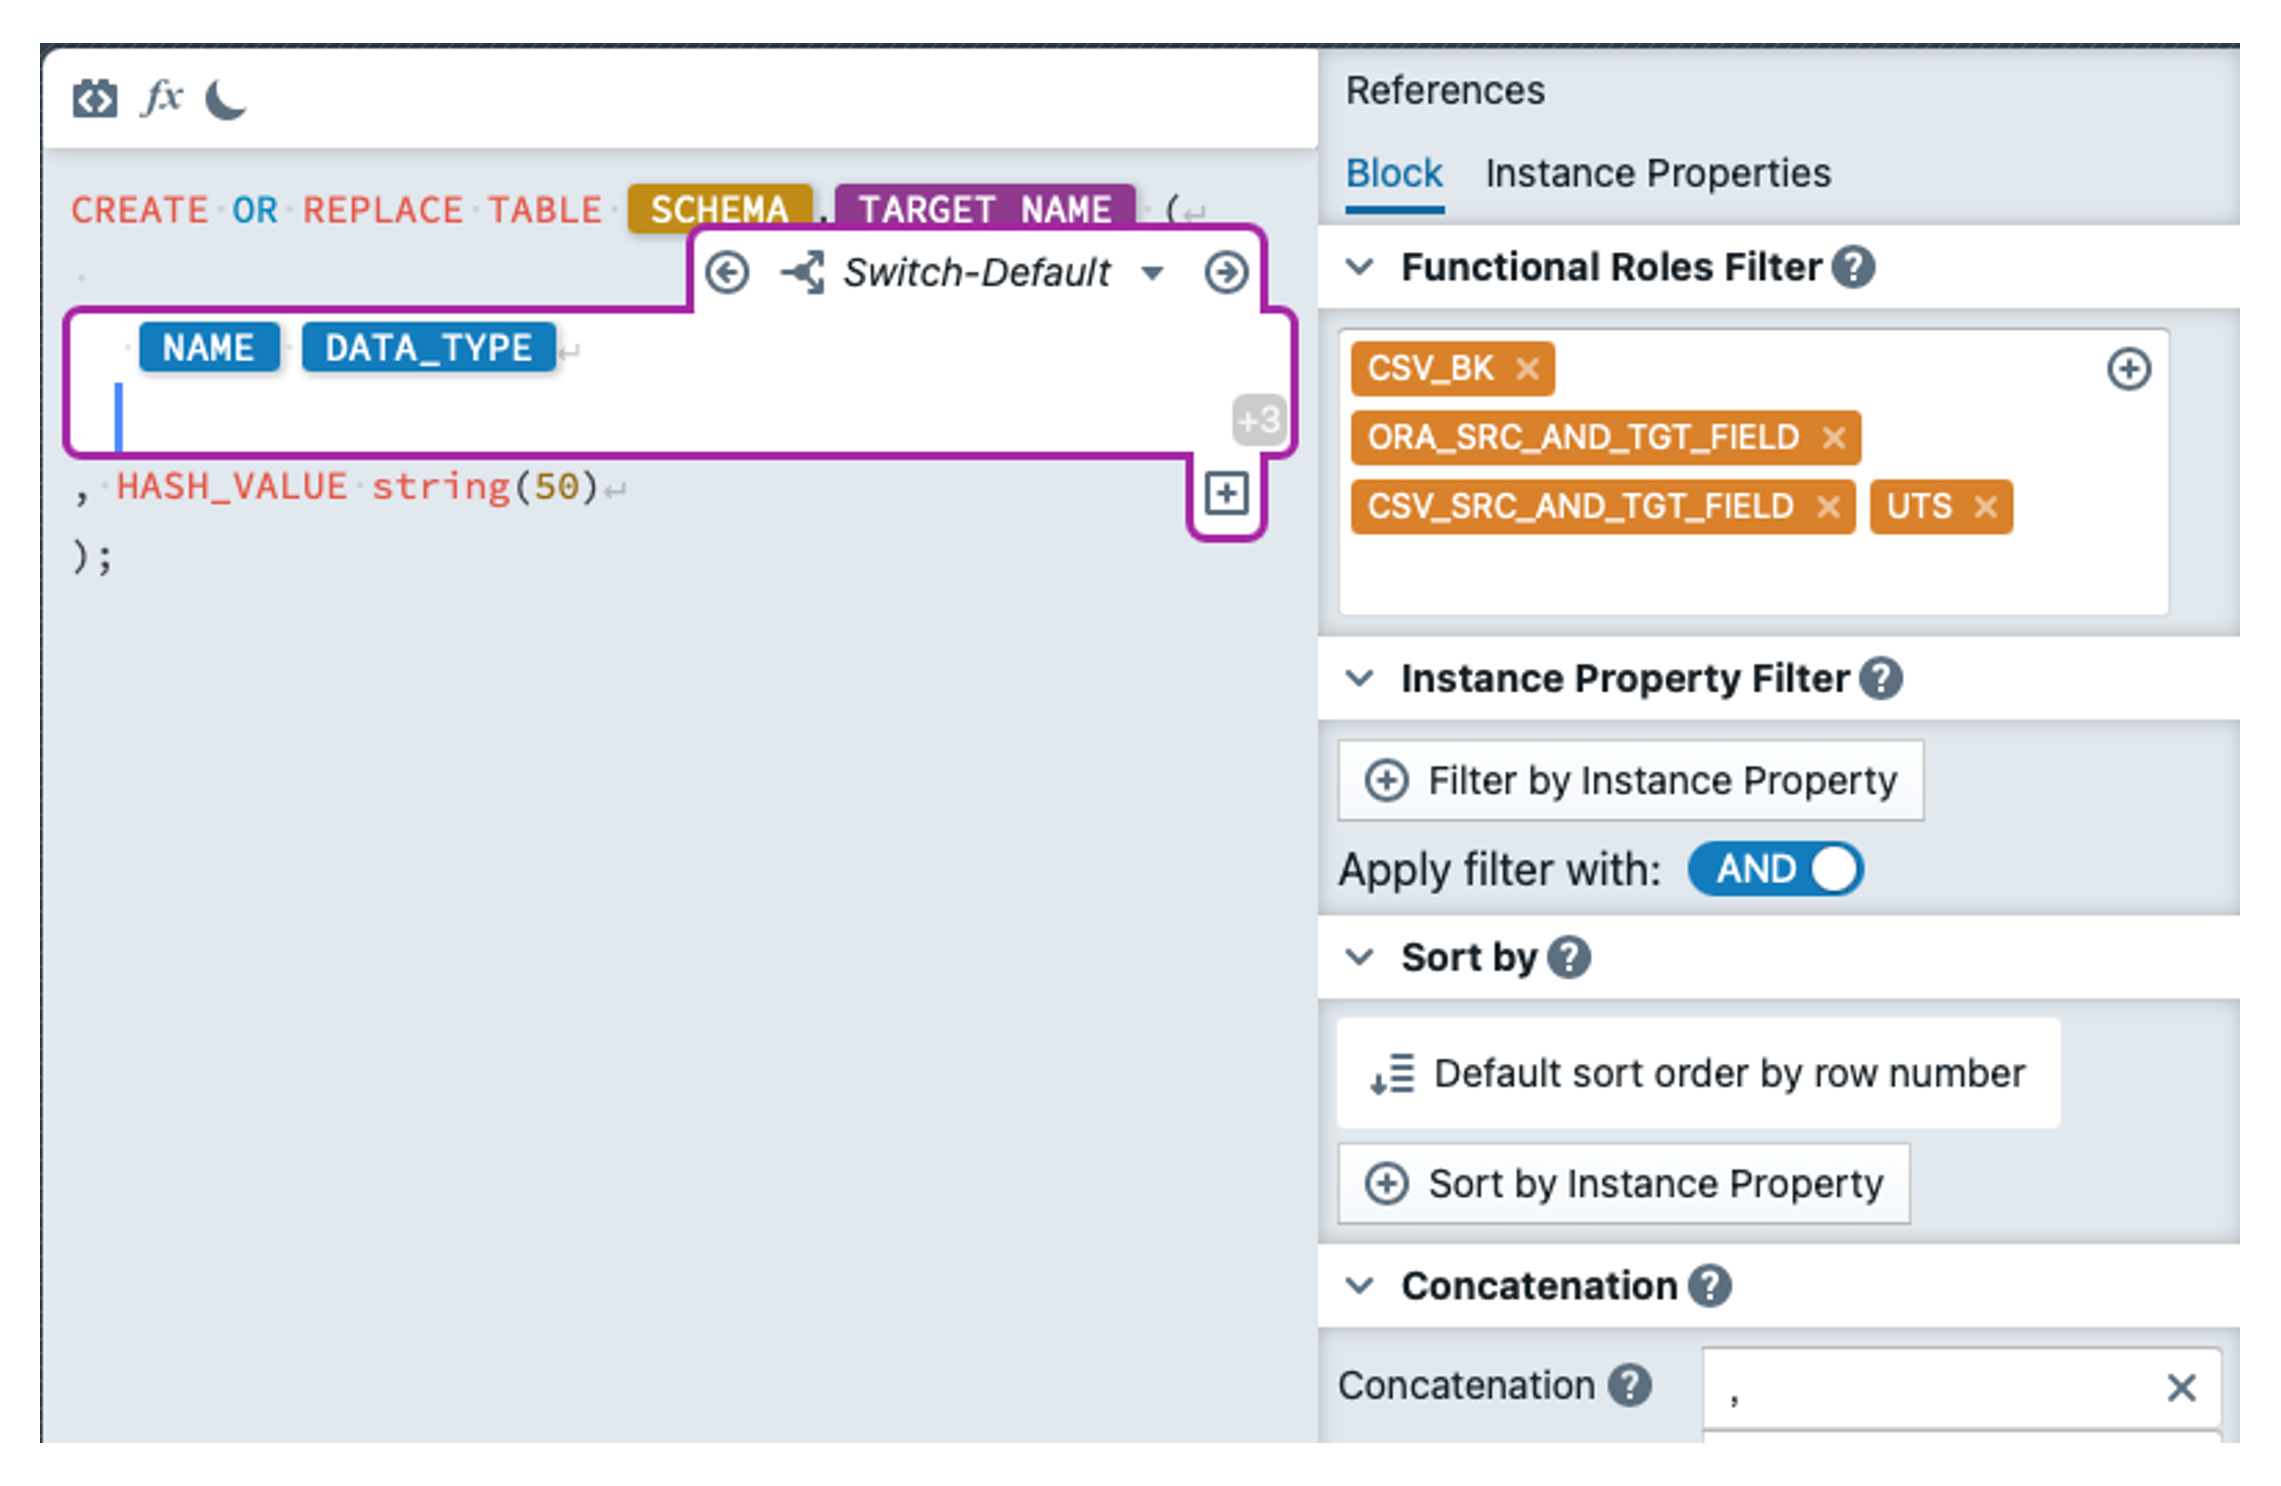
Settings of an Expression Block
When you create an expression block and place the cursor in the block, you will see the settings for this block on the right-hand side of the file editor (see screenshot). The settings are divided into several sections, which are explained below.
Block Filter
- The block filter consists of three other filters: The functional role filter, the instance property filter and the change filter.
- The block filter is used to filter instance metadata for rows which match the filter condition
- The functional role, instance property and change filter are combined by using
ANDin the condition, i.e. all three sub-filters have to be matched for a metadata row to be included in the result
Functional Roles Filter
- Functional Roles (FR) group metadata records by role (e.g.
SRC_FIELD,SRC_AND_TGT_FIELD,AK_BK). - Expression blocks reference FRs to decide which metadata rows to process (for example which columns should appear in a DDL). You could select functional roles in the input of the functional role filter. All selected roles will be displayed as orange tags inside the input.
- The functional role filter is required, i.e. you have to select at least one functional role for the block
Instance Property Filter
- The instance property filter defines conditions for values of the instances properties of a metadata record
- The filter picks only the relevant metadata rows which match the filter condition (e.g.
Nullable = 1). - For each sub-condition of the instance property filter you select an instance property, an comparison operator (=, !=, <, >, <=, >=) and the value for the comparison
- The instance property filter is optional
Change Filter
- The change filter defines which rows should be selected in the current build while taking into account the changes in comparison to a previous state of the instance. This previous state is determined using the "Compare to" setting. For each row of the instance, it is determined whether the row has been added, changed, deleted, or unchanged compared to the previous state. The filter then allows you to select which rows should be selected, for example, to select only added rows. When selecting the previous state using "Compare to," the following options are available:
- Last Build: Compare to the last successful build of this instance.
- Last Commit: Compare to the last commit of this instance. A commit could be a build at the same time.
- Last Download: Compare to the last build of this instance in which the file or package of the build was downloaded by a user.
- Last Deployment: Compare with the last build of this instance in which the file or package was deployed to the target platform using a deployment.
- Last Release: Compare with the last commit within the previous release. This searches backward for the first commit of the instance that is not in the current release.
- Last Change: Compare to the last commit of an instance in which the instance has changed compared to the current state.
- The change filter is optional
Sorting ("Sort by")
The sorting functionality offers multiple ways to sort your metadata:
- Default sort order by row number: Maintains the original order of metadata rows inside the instance table.
- Sort by Instance Property: Allows sorting based on specific instance property values. Also Ascending and Descending sort order are possible. You could select multiple instance properties for the sort order, while they are evaluated in the order of the position they have inside the list. You could change this order by clicking on the up/down buttons on each list entry
Concatenation
The Concatenation feature enables you to combine multiple generated substrings into a larger string:
Configuration Options:
- Concatenation: Main concatenation setting, defines how the substrings of the block should be concatenated, i.e. which string should be used as a connector (e.g.
,) - Prefix: The prefix string is only applied to the whole block, if the block is not empty. It defines a string, which will then be used as a prefix, i.e. will be placed in front of the block. If the filter of the block does not return any rows, the prefix is omitted, which results in an empty string for the whole block
- Suffix: The suffix string is only applied to the whole block, if the block is not empty. It defines a string, which will then be used as a suffix, i.e. will be placed in after the block
- Indentation: Controls the indentation of the generated text block, i.e. the number of spaces at the start of each line (numerical value, e.g.,
0) - Distinct: Checkbox option to ensure only unique values are included. If the text block will generate two or more sub-strings with exactly the same content, only the first occurrence will be included into the resulting text block if the Distinct option is selected
Metadata Join ("Join on")
The Join functionality allows you to join metadata of the current block with the parent block. For each row of the parent block, the child block is evaluated and checked to see if the child row matches the parent row.
The feature is only visible in the block setting if the block is a child of a parent block, i.e. is defined within another block. For root level blocks the join settings will not be available.
Join Configuration:
- Join by Instance Property: Select which property to use as the join key. You could define a separate property for the child and the parent row
- Apply join with: Choose the join type (AND/OR operations available)
Join Types:
- AND: Include records that match all specified conditions
- OR: Include records that match any of the specified conditions
Expression Switches / Conditional expressions
To define conditional expressions for a block, so-called switch cases can be used. These function similarly to a switch statement in a programming language or a CASE statement in SQL. With switch cases, it is possible to generate different subexpressions depending on the values in a metadata row.
A block initially has two default switch cases:
- Switch Default: This case is applied by default to each filtered metadata row, i.e., the expression specified in the 'Switch Default' case is generated for the row.
- Block Default: This case is only output if the block filter returns no rows. i.e., if the set of selected metadata is empty, the expression specified in the 'Block Default' case is generated for the block. This allows a default value to be specified for the block. No instance property may be used in the 'Block Default', since no reference to a metadata row can be established.
In addition to the two default cases, developers can create additional cases. To do so, click the plus (+) icon in the block. This is only visible when the cursor is within the block (but not within a child block). A dialog opens where you can create a new case. The case must first be given a name. Next, a condition must be defined that must apply to a metadata row so that the case is applied to that row. The condition consists of an instance property, a comparison operator (=, !=, <, >, <=, >=), and a value. Additional conditions can be added and combined using OR/AND. After defining the conditions, click + Create new Switch Case to create the case. The case then appears in the editor.
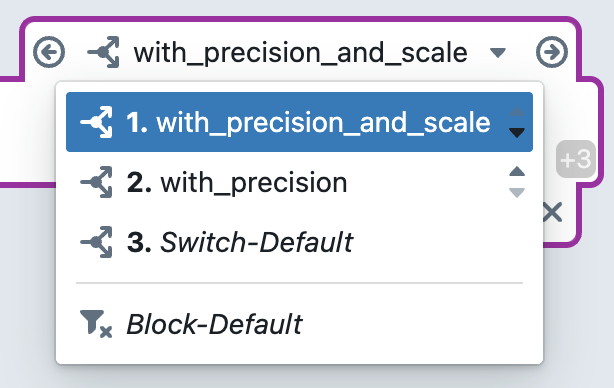
You can switch between the individual cases using the dropdown menu above the block. Within this dropdown menu, you can change the order of the cases. The cases are evaluated for a metadata row in this order from top to bottom. The first case for which the condition applies to the metadata row is selected, and its subexpression is created. If no user-defined case applies, the 'Switch Default' case is used.
You can also switch between the different cases using the arrow buttons next to the dropdown menu. Alternatively, you can also switch between the cases using Ctrl + Alt + → or Ctrl + Alt + ←.
The name and conditions of a case can be edited by clicking the edit icon (![]() ) below the block. A dialog will then open where you can change the case settings.
) below the block. A dialog will then open where you can change the case settings.
Finally, a case can be deleted by clicking the ![]() icon and confirming.
icon and confirming.
Simple Expression Block Example
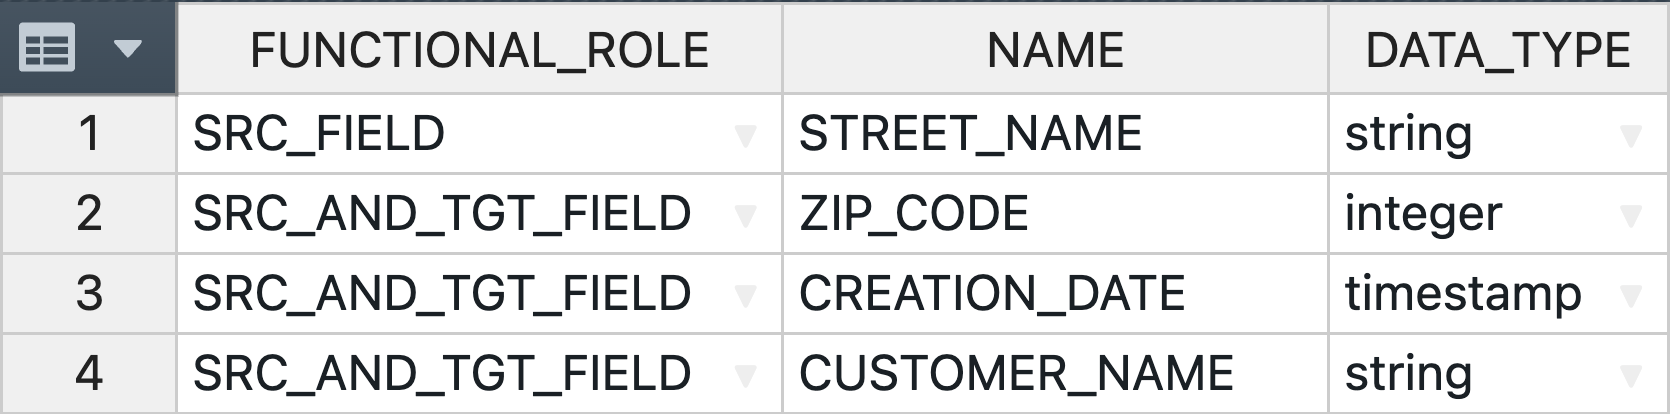
The following example illustrates how expression blocks work. Let us assume we have the following instance metadata:
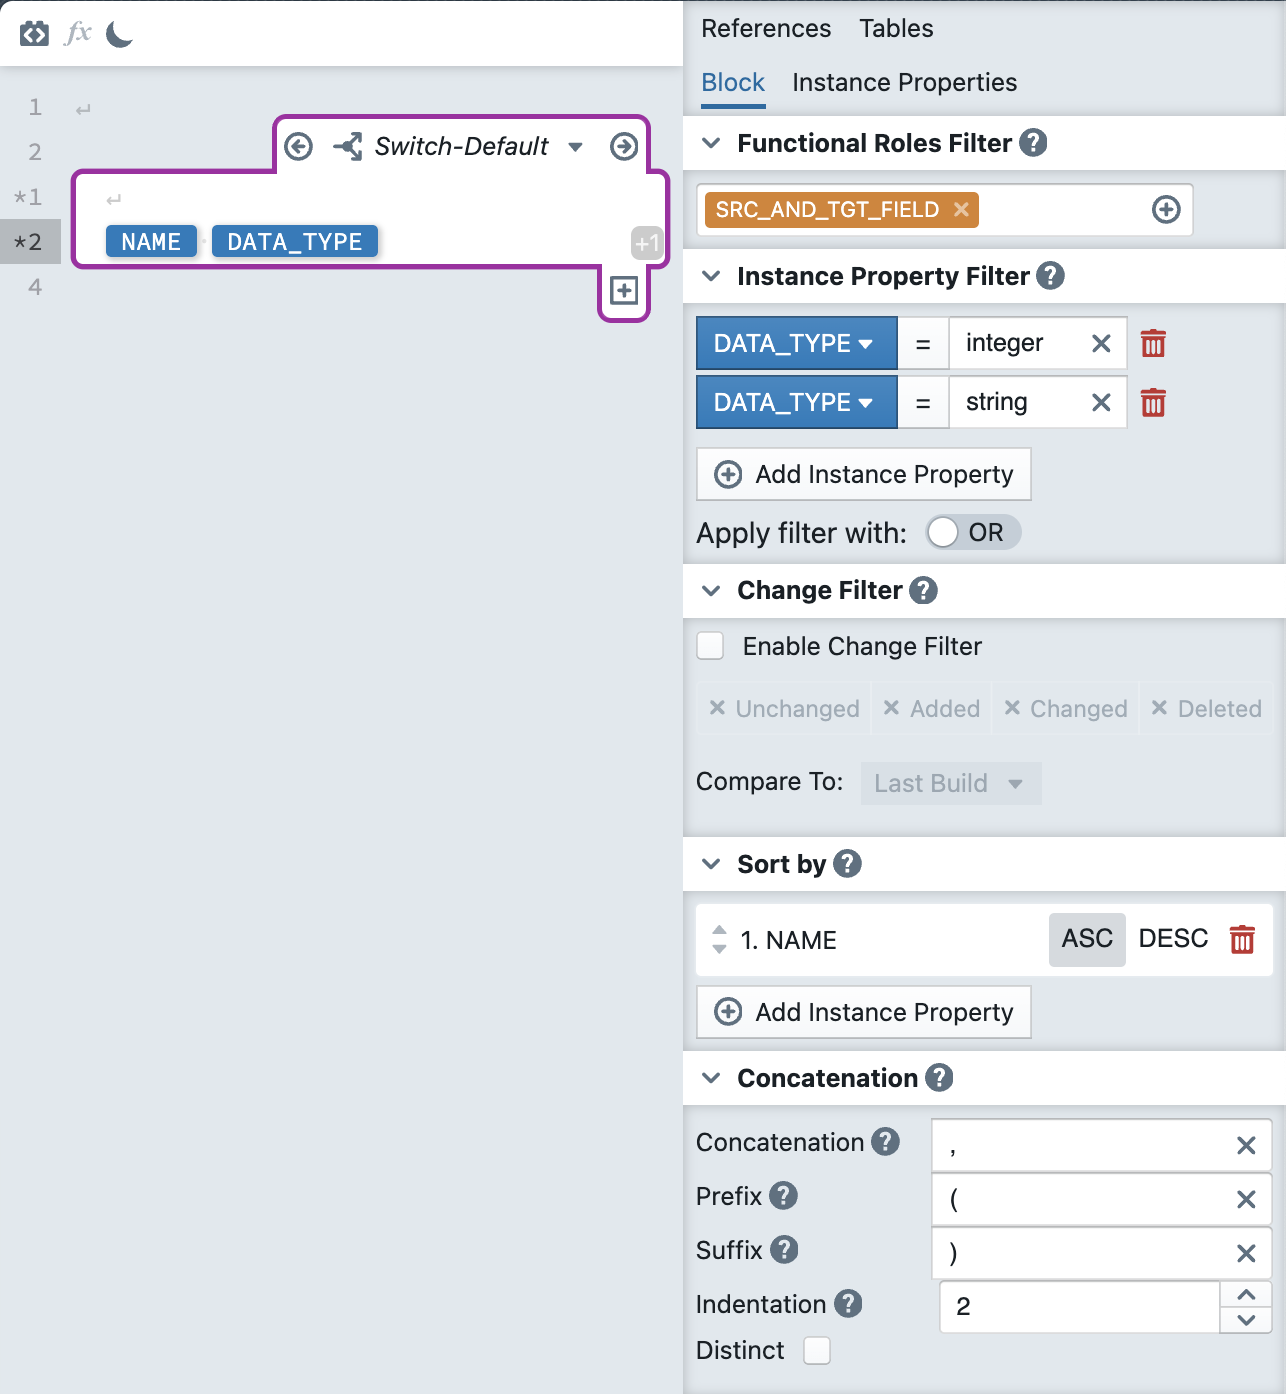
In addition, the following block has been defined:
The following text is then generated for the above instance:
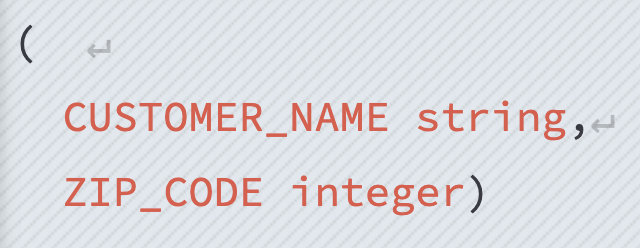
The result can be explained as follows: First only instance metadata rows with the functional role SRC_AND_TGT_FIELD are selected. This is why the STREET_NAME is omitted, it has the role SRC_FIELD which is not in the filter condition. Then, the data type must also be 'integer' OR 'string'. Therefore, the CREATION_DATE is filtered out. After the relevant rows have been determined, they are sorted in ascending order by the instance property NAME. For the two remaining rows, the subexpression consisting of NAME and DATA_TYPE is created. The two instance properties are separated by a space, and there is a line break at the start before NAME. The substrings are then concatenated with a comma (,) and indented by two spaces. In addition, an opening and closing bracket are added as a prefix and suffix, respectively.
Step-by-Step Example: Creating a Table DDL Template
In this practical example, we'll create a file template that generates a DDL (Data Definition Language) script for creating hub tables in a data warehouse. This will demonstrate how to use expression blocks, functional roles, and instance properties to build dynamic SQL files.
Step 1: Create a New File Template
Navigate to the Files tab in your pattern settings. Click on the folder icon above the file list and create a new file:
- Choose a meaningful name:
HUB.sql - Click + Create new File, The new file will appear in the list and open in the editor

Step 2: Add the Basic Table Structure
Start by adding the static SQL keywords that form the foundation of your CREATE TABLE statement by typing the following into the editor:
CREATE TABLEPosition your cursor after TABLE and add a space. This is where we'll insert our dynamic schema name and table name.
Step 3: Insert Dynamic Schema and Table Name
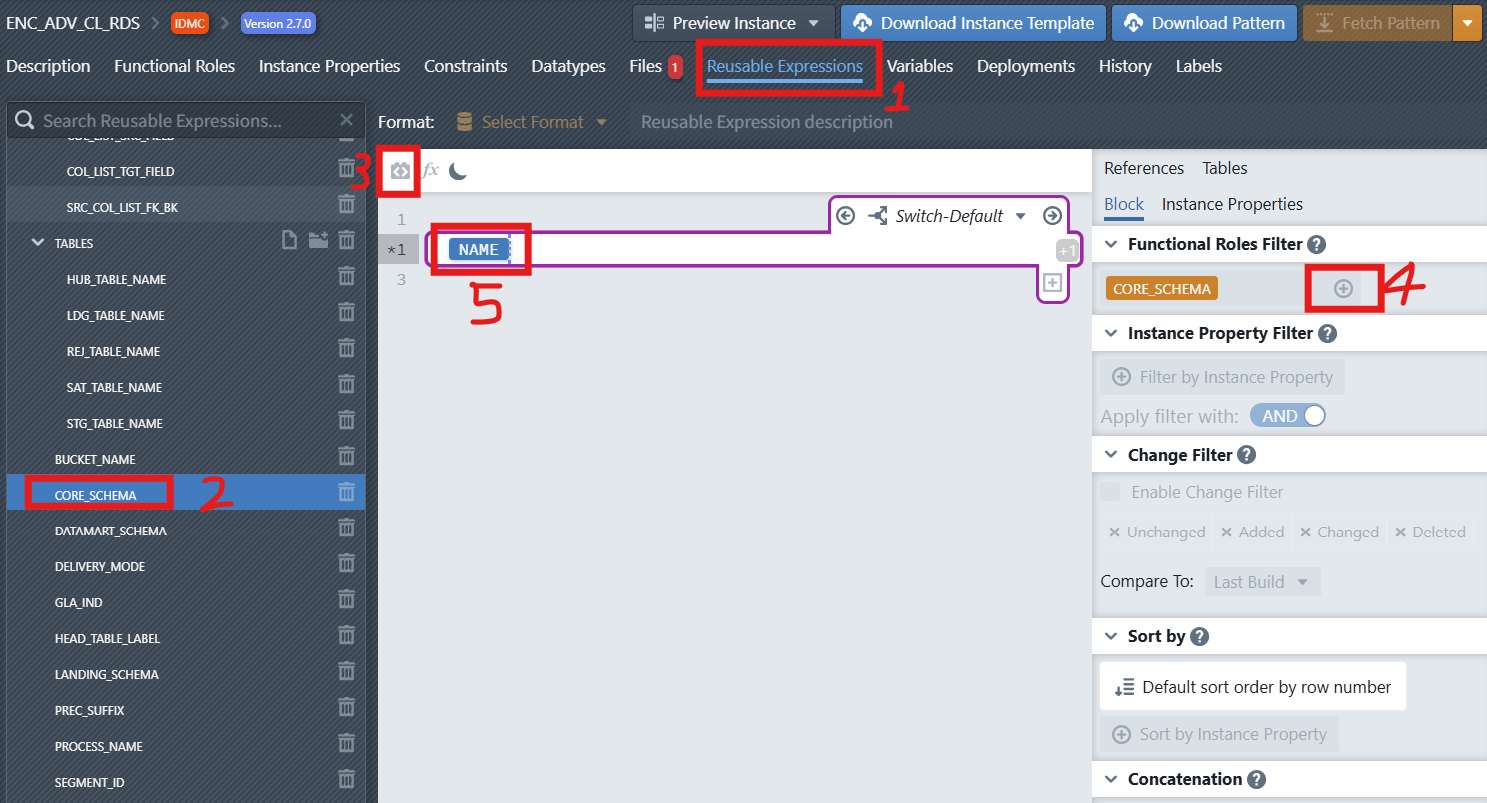
Now we'll add an Reusable expression to dynamically generate the schema and table name:
Click the Reusable Expressions tab
Click on the New Item icon
 and then choose a name by inserting
 CORE_SCHEMAinto the input and then click on + Create new Reusable Expression. The new reusable expression will then appear in the list. To edit the reusable expression, click on it in the sidebar to select it. An editor will then be displayed on the right side next to the list, where the reusable expression can be edited. The editor is the same one used for File Templates.Click the Add Expression Block icon
 in the editor toolbar
In the block settings panel on the right, configure:
- Functional Roles Filter: Select the functional role
CORE_SCHEMA
- Functional Roles Filter: Select the functional role
Inside the block, type
NAME. In the autocomplete the instance propertyNAME(blue IP badge) will appear. Select it by pressing Enter. This will insert the schema name from your instance metadata. Your reusable expression should now look like this:
Please repeat the above steps for HUB_TABLE_NAME and create a reusable expression with this name which references the functional role HUB_TABLE_NAME.
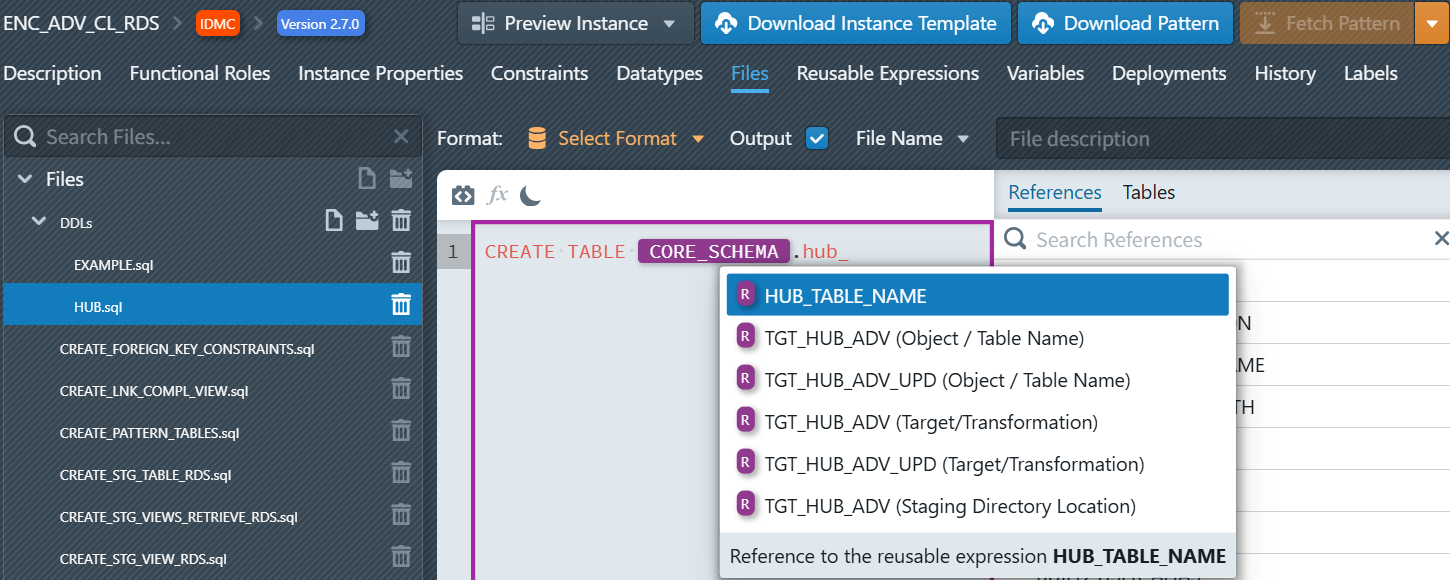
- Navigate back to the Files tab in your pattern settings and open your file
HUB.sql. TypeCORE_(orhub_, upper/lower case is irrelevant). The editor autocomplete automatically opens a list of suggestions. Reusable expressions are recognizable by the purple "R" badge. SelectCORE_SCHEMAfrom the list—by pressing Enter or by clicking on it in the autocomplete. After you selected it, the reusable expression will be seen in the editor as a purple placeholder. At this location the value of the reusable expression for an instance will be inserted during the build process. Now please enter a dot (.) afterCORE_SCHEMAand then insert the reusable expressionHUB_TABLE_NAME.
Step 4: Add Column Definitions
After the table name, add the opening parenthesis and start defining columns:
Insert a new expression block for regular columns (Click the Add Expression Block icon
in the editor toolbar)Configure the block settings:
- Functional Roles Filter: Select
SK(short for Surrogate Key)
- Functional Roles Filter: Select
Inside the block, add the column definition pattern:
[NAME] [DATA_TYPE] NOT NULLWhere
NAMEandDATA_TYPEare instance properties. You can insert instance properties by typing their names and then selecting them in the appearing autocomplete. Alternatively, you can select the desired instance property in the "Instance Properties" tab on the right side of the editor by either double-clicking it into the editor or dragging and dropping it to the desired location in the editor.
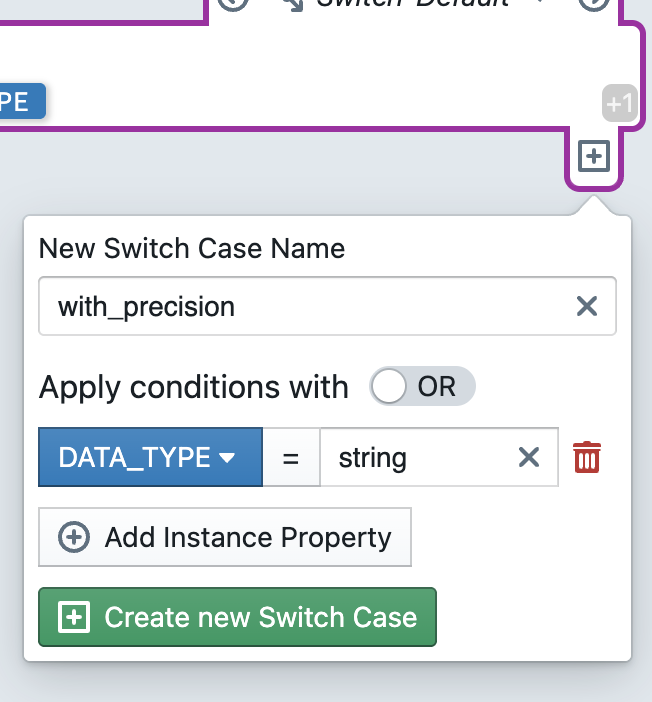
Step 5: Add Dynamic Data Type Handling with Switch Expressions
MetaKraftwerk provides a powerful Switch feature for handling conditional logic based on the value instance properties. Let's use it to handle different data types dynamically:
- In the column expression block, click the plus sign icon
 below the expression block (Create new Switch Case). It will only be visible, when you place the cursor inside the block, so that the block becomes active (purple border is visible)
 - A dialog will appear to configure your switch:
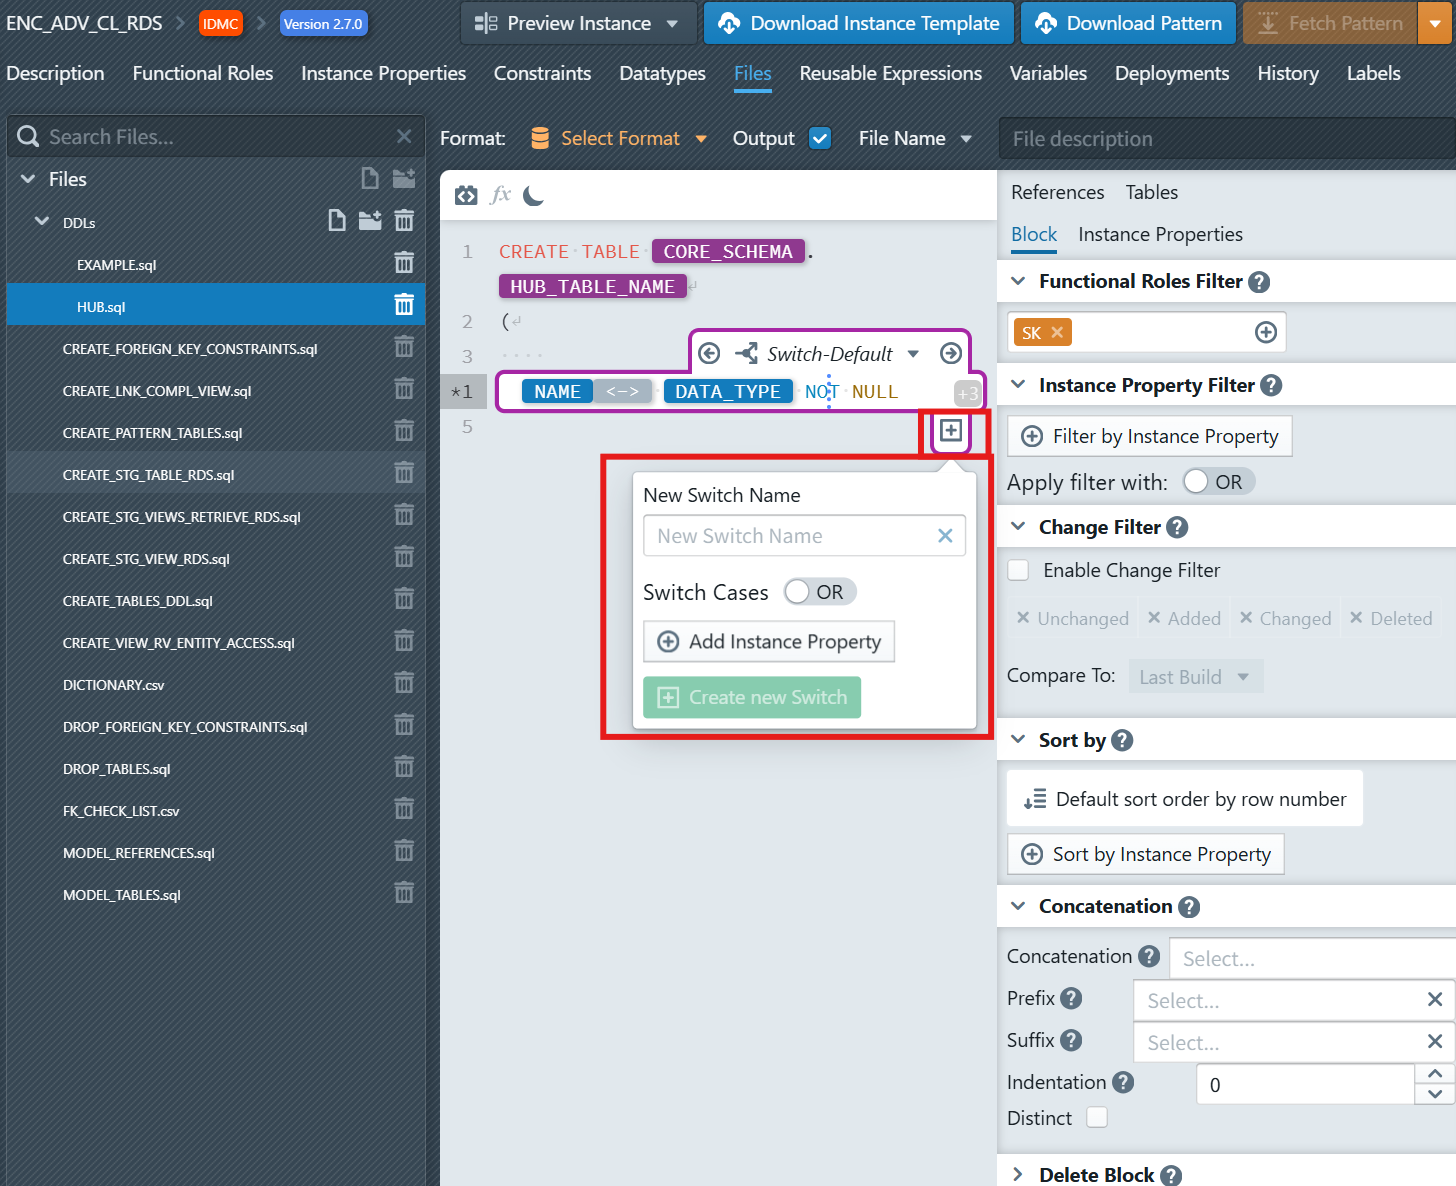
Create new Switch Case
New Switch Name: Enter
with_precisionSwitch Cases: Keep
ORselected (you can chooseORorAND)Add Instance Property: Click on 'Add Instance Property' and then select
DATA_TYPEfrom the dropdown, enterstringin the input. Repeat this but this time enterdecimalinto the text field.Click the + Create new Switch Case button
Inside this case
with_precision, add:
[NAME] [DATA_TYPE]([PRECISION]) NOT NULL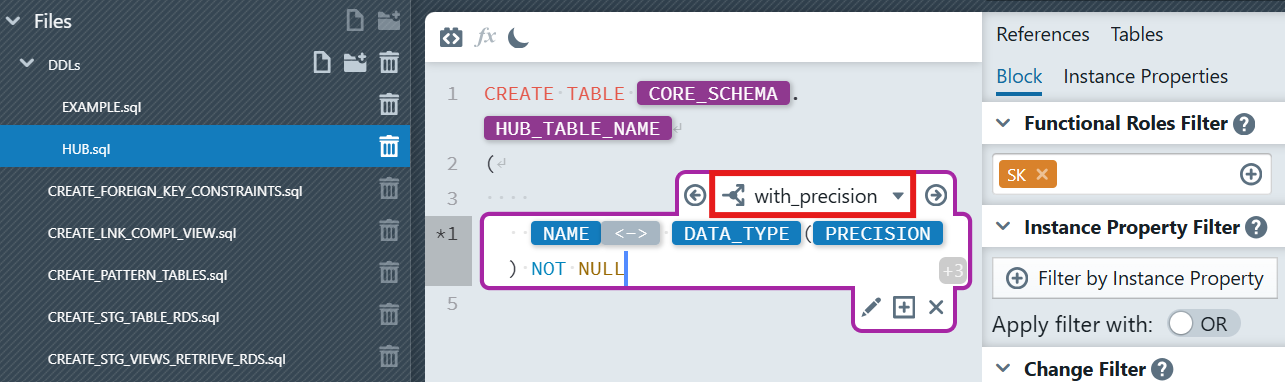
This Switch expression will now:
- Add precision in parentheses for strings or decimals
- Apply the default pattern for all other types
Step 6: Add System Columns and Constraint
After the dynamic column blocks, add static column definitions. You can also complete the table definition with a primary key.
Step 7: Preview Instance
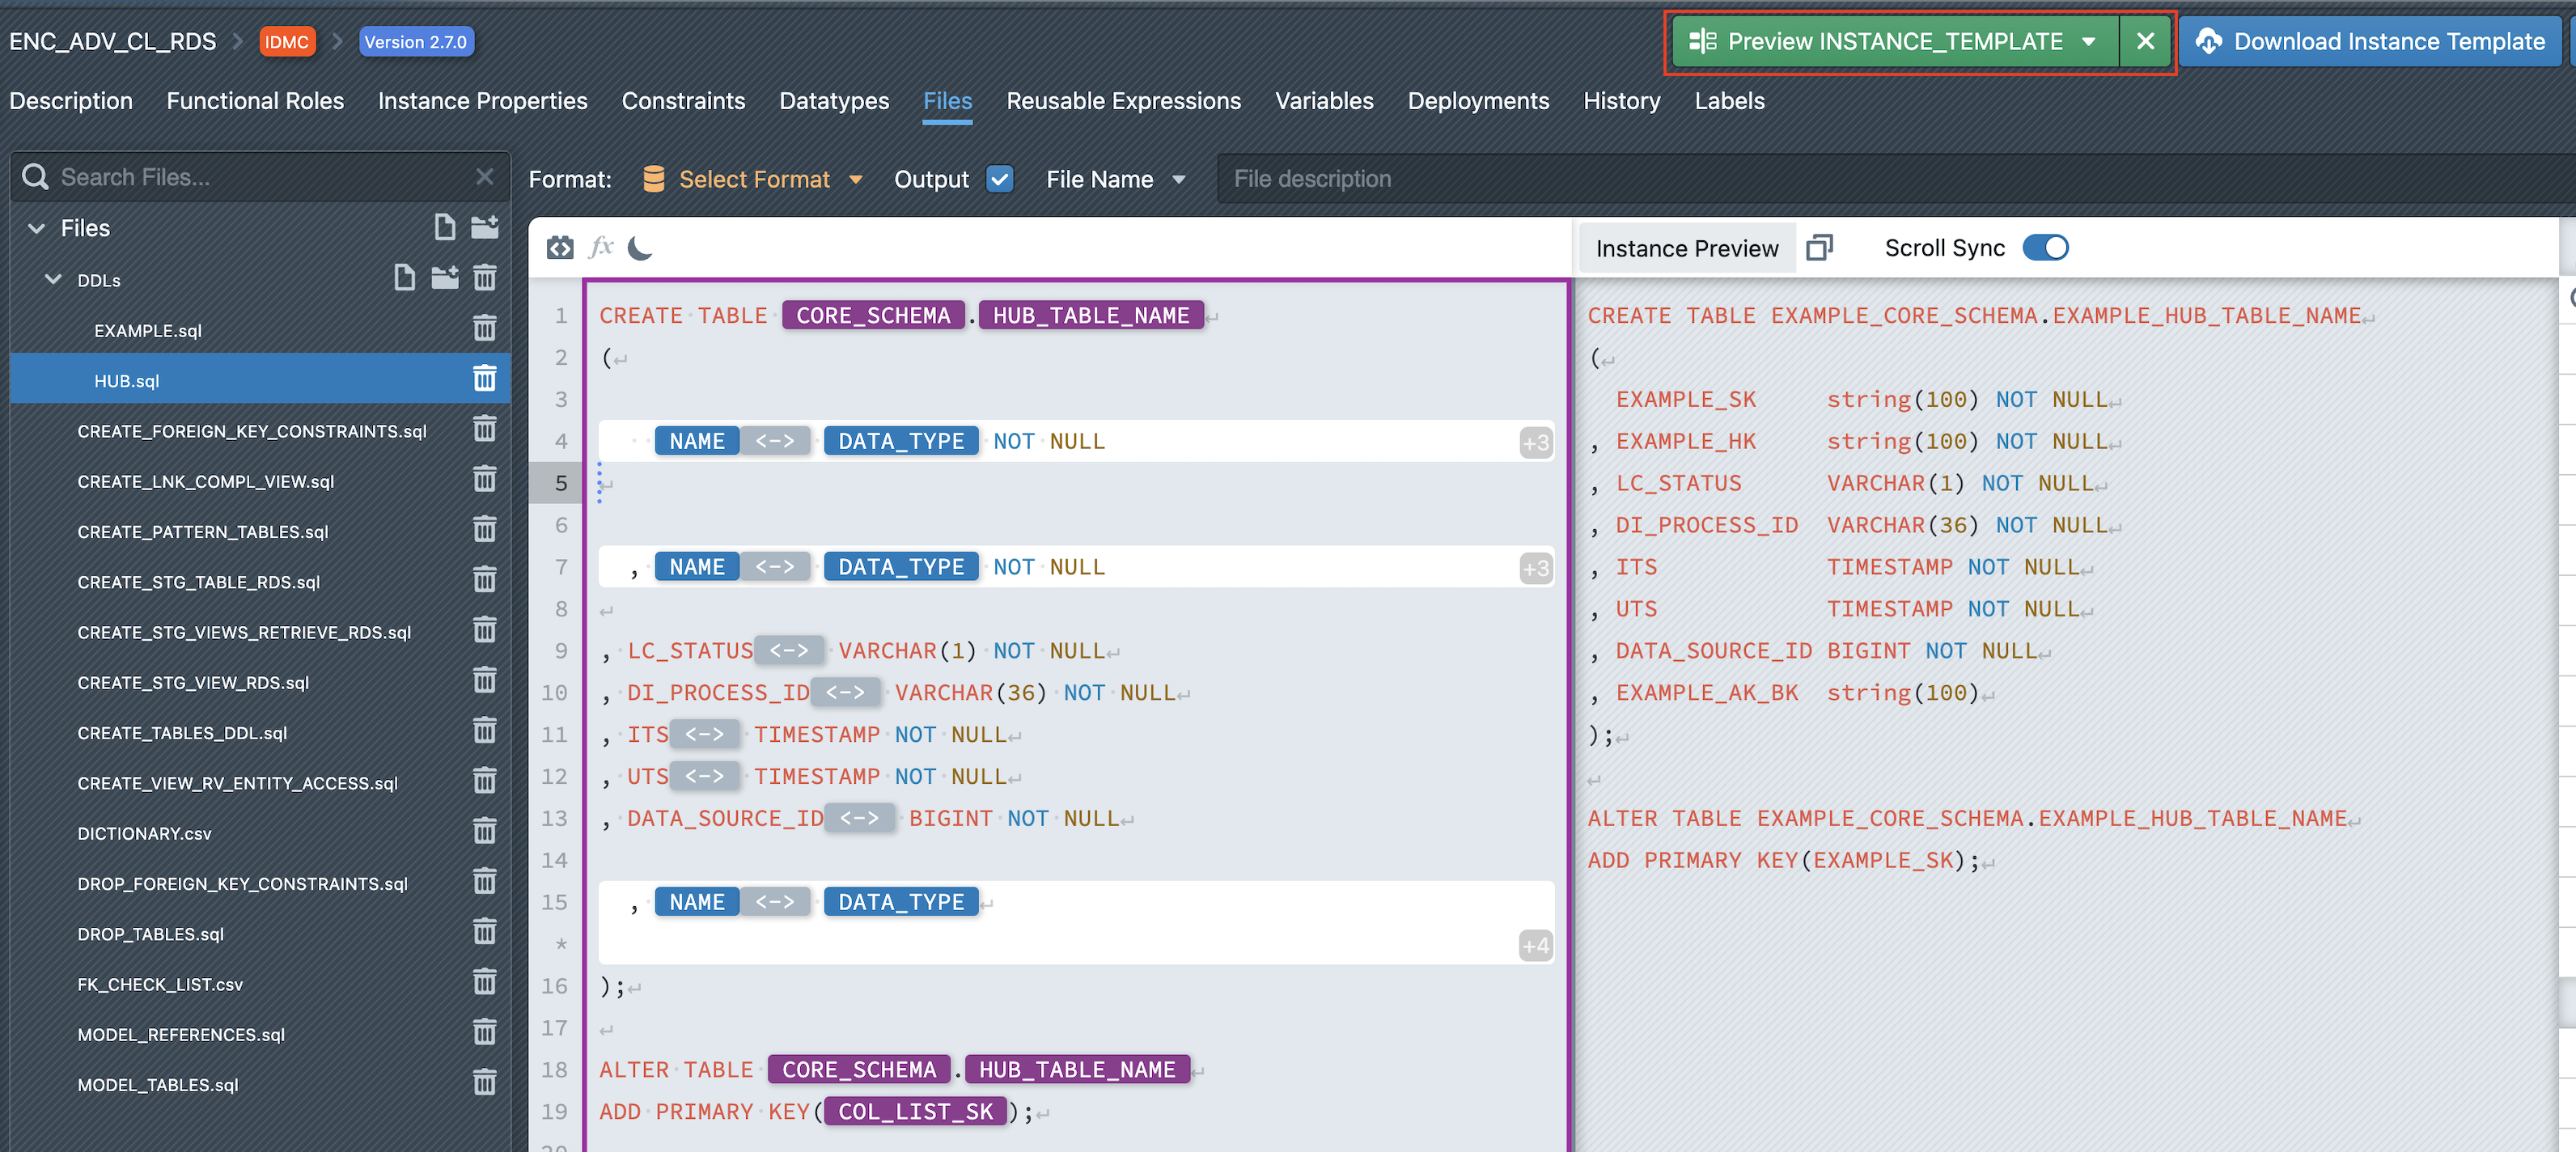
The Preview feature allows you to generate and inspect the code of a selected instance before deploying it to a target platform. This helps validate the logic, review SQL or script details, and test the outcome in a controlled way.
To preview an instance:
- In the File Editor, choose the file you want to inspect.
- At the top-right of the interface, click the Preview Instance dropdown.
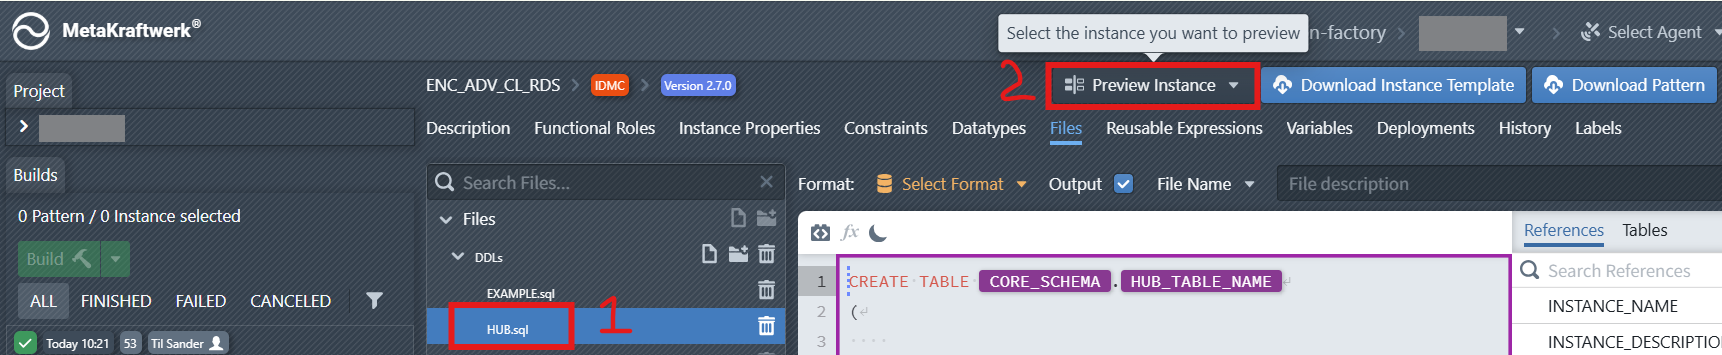
- From the list, select the Instance you want to preview.
- The system will generate the corresponding preview, which is displayed on the right-hand side of the editor.
From here, you can copy the previewed code and use it directly on the target platform (e.g., for testing or validation purposes) without committing the pattern.