 MetaKraftwerk
Part 6 — Build the Instances and Deploy to Synapse
After instance data has been created and validated, it is possible to generate process instances from a pattern and the instance metadata.
MetaKraftwerk creates Synapse Notebooks and Pipelines as a product of pattern and instance metadata. This process is called a Build in this context. Key Steps:
- Build the Instances
- Download build results
- Import the Noteboooks into Synapse
More information about Builds:
- For information on how to start a new build, see the page Start of a new build.
- For information on how to download build results, see the page Download of the build results.
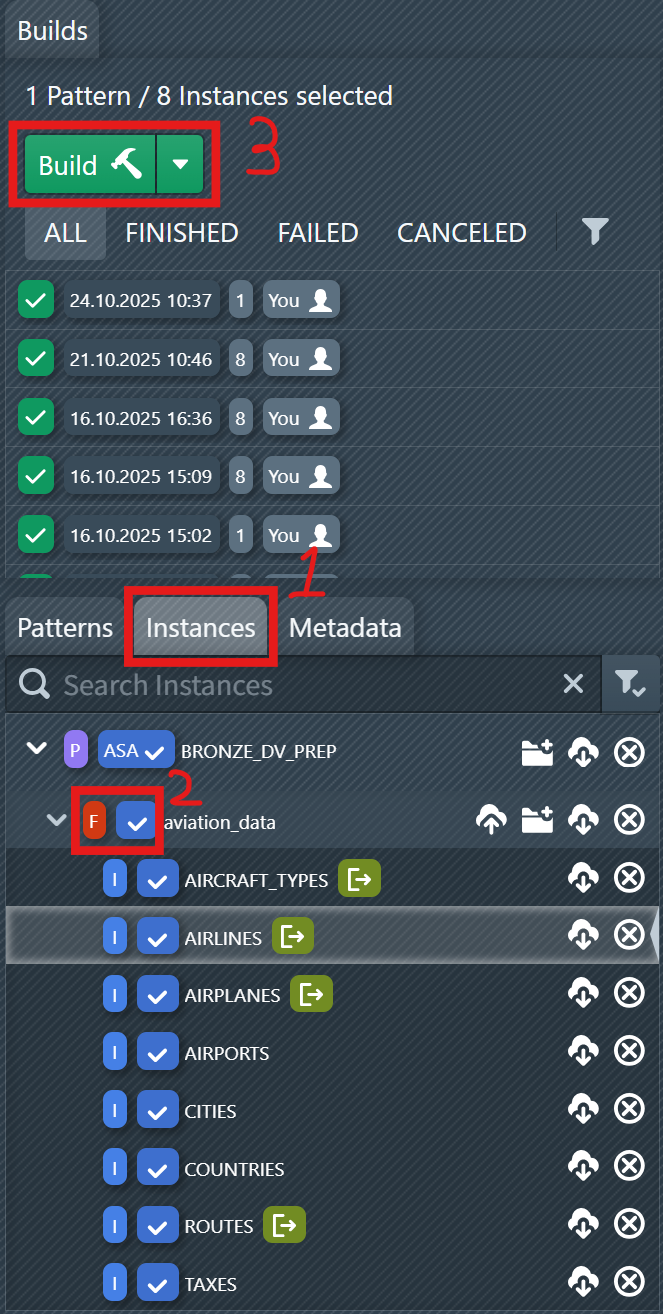
1. Start a New Build
Building transforms your pattern plus metadata into executable Synapse artifacts. By selecting only the instances you need, you keep feedback fast during development and avoid generating unused objects.
Steps:
- Open the
Instancestab in the Builds page (marked as 1 in the first screenshot above). This shows the buildable instances grouped by pattern and folders. - Expand your pattern and select the folder or individual instances by ticking the checkboxes on the right (marked as 2). You can mix instances from different patterns if required.
- Verify the selection counter near the top. It shows how many instances will be generated in this run.
- Click
Build(marked as 3). MetaKraftwerk renders the referenced files (e.g., notebooks and pipelines) with the selected instance metadata and starts the build.
Build states for filtering and troubleshooting:
- BUILDING — The build is still running.
- FINISHED — Generation completed successfully.
- FAILED — An error occurred. Open the build to inspect logs and identify the failing file or expression.
- CANCELED — The build was stopped manually.
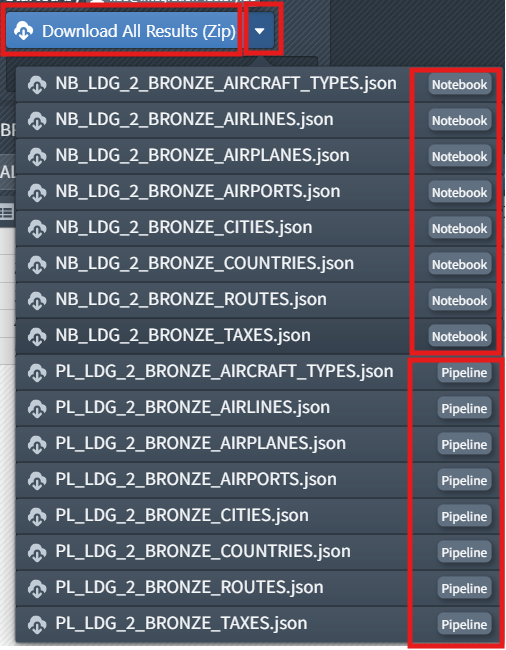
2. Download the Build Results
The generated artifacts are your deployable assets. Downloading them allows you to archive, review, and move them into your Synapse workspace (or CI/CD pipeline) in a controlled manner.
Steps:
Once the build has a status of
FINISHED, select it in the sidebar to view the results.Click
Download All Results (Zip)to download all generated files and then unpack them. Each result is labeled with a type, such asNotebookorPipeline(see second screenshot above).Alternatively, you can download the build results of Synapse Notebooks and Pipelines from here and then unpack them: SYNAPSE_DEMO.zip
Note:
You can also see a complete list of downloads in Prerequisites.
Good practice: Keep the ZIP file with your release notes. This way, you have a reproducible snapshot of this exact build.
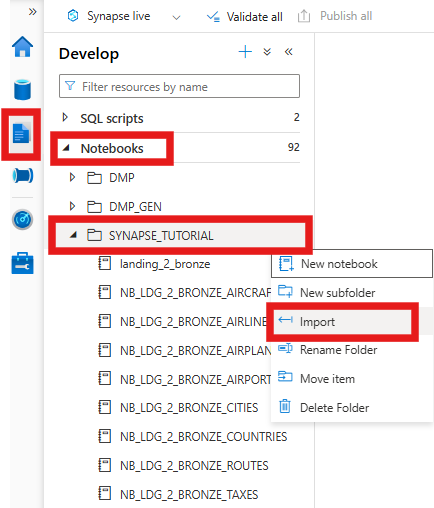
3. Import the Notebooks into Synapse
Importing moves your generated notebooks into the Synapse workspace, where they can be executed, tested, and scheduled via pipelines.
Steps:
- In Synapse Studio, open the Develop pane and navigate to the target folder (e.g.,
SYNAPSE_TUTORIAL, see third screenshot above). - Open the folder's context menu and select Import. Select all downloaded Notebook .json files from the build.
- The imported notebooks will appear in the folder and are immediately executable.
- If you also want to import the pipelines, you can follow the steps in Part 4 Steps of create/import a new pipeline.
Validation checklist:
- Open an imported notebook and check parameters, imports, and the order of cells.
- Perform a short test run with sample data or path previews to verify that names and paths are resolved correctly.