 MetaKraftwerk
Part 5 — Upload & Develop Pattern in MKW
Now that you have created the support files in Synapse, it is time to upload this metadata to MetaKraftwerk. The support files can be uploaded via the menu by selecting Upload Pattern. You have to select your pattern in the sidebar to see the menu.
A Notebook file in MetaKraftwerk is not static; it can be dynamically defined by combining multiple metadata expressions and reusable expressions. These reusable expressions are modular code or logic blocks that can be flexibly assembled to create complex files tailored to your specific requirements.
The parameters or column information for each Pattern can be configured using the Functional Roles Filter and Instance Property settings. By applying these filters, you can precisely control which parameters or columns are included in your Notebook and how they are mapped.
When you create a new instance of a Pattern, MetaKraftwerk automatically generates a new Notebook for that instance, populated with its own specific values. This ensures that each instance operates with the correct configuration and data, supporting scalable and repeatable integration processes.
Summary of Key Steps:
- Upload support files via the menu
Upload Pattern. - Define Notebook files by combining multiple reusable expressions.
- Configure parameters/columns using
Functional Roles FilterandInstance Property. - Each Pattern instance will generate a new Notebook with its own values. This approach provides flexibility, reusability, and automation for managing complex data integration scenarios in MetaKraftwerk.
1. Upload Pipeline Support File
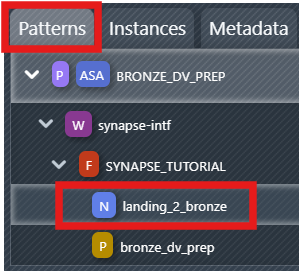
The first step will be to upload our exported support files to the pattern in MetaKraftwerk. Please click on the pattern in the sidebar. Then click on Upload Pattern .

Here you can upload the pipeline support files that you downloaded in Part 4 — Synapse: Create a Pipeline and Download support files.
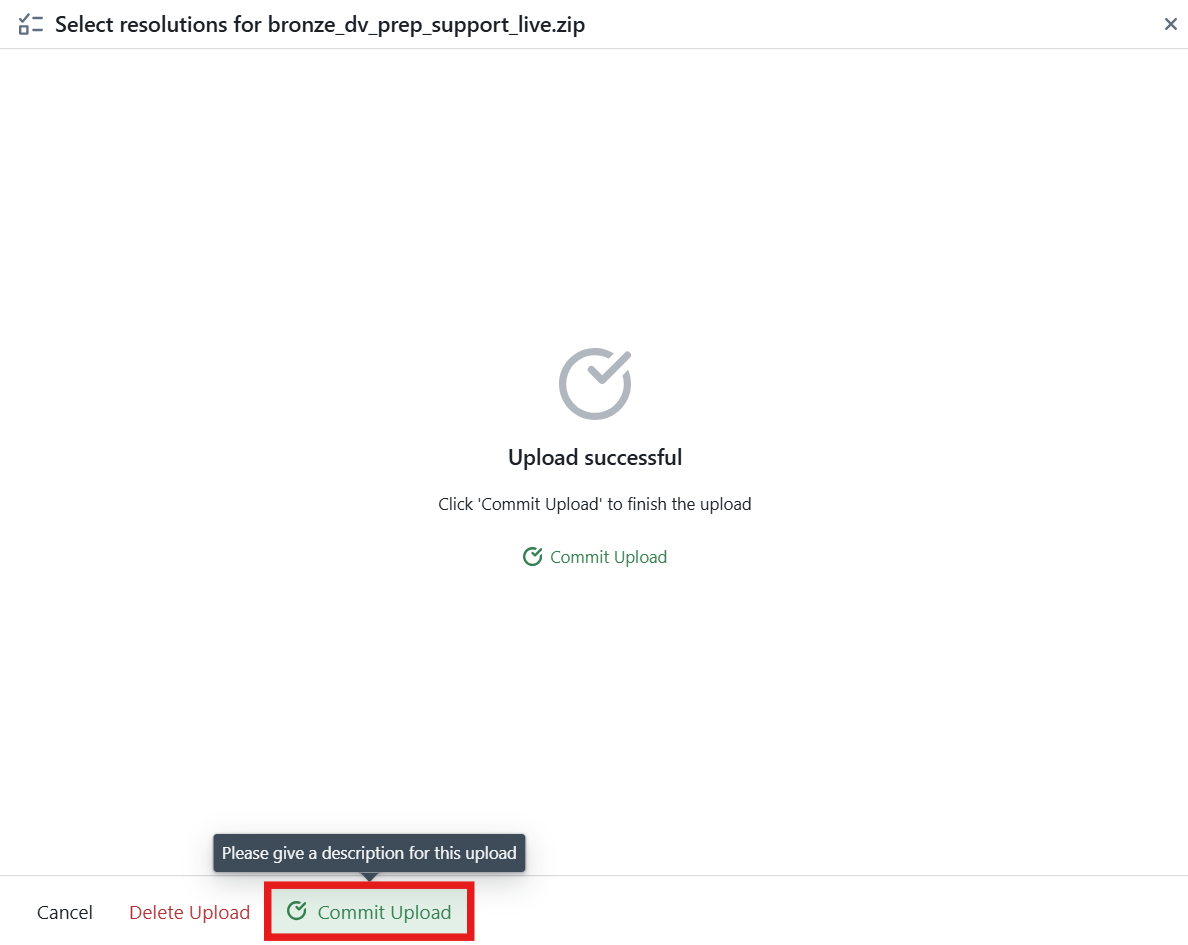
Alternatively, you can download a preconfigured Sample Pattern file and upload it directly into Metakraftwerk ( Download bronze_dv_prep_support_live.zip ).
These files represent a base pattern — meaning they are not yet parameterized. You will need to configure them step by step to turn this pattern into a dynamic one, capable of generating the appropriate notebooks for different instances.
Note:
You can also see a complete list of downloads in Prerequisites.
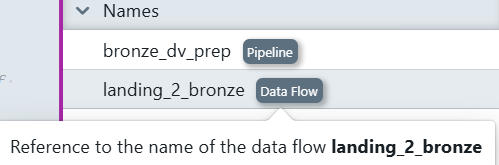
2. Define Names for Dataflow and Pipeline
For notebooks and pipelines to be generated, the name of the new objects must be defined. This can be done using the naming editor. To open it, you first have to select the folder containing the objects in the sidebar on the left—in this case, the SYNAPSE_TUTORIAL folder. Then you click on one of the objects to open the naming editor. In the editor, you can now define a naming rule consisting of a prefix, instance name, and suffix. The prefix and suffix can be changed by the developer. The name of the instance for which the object is being created is entered in INSTANCE_NAME during object creation.
Assign clear, consistent names to your Dataflow (Notebook) and Pipeline components. This helps maintain traceability. For example, name the Dataflow: NB_LDG_2_BRONZE_INSTANCE_NAME, Pipeline: PL_LDG_2_BRONZE_INSTANCE_NAME.
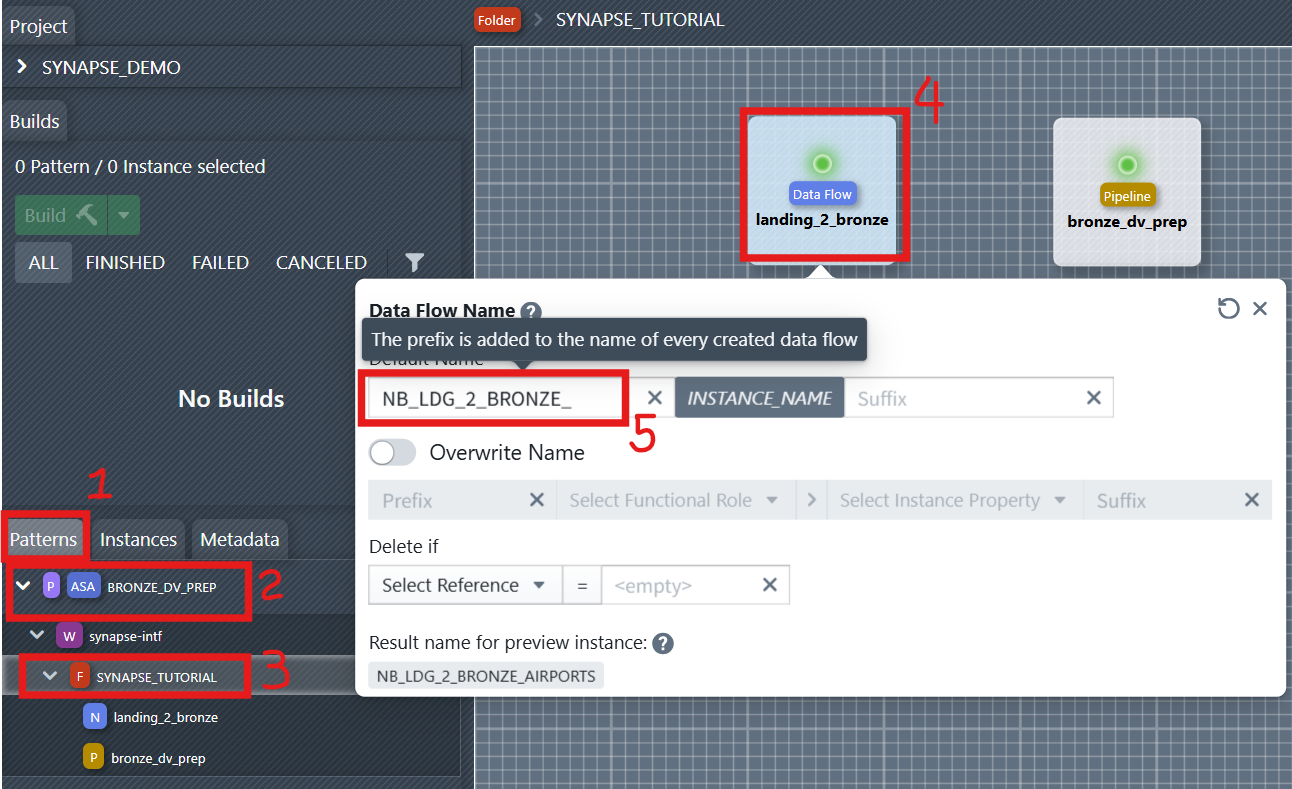
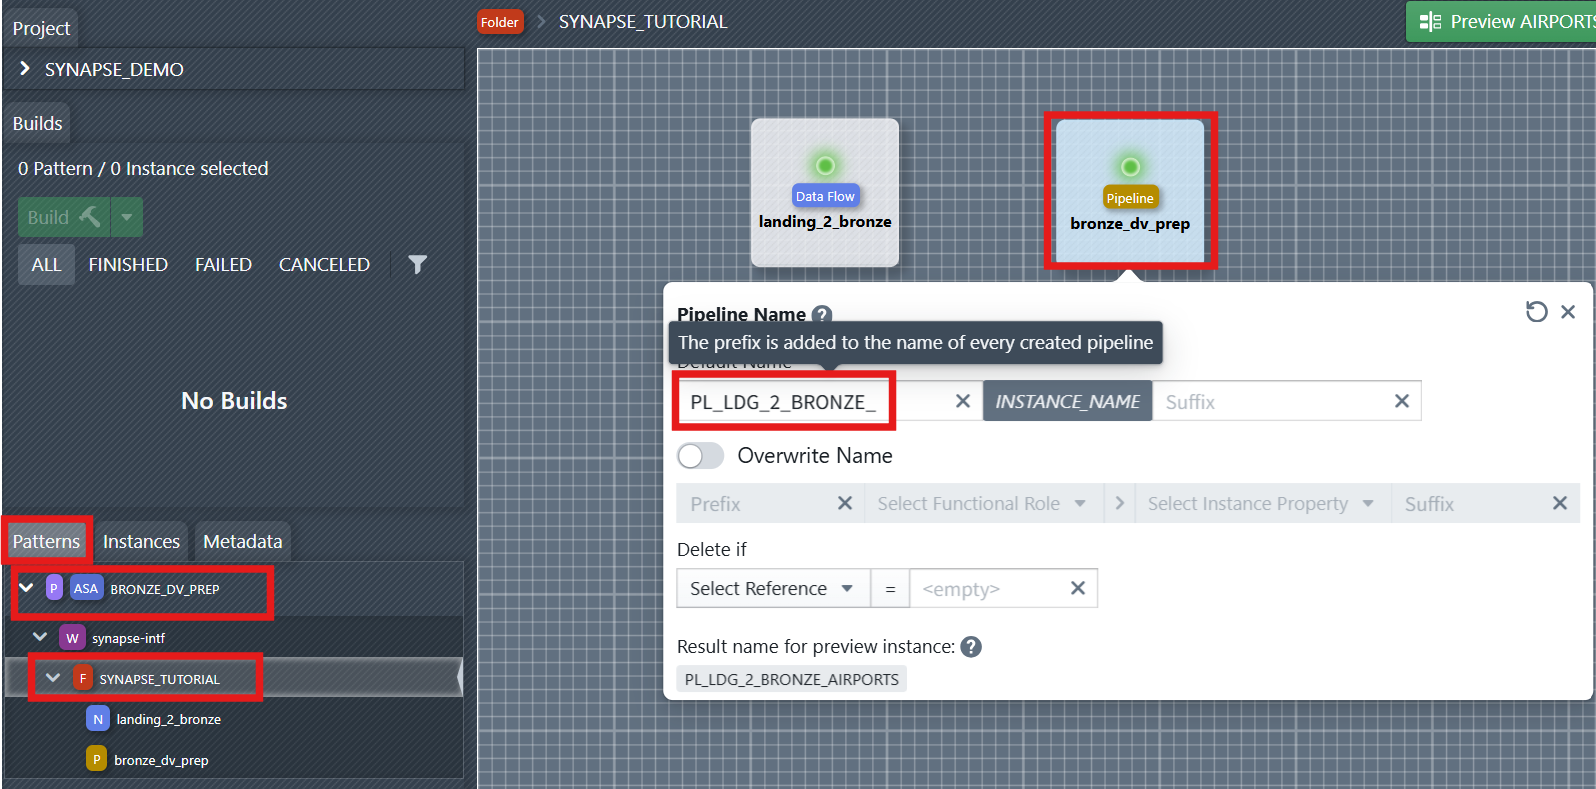
You can later reference the naming rule of the data flow and pipeline in files or reusable expressions. You will see it in the right side of the file editor under References -> Names.
3. Configure the Notebook File (Parameterization & Reusable Expressions)
Next, we need to configure the Notebook File so that it can dynamically generate different Notebooks based on the metadata of different instances.
- Use reusable expressions to simplify logic and enable modular design.
- Add blocks in your reusable expressions to parameterize certain attributes (e.g., table schema). Configure parameters and columns using Functional Roles Filter and Instance Property to ensure dynamic substitution during notebook generation.
So we can:
- Build reusable expressions (cells) that encapsulate all logic.
- Assemble the final notebook by referencing those reusable expressions.
More information about file templates:
- For a practical walkthrough of the File Editor, watch the video in the File Editor. It explains how to navigate the editor, use dynamic metadata, and build custom file templates(SQL script and Notebook) efficiently.
- For the core concepts of the File Editor and a detailed step-by-step walkthrough with screenshots demonstrating how to create a DDL Template for a database table, see the page Files Templates.
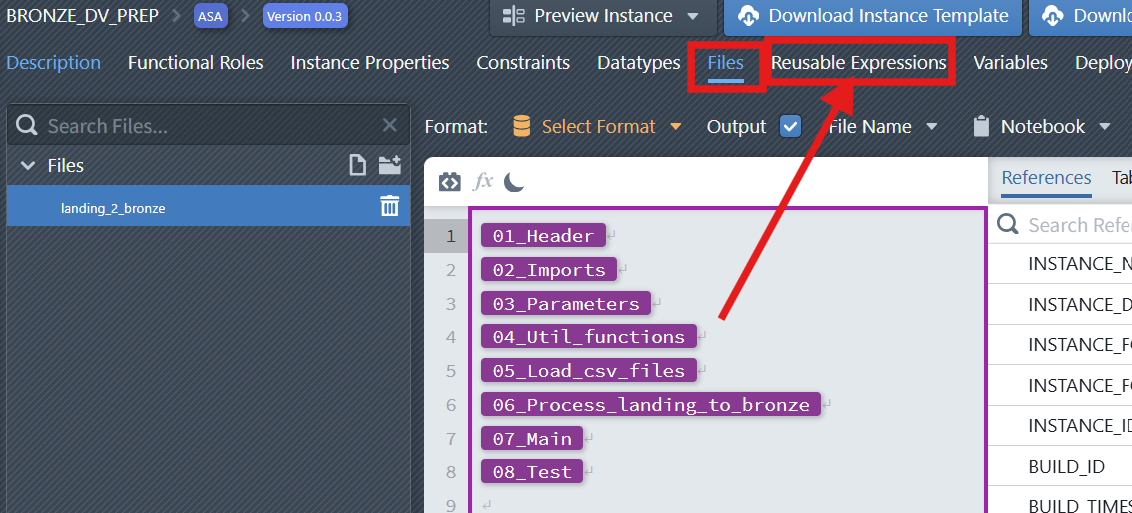
3.1 Build the Reusable Expressions
Before assembling the notebook, first create the folder that will hold your reusable expressions and then add the expressions themselves. If you already have an original Synapse notebook, you can copy relevant cells or code from that file directly into each reusable expression editor.
Steps: 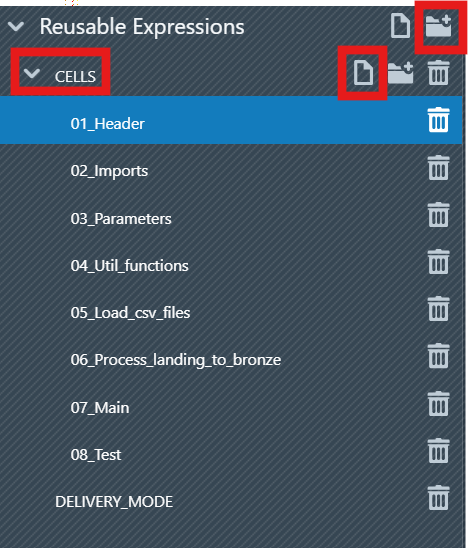
- Click the
Reusable Expressionstab. - Create the folder
CELLS:
- Click on the new Folder icon

- Enter
CELLSin the input box to insert the folder name, then click on + Create new Folder. - The new Folder
CELLSwill then appear in the list. This keeps reusable expressions organized and mirrors the structure shown in the screenshots
- Create the
Reusable Expressions:
- In the Folder
CELLSclick on the New Item icon
- Enter
01_Headerin the input box to insert the reusable expression name, then click on + Create new Reusable Expression. - The new reusable expression will then appear in the list.
- To edit a reusable expression, click it in the sidebar to select it. An editor appears on the right where you can paste or type content (you may copy parts of the original notebook file here). The editor is the same one used for File Templates.
Create the following reusable expressions. Each reusable expression begins with a Cell Format Indicator and can contain one or more expression blocks and optional switch cases.
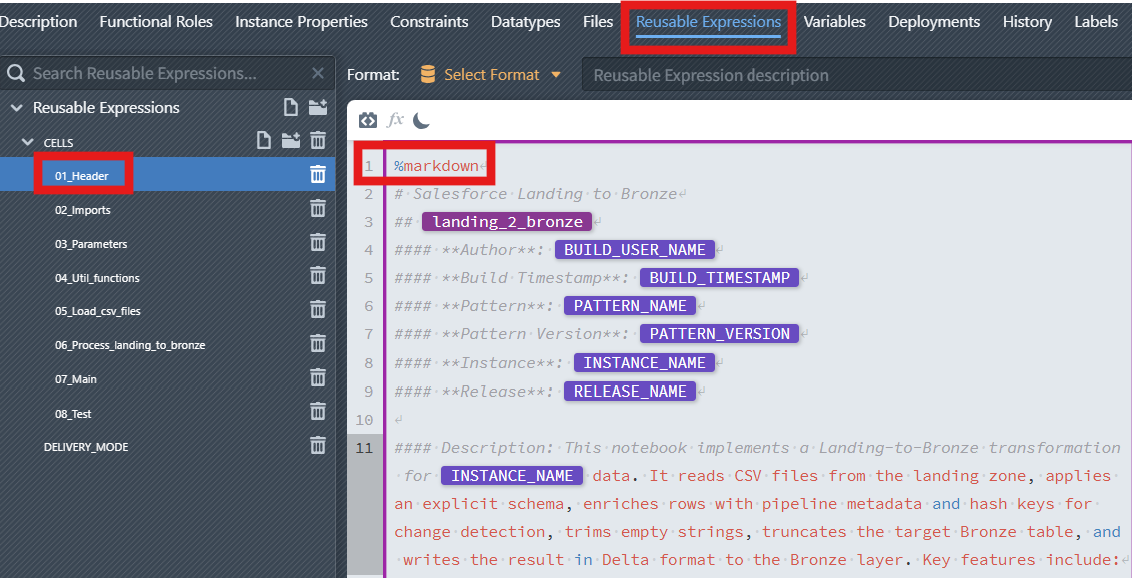
01_Header—%markdown- Purpose: Human-readable description with dynamic placeholders (
BUILD_USER_NAME,BUILD_TIMESTAMP,PATTERN_NAME,PATTERN_VERSION,INSTANCE_NAME,RELEASE_NAME). - Result: A rendered header section in the final notebook.
Note
For more information on how to generate dynamic Markdown, see the supplementary section Part 7(optional): Add a dynamic markdown header.
- Purpose: Human-readable description with dynamic placeholders (
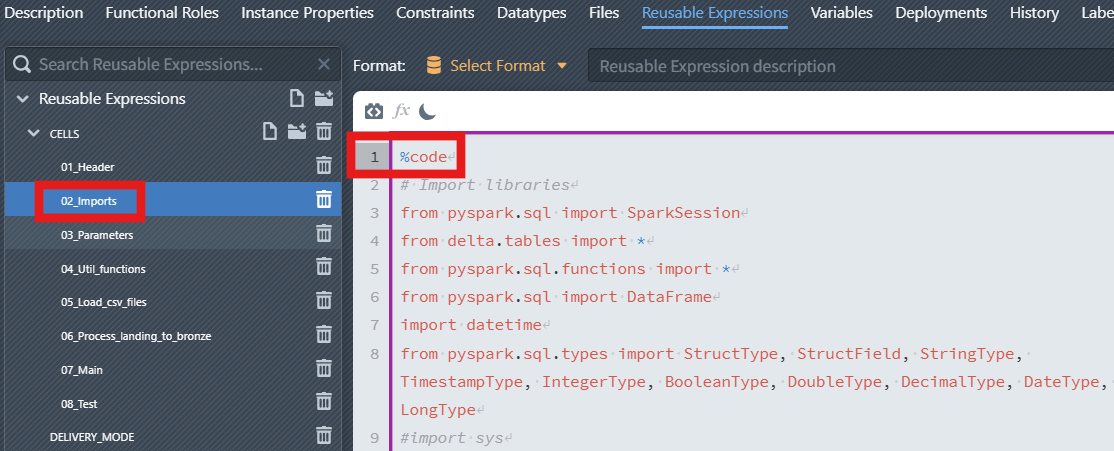
02_Imports—%code- Purpose: Import PySpark/Delta libraries and define any small helpers needed across cells.
- Typical content: imports for
SparkSession,DataFrame,StructType,StructField, and Spark data types.
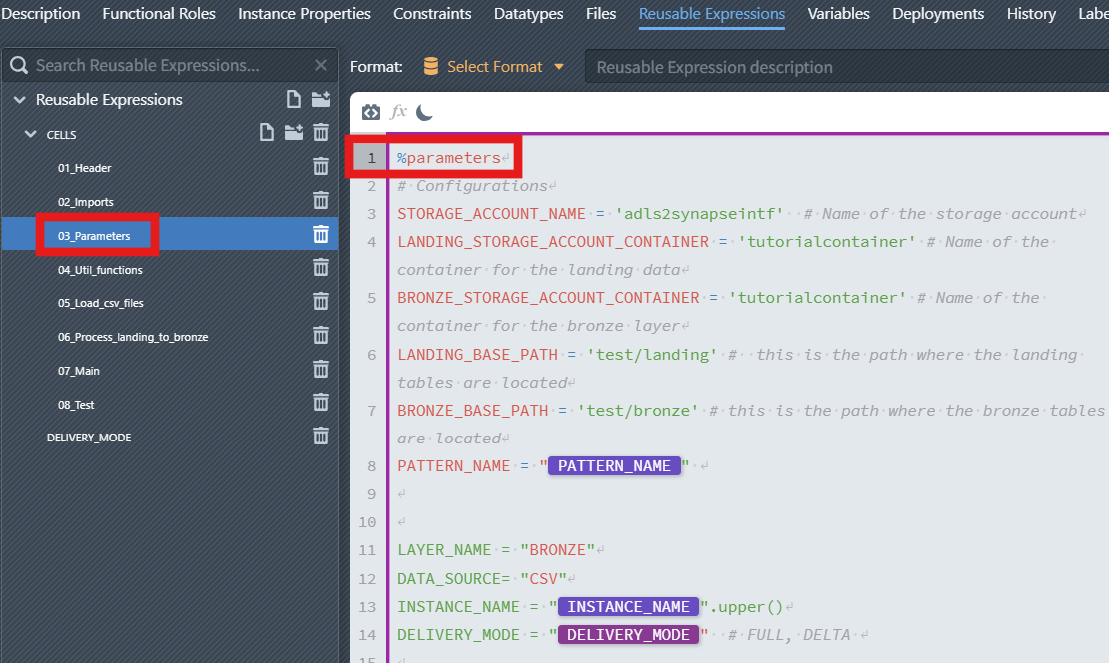
03_Parameters—%parameters- Purpose: Declare runtime configuration (storage account/container names, base paths,
PATTERN_NAME,LAYER_NAME,DATA_SOURCE,INSTANCE_NAME,DELIVERY_MODE). - Rule: Only one
%parameterscell per notebook. Keep it at the top so later cells can use these variables.
- Purpose: Declare runtime configuration (storage account/container names, base paths,
04_Util_functions—%code- Purpose: Utility functions used throughout the pipeline (e.g.,
generate_md5_hash,generate_hdiff).
- Purpose: Utility functions used throughout the pipeline (e.g.,
05_Load_csv_files—%code- Purpose: Load raw files from the landing zone using the declared parameters.
06_Process_landing_to_bronze—%code- Purpose: Core processing cell including schema application, metadata enrichment, hash key & hash value generation, and Delta write.
- Contains expression blocks and switch cases(see Subsection 3.3) to parameterize schema and hashing.
07_Main—%code- Purpose: Orchestrate the logical steps (call utils, load, process, write) and handle high-level flow.
08_Test—%code(optional)- Purpose: Quick validations or preview queries used during development.
3.2 Cell Format Indicators
Here you'll learn how %markdown, %code, and %parameters control rendering, execution, and runtime configuration across your expressions.
In Synapse notebooks, each cell can start with a format indicator that controls how the content is treated. The three indicators used in this pattern are shown in your screenshots and explained below.
| Indicator | Where used in screenshots | Purpose | Typical content |
|---|---|---|---|
%markdown | 01_Header | Renders documentation and headings | Overview, BUILD_USER_NAME, BUILD_TIMESTAMP, PATTERN_NAME, INSTANCE_NAME, RELEASE_NAME, etc. |
%code | 02_Imports | Executable code cell (Python by default). | Library imports, Standard code cell for Python code blocks. |
%parameters | 03_Parameters | Declares runtime parameters available to later cells. | STORAGE_ACCOUNT_NAME, LANDING_BASE_PATH, BRONZE_BASE_PATH, INSTANCE_NAME, etc. |
Details matching the images:
01_Headeruses%markdown. This cell documents the notebook and can embed dynamic references likeBUILD_USER_NAME,BUILD_TIMESTAMP,PATTERN_NAME,INSTANCE_NAME, andRELEASE_NAME. These values are resolved during instance generation so the rendered header always reflects the selected instance.Note
For more information about
%markdownheader, see the page Part 7 (optional) - Add a dynamic markdown header.02_Importsuses%code. It contains import statements for PySpark, Delta, and types. Being a%codecell, it is executed and makes these symbols available to subsequent cells.03_Parametersuses%parameters. It defines configuration variables. These variables are injected by the pipeline/notebook and referenced later in%codecells.WARNING
Only a single
%parameterscell is allowed per notebook. Place it near the top so all later cells can reference these values.
3.3 Creating the loaded_schema Block
In this subsection, you'll implement a dynamic loaded_schema using expression blocks and switch cases so data types resolve from metadata at generation time.
Why This Matters: The loaded_schema block is the foundation of your data processing pipeline. Without a properly defined schema, your data transformations will fail, and you'll spend hours debugging type mismatches and field mapping errors. This block acts as a "contract" between your source data and your processing logic, ensuring data integrity throughout your pipeline.
The Challenge: Different data sources often have varying field types - some tables might have string fields, others decimal numbers, long, or timestamp values. Hard-coding these types would mean creating separate notebooks for each data source, defeating the purpose of a reusable pattern.
The Solution: Switch Cases allow you to create one intelligent schema definition that adapts based on your metadata. When MetaKraftwerk generates your notebook, it reads your metadata and automatically applies the correct data type for each field. This is where the magic happens - one pattern, infinite possibilities!
Step 1: Add the Expression Block
Open the reusable expression
06_Process_landing_to_bronze, and findloaded_schemain the function process_landing_to_bronze().Position the cursor where you want to add the schema definition, click the Add Expression Block icon
 in the editor toolbar to insert a new expression block.
The new expression block will appear with a purple border, indicating it's active and ready for configuration.
In the block settings panel on the right, configure:
Functional Roles Filter: Select the functional roleBUSINESS_KEYandSRC_AND_TGT_FIELD. Concatenation: Use,(comma) as the separator.Switch-Default: Inside the block, In the content field, enter:
StructField("
NAME",DATA_TYPEType(), True)When you reach the
NAMEpart (inside the quotes), typeNAMEexplicitly. As you type, an autocomplete suggestion labeled with a blueIPbadge (indicating an instance property) will appear. Select this suggestion by pressing Enter. This action inserts a dynamic reference to the instance propertyNAME, which automatically pulls the business key and field name from your instance metadata. Your reusable expression should now look like this: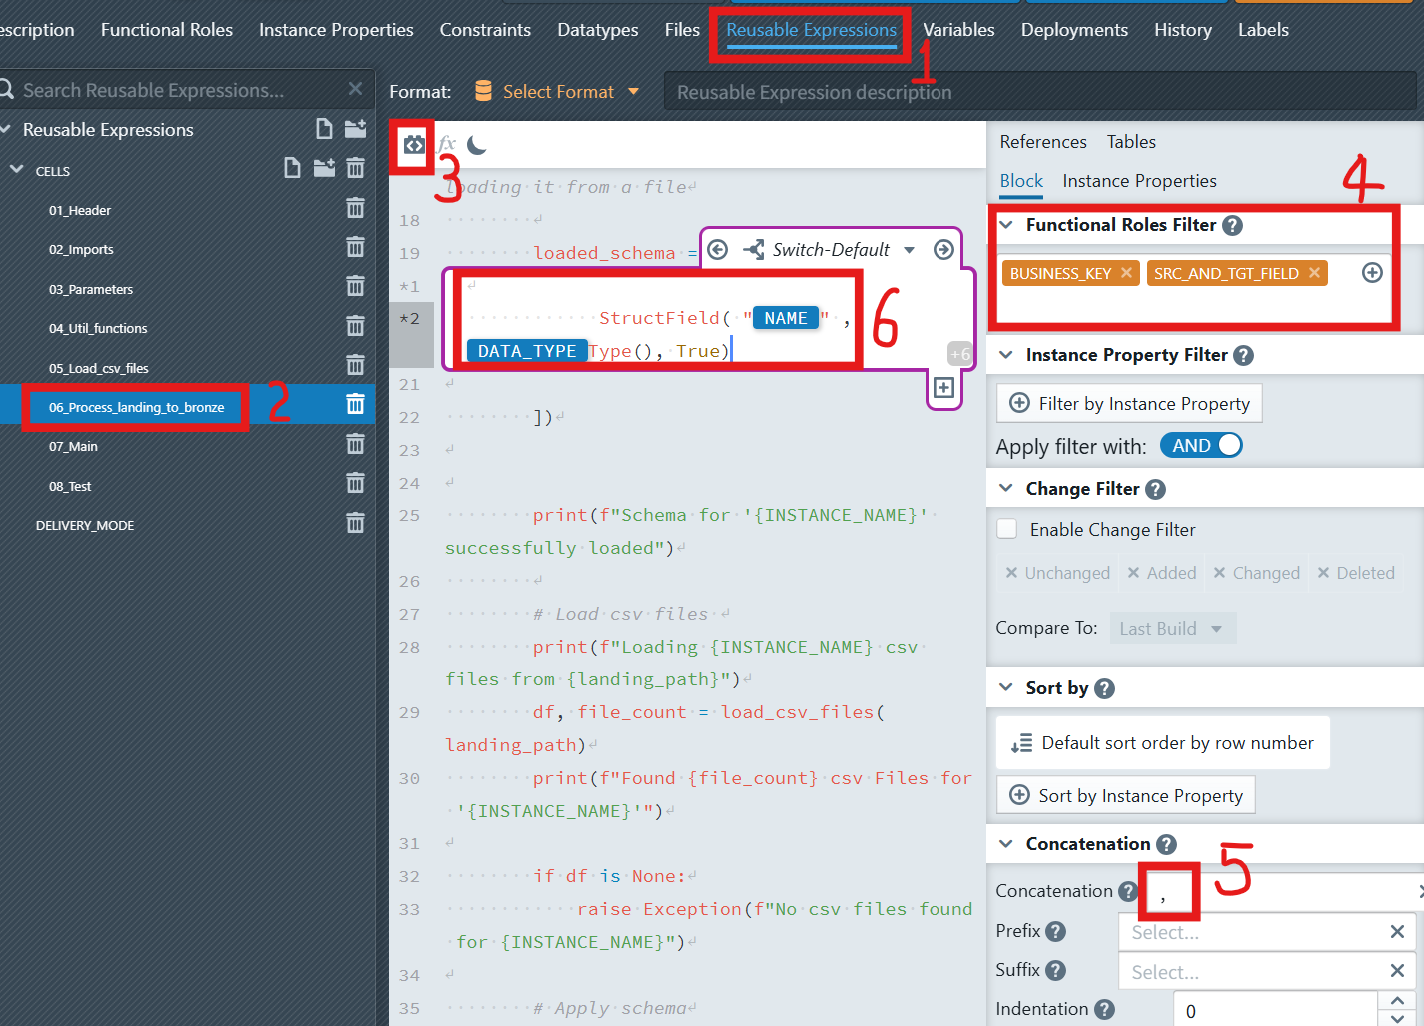
Step 2: Configure the Base Schema Structure
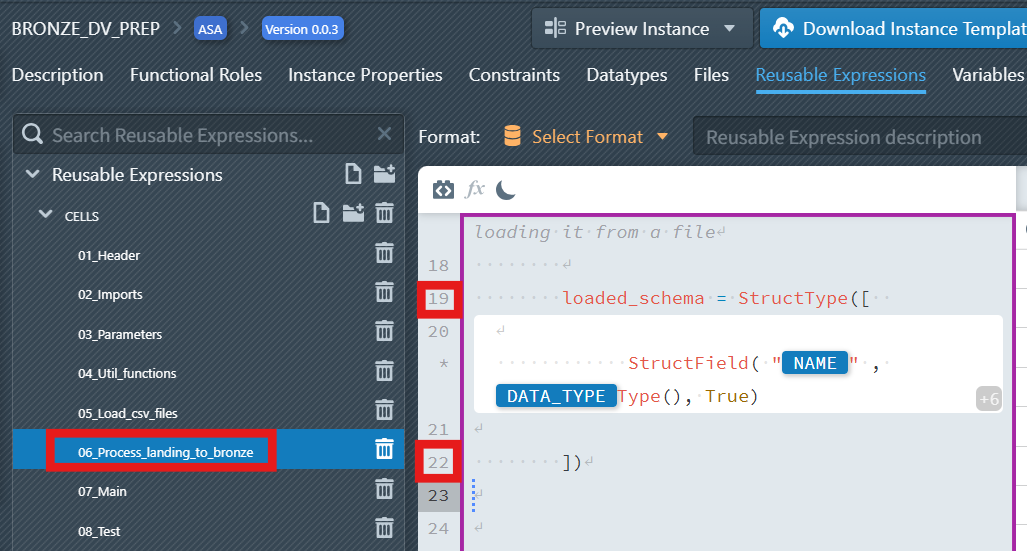
- Outside the expression block, define the base schema structure (as shown in lines 19 and 22 in the screenshot):
loaded_schema = StructType([
    # Schema fields will be defined here using Switch Cases
])
Why StructType: Apache Spark uses StructType to define the structure of DataFrames. This is like creating a blueprint that tells Spark exactly what to expect in each column - the column name, data type, and whether it can contain null values. Without this definition, Spark would have to guess the data types, often leading to incorrect interpretations and processing errors.
Step 3: Create the First Switch Case (StringType Fields)
In addition to the two default cases( Block-Default and Switch-Default), developers can create additional cases. In the expression block, click the plus sign icon
 below the expression block (Create new Switch Case). It will only be visible, when you place the cursor inside the block, so that the block becomes active (purple border is visible). A dialog will appear to configure your switch:
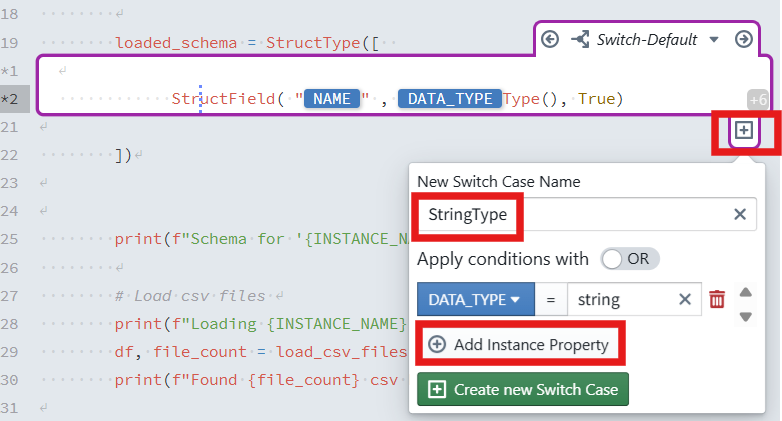
New Switch Name: Enter
StringType.Switch Cases: Keep
ORselected (you can chooseORorAND).Add Instance Property: A condition must be defined that must apply to a metadata row so that the case is applied to that row. The condition consists of an instance property, a comparison operator (=, !=, <, >, <=, >=), and a value. Click on
+ Add Instance Propertyand then selectDATA_TYPEfrom the dropdown, enterstringin the input.Click the + Create new Switch Case button. The case then appears in the editor.
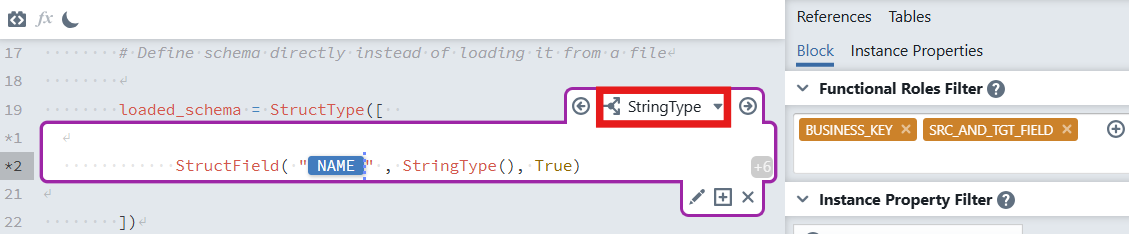
Inside this case
StringType, add:StructField("
NAME", StringType(), True)
Step 4: Complete the Schema with Additional Switch Cases
The Power of Completeness: Once you've created cases for all your data types, you'll have a truly dynamic schema that can handle any data source. This is the difference between a "one-off" script and a professional, enterprise-grade data processing pattern.
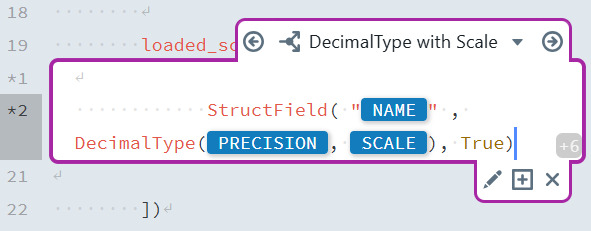
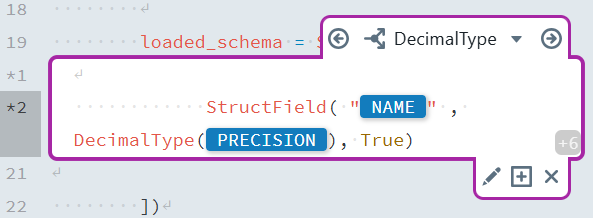
After creating the first Switch Case, you can add additional cases for different data types. Here's a reference table for the remaining Switch Cases:
| Switch Case Name | Condition | Content |
|---|---|---|
DecimalType with Scale | DATA_TYPE = decimal AND SCALE != <empty> | StructField("[NAME]", DecimalType([PRECISION],[SCALE]), True) |
DecimalType | DATA_TYPE = decimal | StructField("[NAME]", DecimalType([PRECISION]), True) |
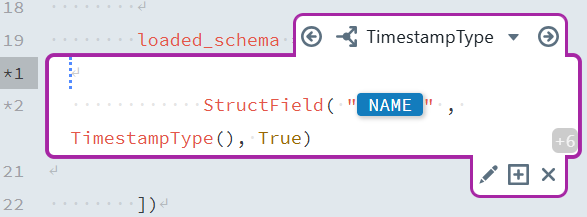
TimestampType | DATA_TYPE = timestamp | StructField("[NAME]", TimestampType(), True) |
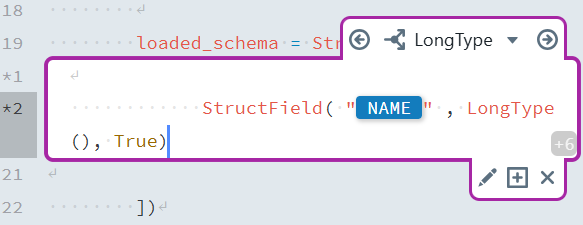
LongType | DATA_TYPE = long OR DATA_TYPE = bigint | StructField("[NAME]", LongType(), True) |
3.4 Additional Expression Blocks
The Modular Approach: After completing the loaded_schema block, you'll start to see how MetaKraftwerk's modular approach scales. Each expression block handles one specific concern, making your patterns easier to maintain, test, and reuse across different projects.
After completing the loaded_schema block, you can add other expression blocks for different parts of your notebook:
Hash Key Generation: The hash key uniquely identifies a business entity.
- Use an expression like:
pythondf_with_metadata = ( df_with_metadata.withColumn( "HASH_KEY", generate_md5_hash([ # insert Expression Block here "NAME" # instance property for the business key column name ]) ) )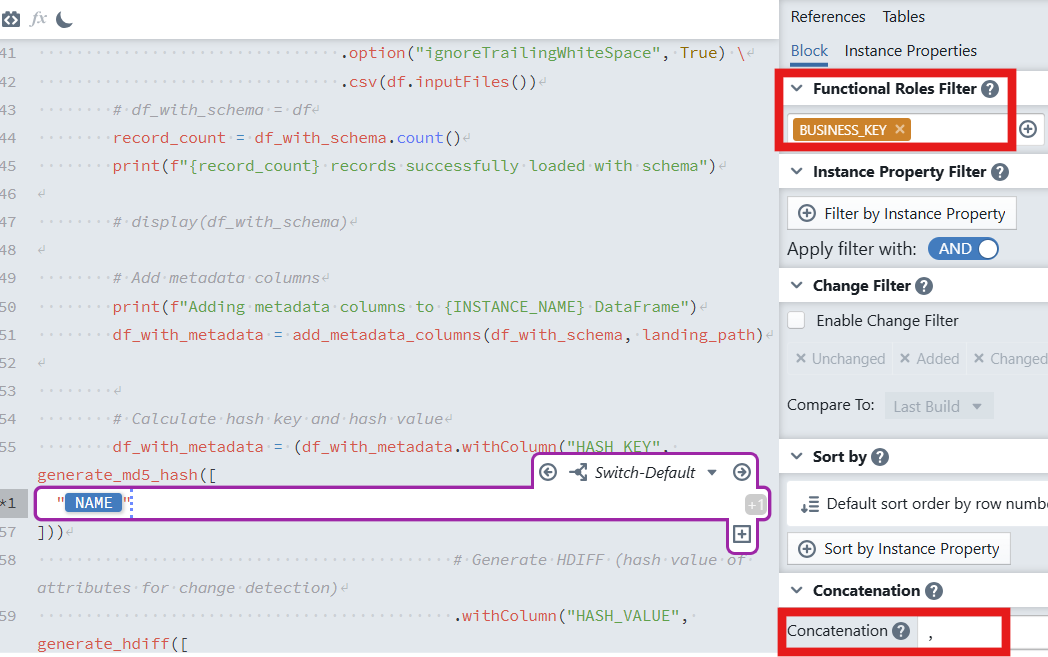
- In the expression block:
- Set Functional Roles Filter to
BUSINESS_KEY. - Set Concatenation to
,(comma). If multiple key columns exist, they will be concatenated in a stable order before hashing.
- Set Functional Roles Filter to
Explanation: the block iterates over rows matching the role
BUSINESS_KEYand injects the selected instance property (e.g.,NAME) intogenerate_md5_hash. When multiple business-key columns are present, they are concatenated with,and then hashed to produce a deterministicHASH_KEY.Hash Value Generation: The hash value captures changes in the non-key attributes.
- Use an expression like:
pythondf_with_metadata = ( df_with_metadata.withColumn( "HASH_VALUE", generate_hdiff([ # insert Expression Block here "NAME" # instance property; the block will expand to all SRC_AND_TGT_FIELD columns ]) ) )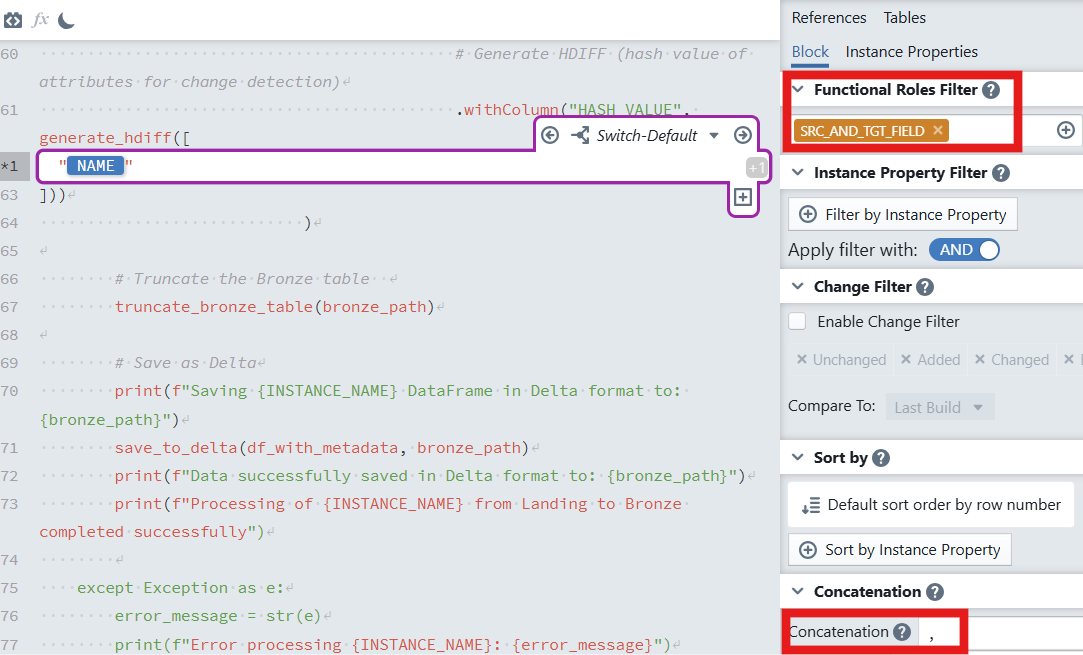
- In the expression block:
- Set Functional Roles Filter to
SRC_AND_TGT_FIELD. - Set Concatenation to
,(comma) so all attributes are combined in a consistent order.
- Set Functional Roles Filter to
Explanation: the block expands over all attributes marked with the functional role
SRC_AND_TGT_FIELD. These values are concatenated using,and hashed bygenerate_hdiff. Any change in any tracked attribute will result in a differentHASH_VALUE, enabling efficient change detection.
3.5 Assemble the Notebook from Reusable Expressions
In this subsection, you'll compose the final notebook by referencing the previously defined reusable expressions in sequence, producing an instance-ready notebook.
Once your reusable expressions are defined, you do not handwrite a long monolithic notebook. Instead, select the target notebook file in the Files editor and reference the reusable expressions in the desired order. The final notebook is produced by concatenating the referenced reusable expressions with their resolved metadata.
Note
Please note that when you click the blue icon ![]() landing_2_bronze in the pattern section of the sidebar, the file that opens by default under the "Files" option is the active file. You must always pay attention to which file is the "active" file mapped in the pattern, this is the file required for the build and where you must place the final code version.
landing_2_bronze in the pattern section of the sidebar, the file that opens by default under the "Files" option is the active file. You must always pay attention to which file is the "active" file mapped in the pattern, this is the file required for the build and where you must place the final code version.
Recommended order (as shown in the screenshot):
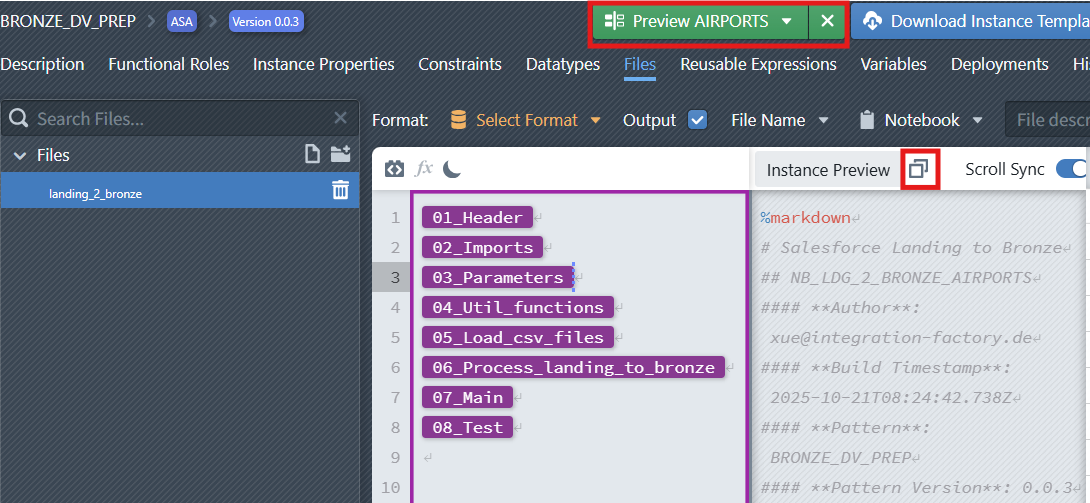
01_Header02_Imports03_Parameters04_Util_functions05_Load_csv_files06_Process_landing_to_bronze07_Main08_Test(optional)
This approach keeps logic modular and makes it easy to reuse the same expressions across multiple patterns or instances.
4. Adjust File Settings
Now after we have implemented the notebook, we have to do the following:
- Check that the
Outputcheckbox is selected for our notebook file, otherwise the file will not be part of the build results - Define
Notebookas the type of the file. - Define a dynamic naming rule for the notebook file (e.g., NB_LDG_2_BRONZE_
INSTANCE_NAME.json). Click on theFile Namebutton to open the naming editor of the file (see screenshot below). Make sure to activate theDynamic Namecheckbox.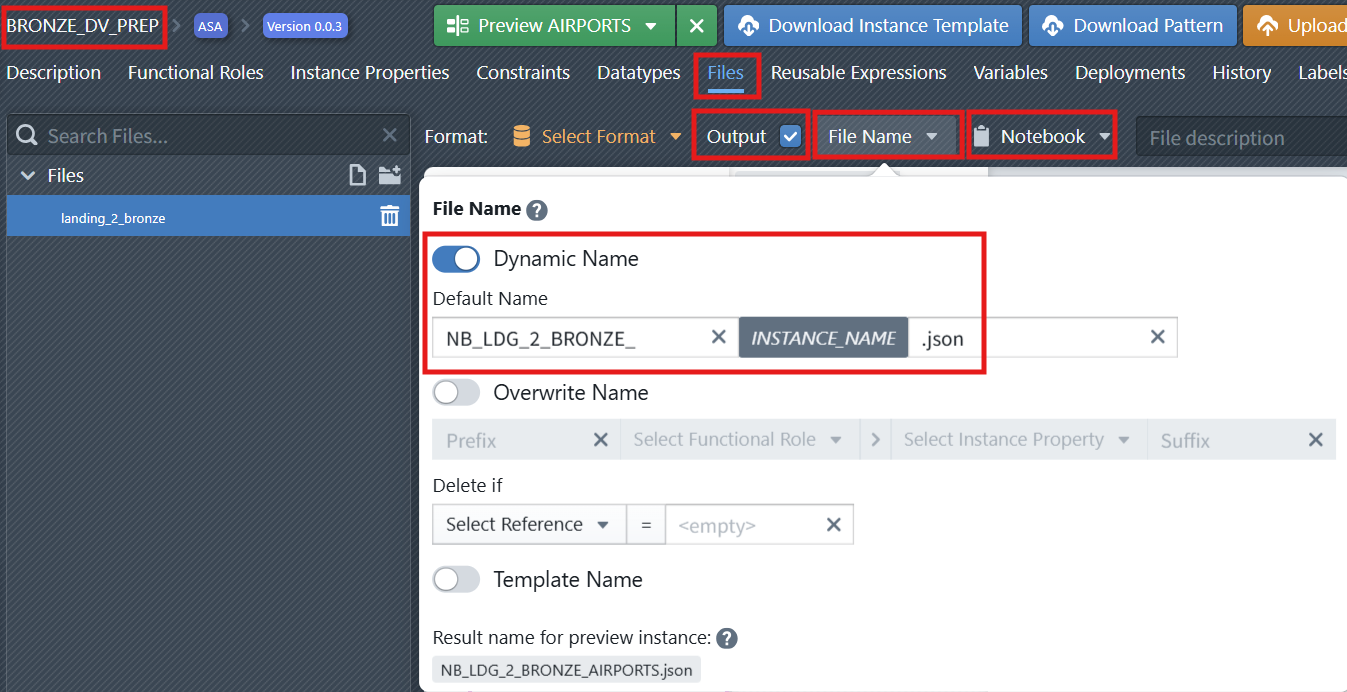
5. Preview the Generated Notebook
The Preview feature allows you to generate and inspect the code of a selected instance before deploying it to a target platform. This helps validate the logic, review script details, and test the outcome in a controlled way.
To preview an instance:
In the File Editor, choose the file you want to inspect.
At the top-right of the interface, click the
Preview Instancedropdown.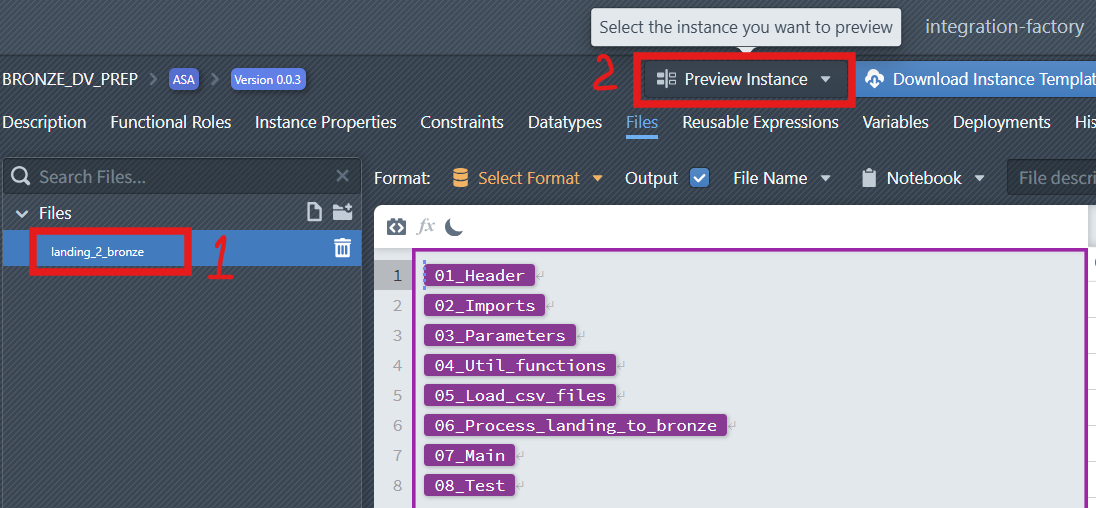
From the list, select the Instance you want to preview.
The system will generate the corresponding preview, which is displayed on the right-hand side of the editor.
From here, you can see and copy the previewed code and use it on the target platform (e.g., for testing or validation purposes) without committing the pattern.