 MetaKraftwerk
Part 7(optional): Add a dynamic markdown header
A dynamic markdown header turns your notebook’s first cell into living documentation. It shows who built the artifact, when it was generated, which pattern and instance were used, and the release. This creates immediate context for reviewers and operators and prevents “which version is this?” confusion.
1. What you will build
A reusable expression
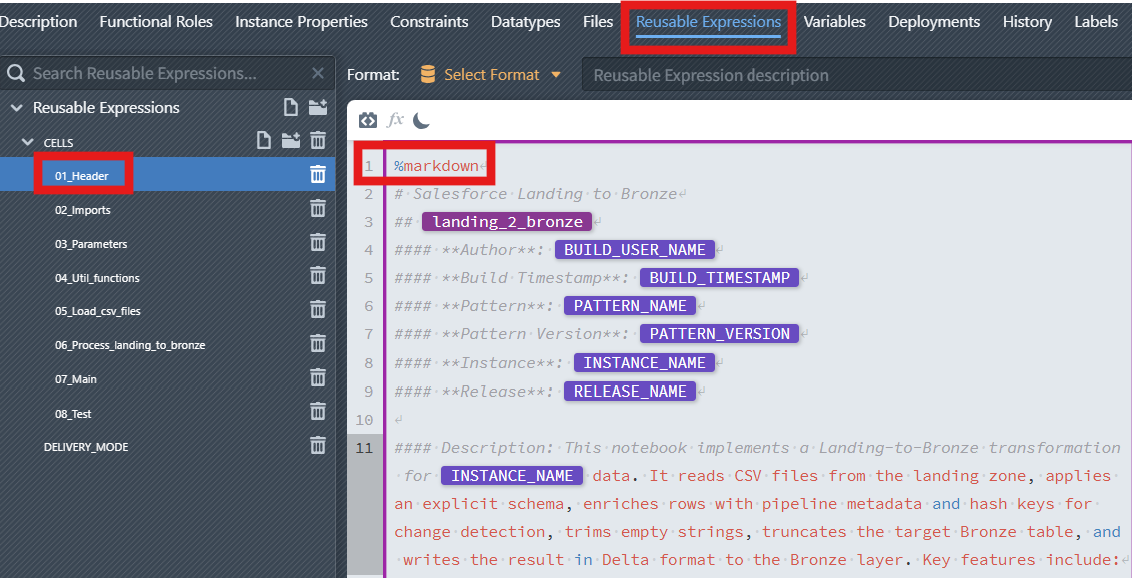
01_Headerthat uses%markdownDynamic placeholders (References) such as
BUILD_USER_NAME,BUILD_TIMESTAMP,PATTERN_NAME,PATTERN_VERSION,INSTANCE_NAME,RELEASE_NAMETable snippet documenting the generated schema and key columns
2. Where the dynamic values come from
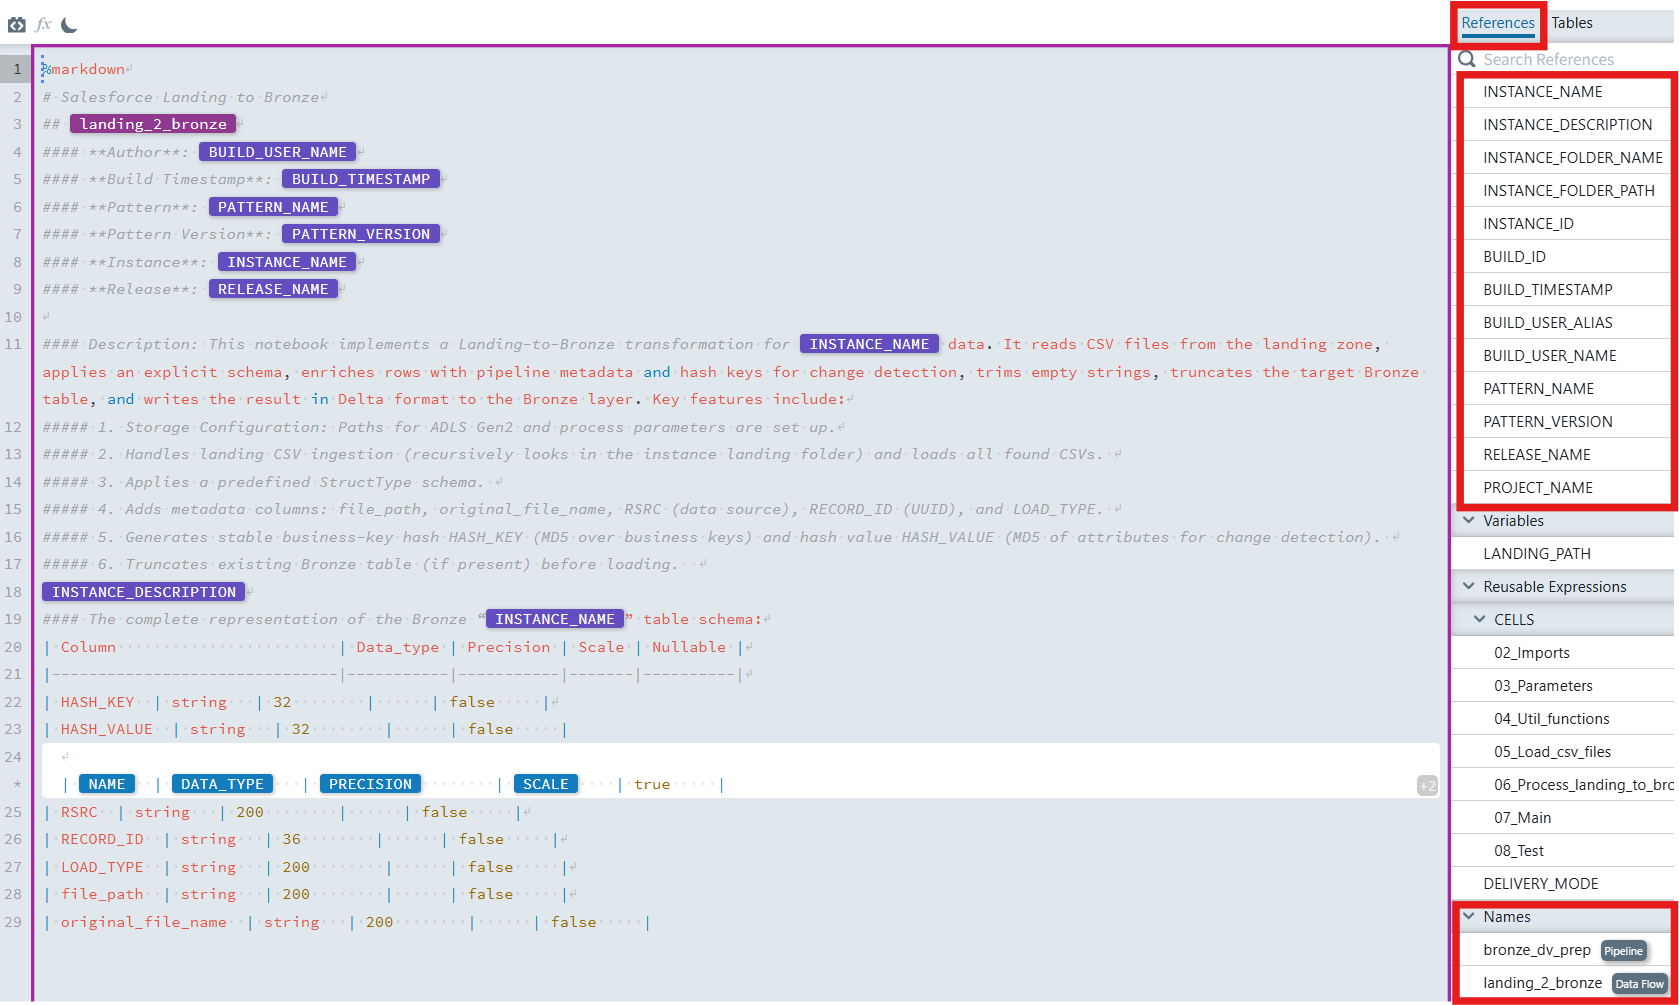
The File Editor exposes build- and instance-scoped references on the right side. You insert them by typing the token name and selecting the suggestion. They are resolved during build or preview.
3. Steps
Open
Reusable Expressionsand create01_Headerinside theCELLSfolder (see details in Part 5 - 3.1 Build the Reusable Expressions).Set the cell format indicator to
%markdown.Copy & paste your header content from your notebook file and insert references for user, timestamp, pattern, instance, and release by selecting them from the suggestions.
Example header structure:
The following shows the original header structure. The placeholders in angle brackets
<...>shoud be replaced by references in MetaKraftwerk.txt# Salesforce Landing to Bronze ## <landing_2_bronze> #### **Author**: <BUILD_USER_NAME> #### **Build Timestamp**: <BUILD_TIMESTAMP> #### **Pattern**: <PATTERN_NAME> #### **Pattern Version**: <PATTERN_VERSION> #### **Instance**: <INSTANCE_NAME> #### **Release**: <RELEASE_NAME> #### Description: This notebook implements a Salesforce Landing-to-Bronze transformation for <INSTANCE_NAME> data. It reads CSV files from the landing zone, applies an explicit schema, enriches rows with pipeline metadata and hash keys for change detection, truncates the target Bronze table, and writes the result in Delta format to the Bronze layer. Key features include: ##### 1. Storage Configuration: Paths for ADLS Gen2 and process parameters are set up. ##### 2. Handles landing CSV ingestion (recursively looks in the instance landing folder) and loads all found CSVs. ##### 3. Applies a predefined StructType schema. ##### 4. Adds metadata columns: file_path, original_file_name, RSRC (data source), RECORD_ID (UUID), and LOAD_TYPE. ##### 5. Generates stable business-key hash HASH_KEY (MD5 over business keys) and hash value HASH_VALUE (MD5 of attributes for change detection). ##### 6. Truncates existing Bronze table (if present) before loading. <INSTANCE_DESCRIPTION> #### The complete representation of the Bronze <INSTANCE_NAME> table schema: | Column | Data_type | Precision | Scale | Nullable | |-------------------------------|-----------|-----------|-------|----------| | HASH_KEY | string | 32 | | false | | HASH_VALUE | string | 32 | | false | <add_expression_block_here> | RSRC | string | 200 | | false | | RECORD_ID | string | 36 | | false | | LOAD_TYPE | string | 200 | | false | | file_path | string | 200 | | false | | original_file_name | string | 200 | | false | <or_add_expression_block_here>Add a short description and a compact schema summary for fast reading. Add technical columns, such as HASH_KEY, HASH_VALUE, etc., must be statically entered before the expression block so that the entire schema can adapt. Then insert an expression block to display the schema information for all the columns.
Create the expression block
Expand over all attributes using instance metadata, so types and nullability adapt per table.
Steps:
Place the cursor inside the table , at the position where dynamic columns should be generated (e.g., where the placeholder
<add_expression_block_here>is located).click the Add Expression Block icon
 in the editor toolbar to insert a new expression block. The new expression block will appear with a purple border, indicating it's active and ready for configuration.
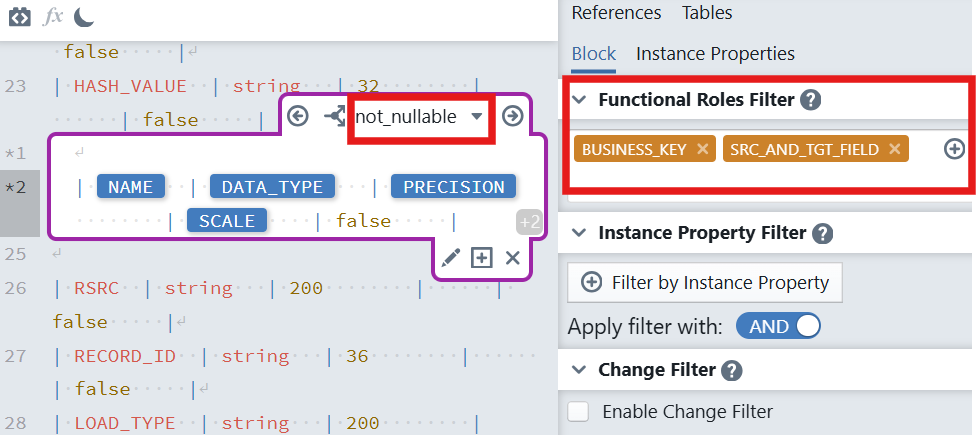
In the block settings panel on the right, configure:
Functional Roles Filter : Select the functional role
BUSINESS_KEYandSRC_AND_TGT_FIELD.Why: You often need to see both keys and attributes when generating schemas or hashes; this filter restricts the rows the block will iterate over.
In the Switch-Default block content enter the default template:
txt(A Enter key here) | [NAME] | [DATA_TYPE] | [PRECISION] | [SCALE] | true |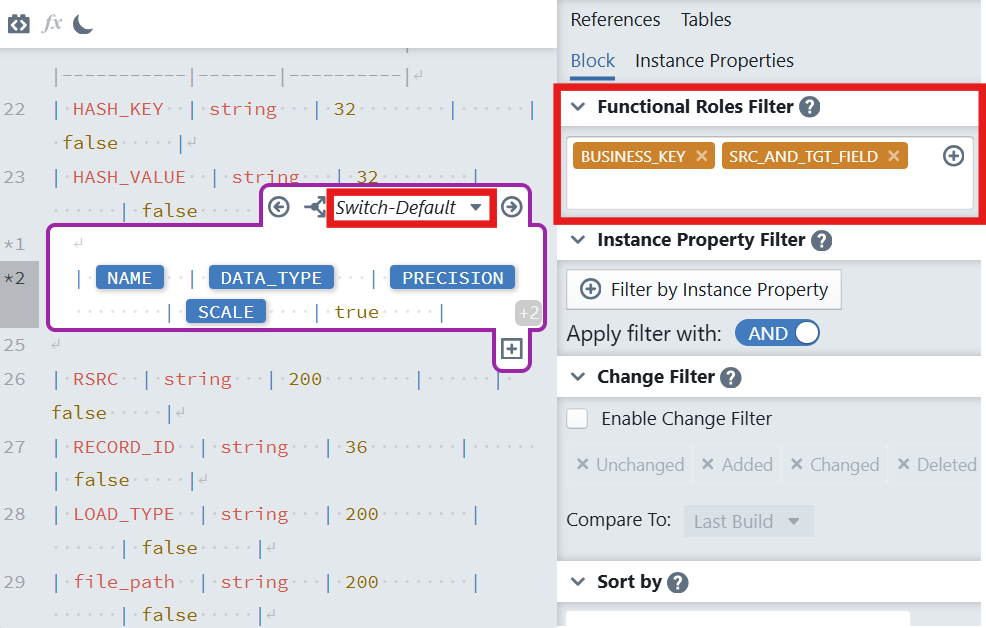
Add a Switch Case for nullability
Override the default when a column is not nullable according to metadata.
Steps:
- In the expression block, click the plus sign icon
 below the expression block (Create new Switch Case). It will only be visible, when you place the cursor inside the block, so that the block becomes active (purple border is visible). A dialog will appear to configure your switch:
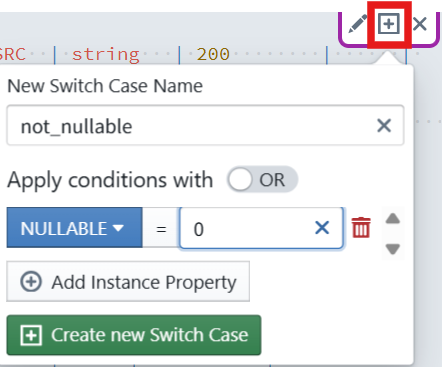
- New Switch Name: Enter
not_nullable. - Switch Cases: Keep
ORselected (you can chooseORorAND). - Add Instance Property: A condition must be defined that must apply to a metadata row so that the case is applied to that row. The condition consists of an instance property, a comparison operator (=, !=, <, >, <=, >=), and a value. Click on
+ Add Instance Propertyand then selectNULLABLEfrom the dropdown, enter0in the input. - Click the + Create new Switch Case button. The case then appears in the editor.
- Inside this case
not_nullable, add:
txt(A Enter key here) | [NAME] | [DATA_TYPE] | [PRECISION] | [SCALE] | false |- In the expression block, click the plus sign icon
Save. Later, reference
01_Headerat the top of your notebook file in the Files editor.