 MetaKraftwerk
Merging two commits of an instance
When an instance is developed in parallel in two or more releases, it is easy for the states of the instance to differ between the releases. A field that was added in a hotfix release, for example, should now also be included in the next release. It can also happen that one and the same field has been changed, e.g. if the precision has been increased by 10 in one release and by 5 in another release. In order to re-establish a common consensus from which the development of the instance can continue, it is necessary to merge two states of an instance from two releases. This is done in MetaKraftwerk by means of a merge editor. In this editor a commit of another release is merged with the last commit of the current release. The editor allows you to apply changes from either the current commit (left) or the merged commit (right). After two commits have been merged, the commit graph is also merged again. A new commit is created that has the two remembered commits as parent nodes.
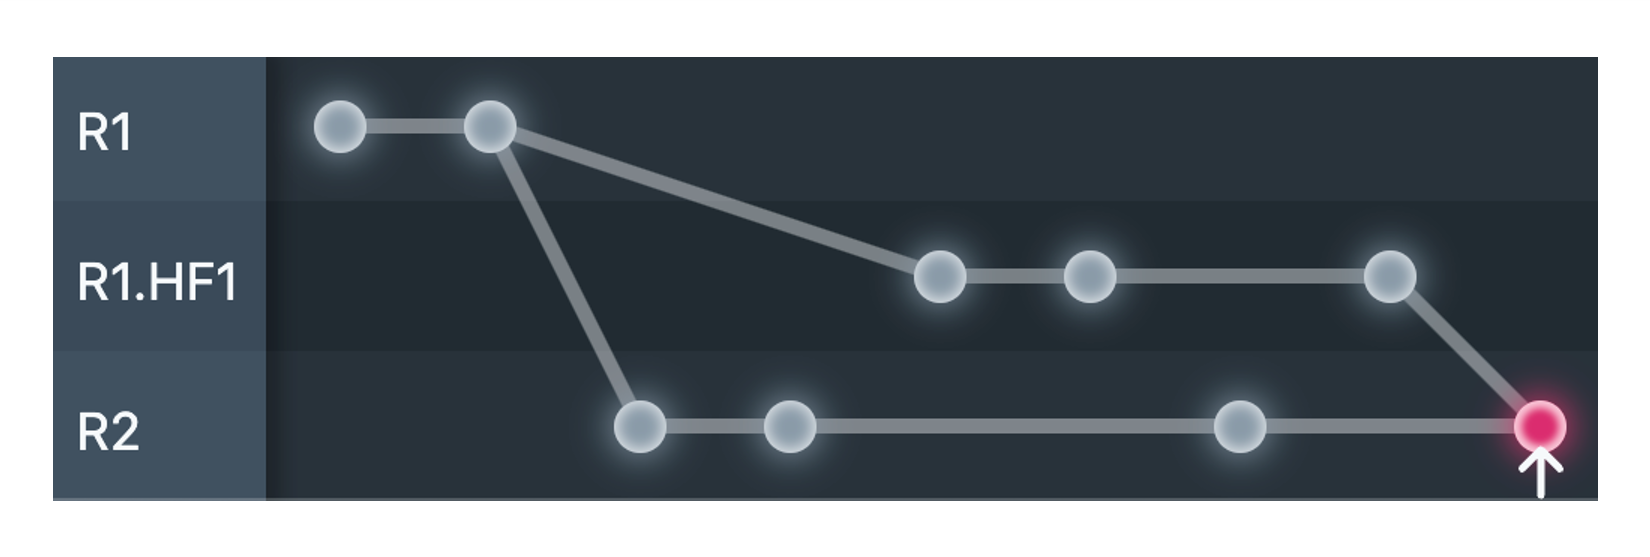
The following diagram shows a typical situation: Development is actually already taking place in Release R2, but changes had to be made subsequently in Release R1, and a hotfix release was created for this purpose (R1.HF1) in order to incorporate the fixes there. Now these changes are to be taken over in R2.
As with Git, to determine the relevant changes, a so-called "best common ancestor" (also called merge base (git-scm.com)), i.e. the best common parent commit of the two marked commits, is used. In the above diagram, this is the last commit in R1. Basically, you can say that a commit is searched for in the history that is a predecessor of both commits and that is as close as possible to these two. The selection is done automatically and transparent for the user.
Start of a merge
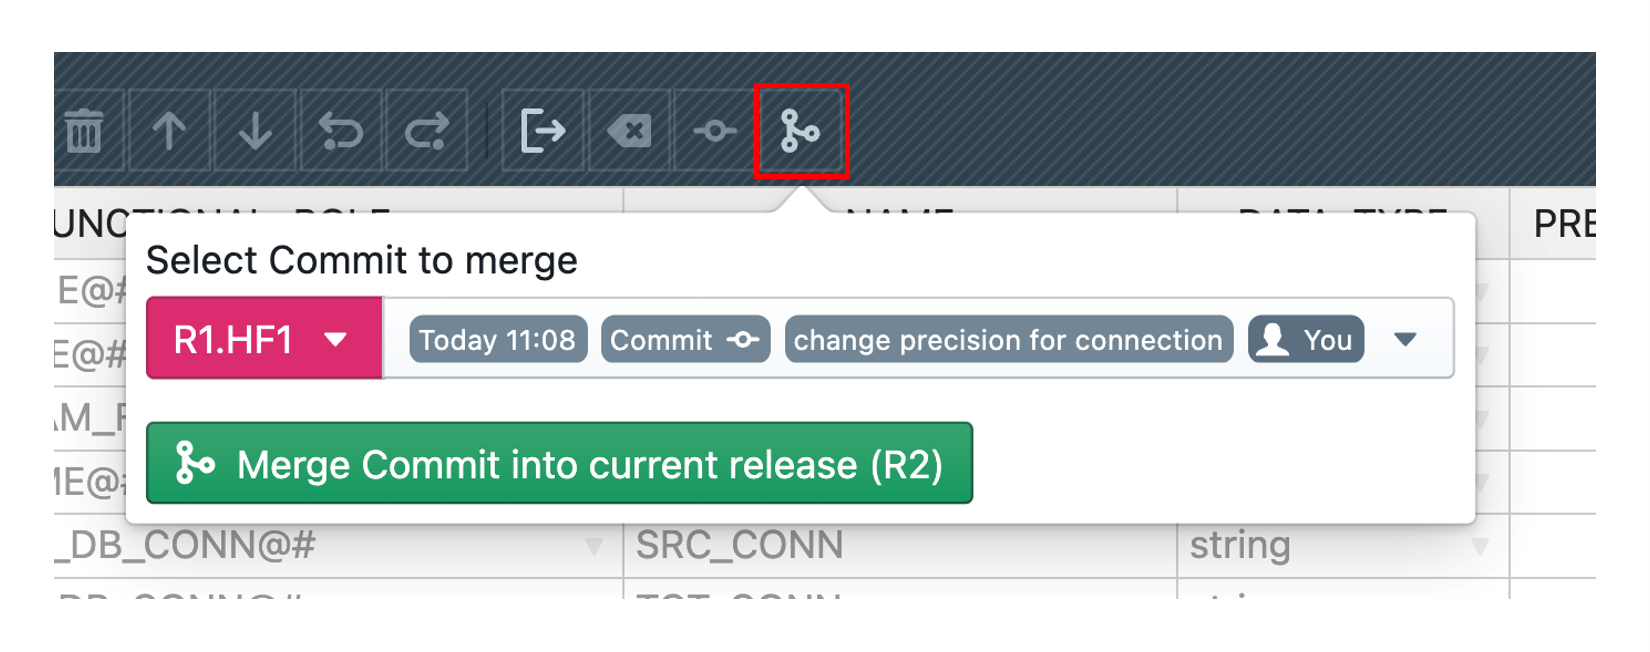
To start a merge process, you have to switch to the release in which the commit state resulting from the merge is to be saved later, i.e. release R2 in the example above. Then open the instance and click on the Merge button in the toolbar. In the popup that appears, first select another release and then a commit that should be merged into the current one. In the example this is the last commit of R1.HF1. After clicking on "Merge Commit into current release" the merge view is opened, which is explained in the next section.
How the merge view works
The merge view is used to determine a merged commit from two commits. The user is given the option of selecting changes from the current release and the selected commit, either individually or globally.
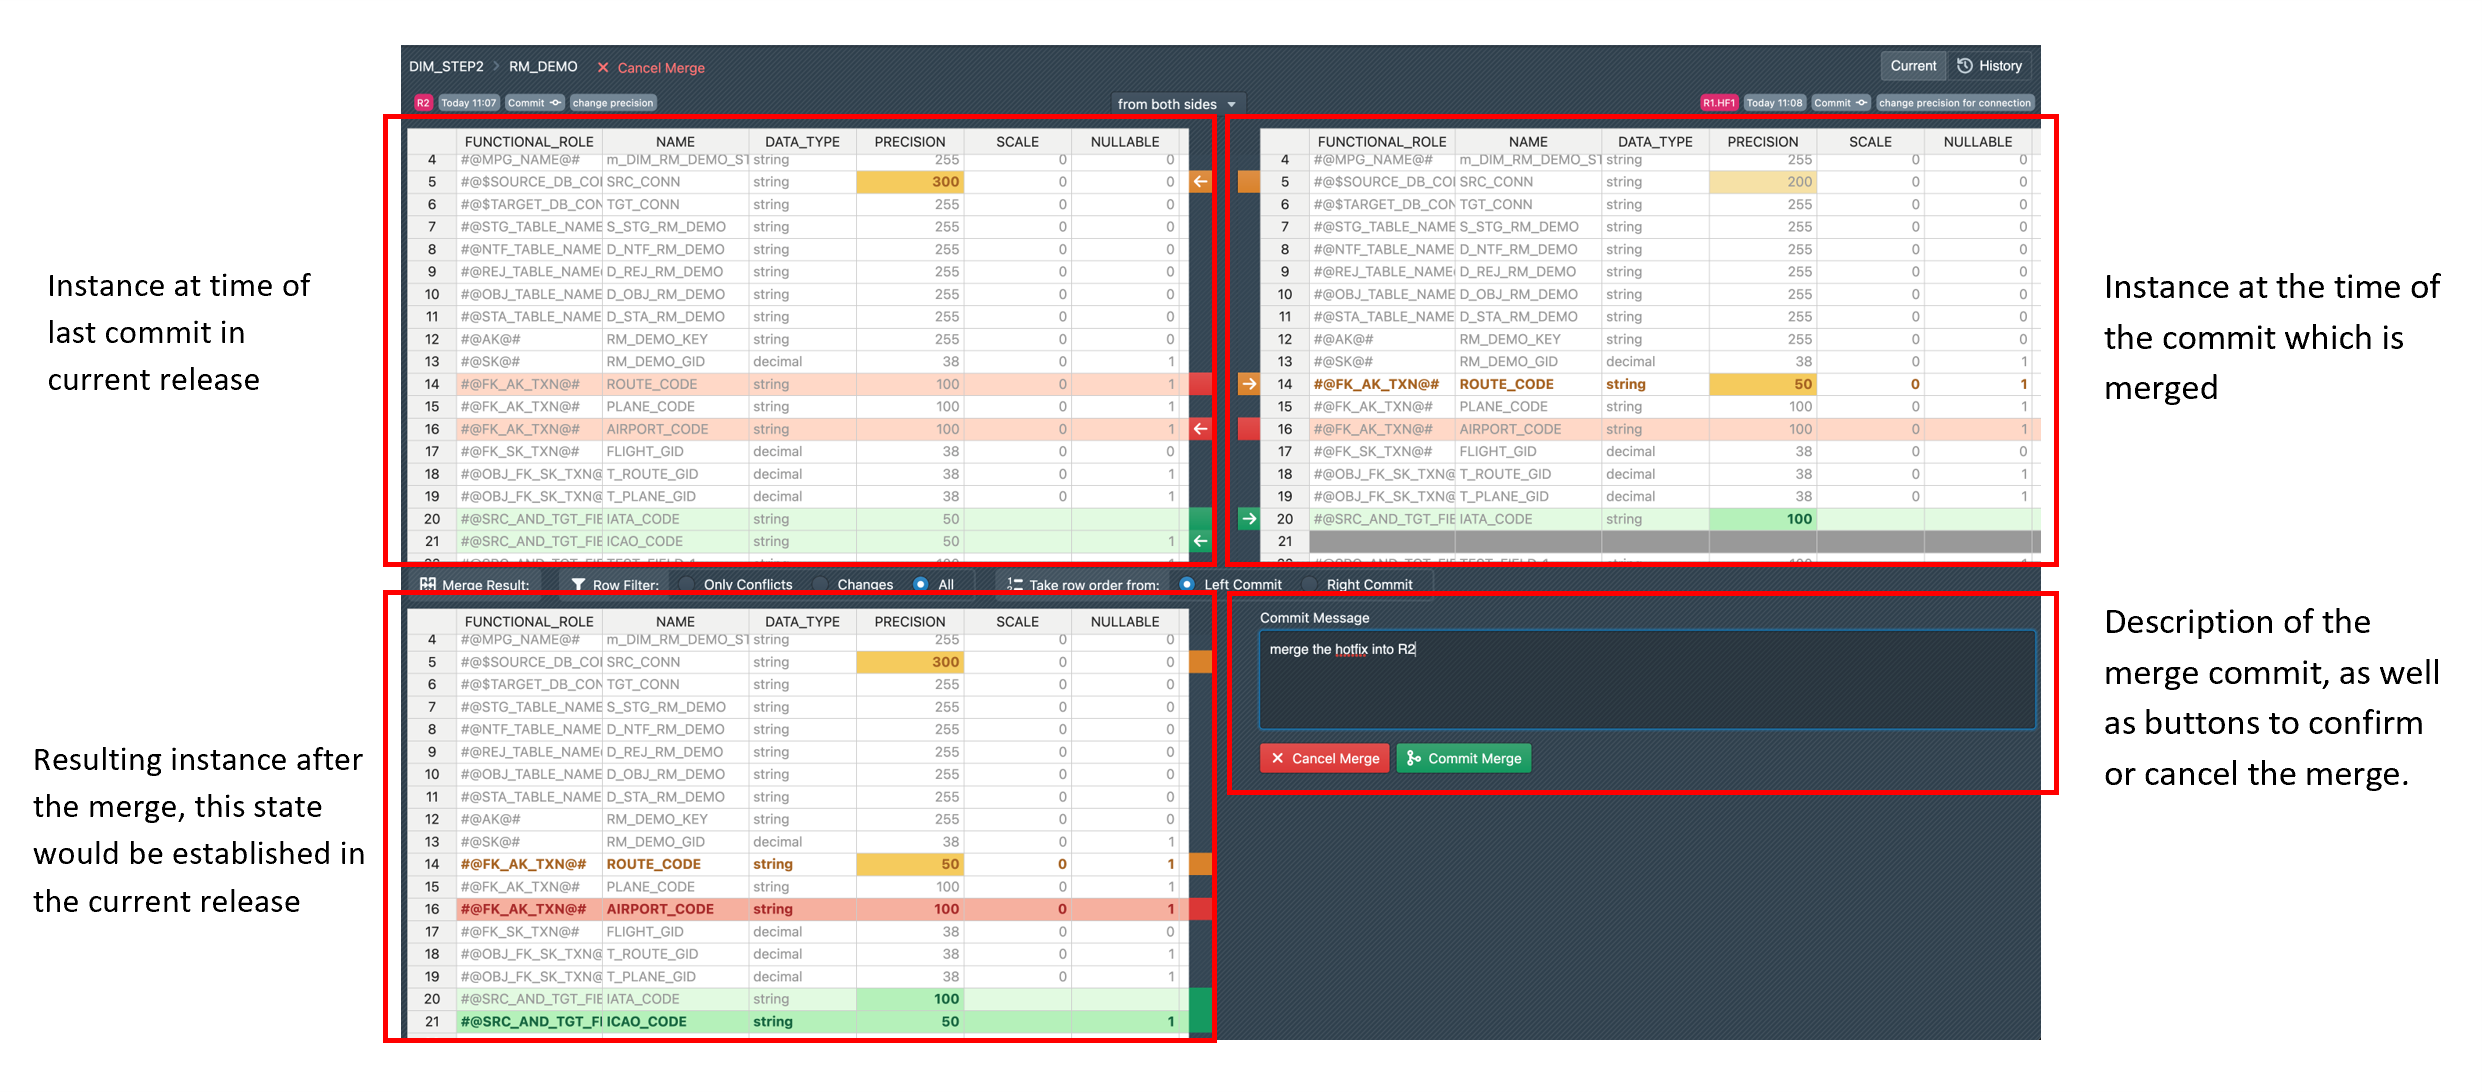
The view is roughly divided into four areas. At the top left are the changes that have taken place in the current release since the common predecessor (merge base) of the two merged commits. Similarly, the changes in the selected commit are shown in the upper right. At the bottom left, there is a preview showing how the instance would look after the merge, taking into account the user selection. At the bottom right there is a text field to enter a description of the merge commit and buttons to either complete or cancel the merge.
In the first three areas there is an intuitive color coding for the changes: green lines are lines that were added, red lines were deleted and orange cells were changed.
Now, in order to select the desired changes as a user, you have three different options:
- Via the selection which is located in the top center above the tables, it is possible to decide globally for the left or right side. The previous selection will be overwritten for all changed rows.
- A bit more fine-grained, you can make a selection for a single line by clicking on the corresponding page using the buttons/arrows, which are located vertically in the middle of each line.
- The most fine-grained selection is possible by clicking directly in certain cells of the table. For example, it is possible to select a value in row 5, column DATA_TYPE on the left side and a value in row 5, column PRECISION. Thus, a new row is created from the combination of individual values.
It is important to note that the user only has to make a selection in the event of a merge conflict. If a line has no change in both commits, or only in one commit, the change is automatically applied. Thus it can be also that for a Merge no user specification is necessary, except for the obligatory description.
Since not all lines of an instance are of importance for the merge, it is possible to restrict what one gets to see in the merge view. You can choose the "Row Filter" between:
• Only Conflicts: Only the merge conflicts for which user selection is necessary are displayed
• Changes: All changed lines are displayed, even those where a canonical merge is performed
• All: All lines of the instance are displayed

Another special feature of the merge view is that it also takes into account the order of the rows/fields. Because this can of course have changed just like the values in a release. Via the selection "Take row order from" you can decide whether the order should be taken from the left or from the right, which then also leads directly to the corresponding display in the tables.

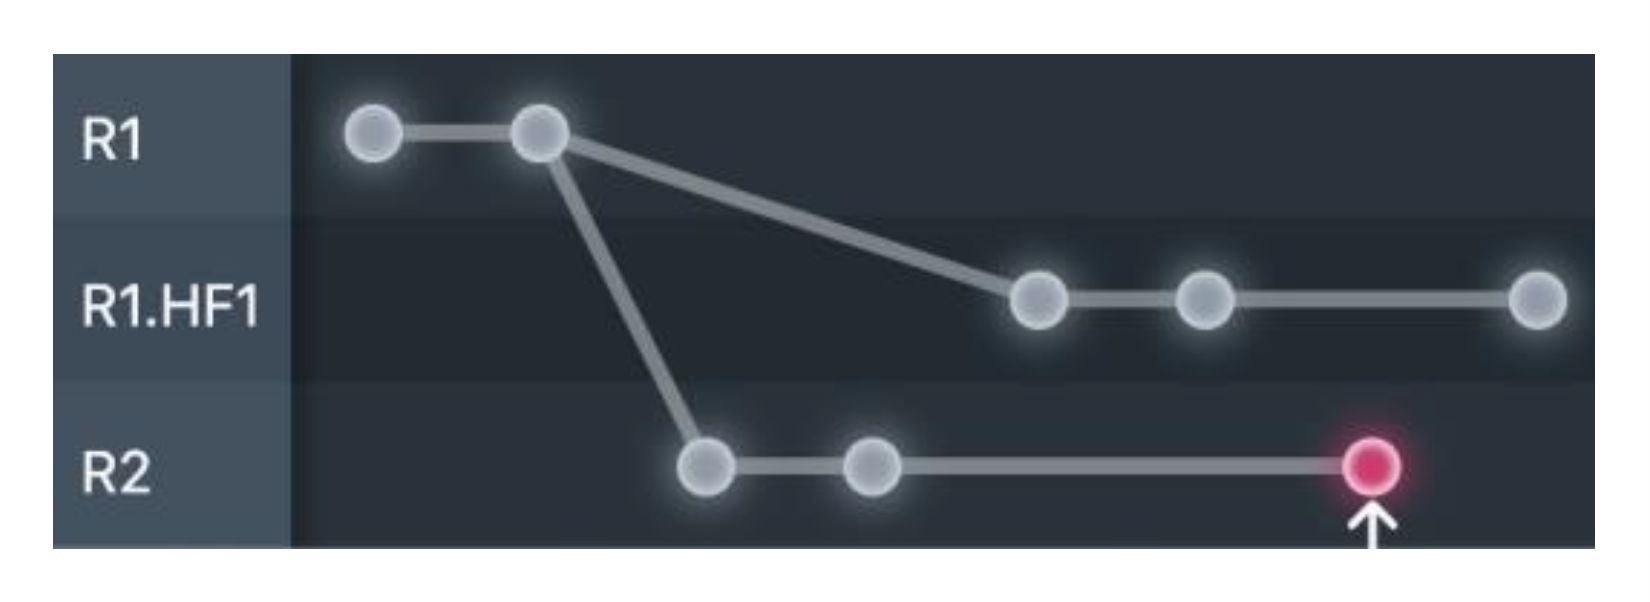
After the merge is committed, we find the instance from the above example in the following state. A new (merge) commit has been created, which is composed of the two merged commits.