Release Management
Overview
Release Management in MetaKraftwerk provides built-in functionality similar to version management systems like Git or SVN. It enables teams to manage different releases within a project and supports concurrent development of instance metadata. This system handles common project scenarios such as hotfixes in previous releases and allows merging of instance versions from different releases.
The instance data is stored historically by MetaKraftwerk, providing full version control similar to Git/SVN. Each build commits the data, and commits can be compared to track changes. Lines added, changed, or deleted relative to any commit are highlighted for easy identification.
Core Concepts
Release Groups
 Release groups serve as logical containers for organizing related releases. Each release group has a concise name and can be created by users with appropriate rights in the Admin Console. When created, each release group automatically includes a "Default Release" that cannot be deleted.
 Release States
Each release can exist in two states throughout its lifecycle:
- Open - Active development phase where instances can be added, edited, built, and deleted
- Closed - Locked state where instances can only be viewed; their state is frozen
- Temporary Reopening - Closed releases can be temporarily reopened when needed
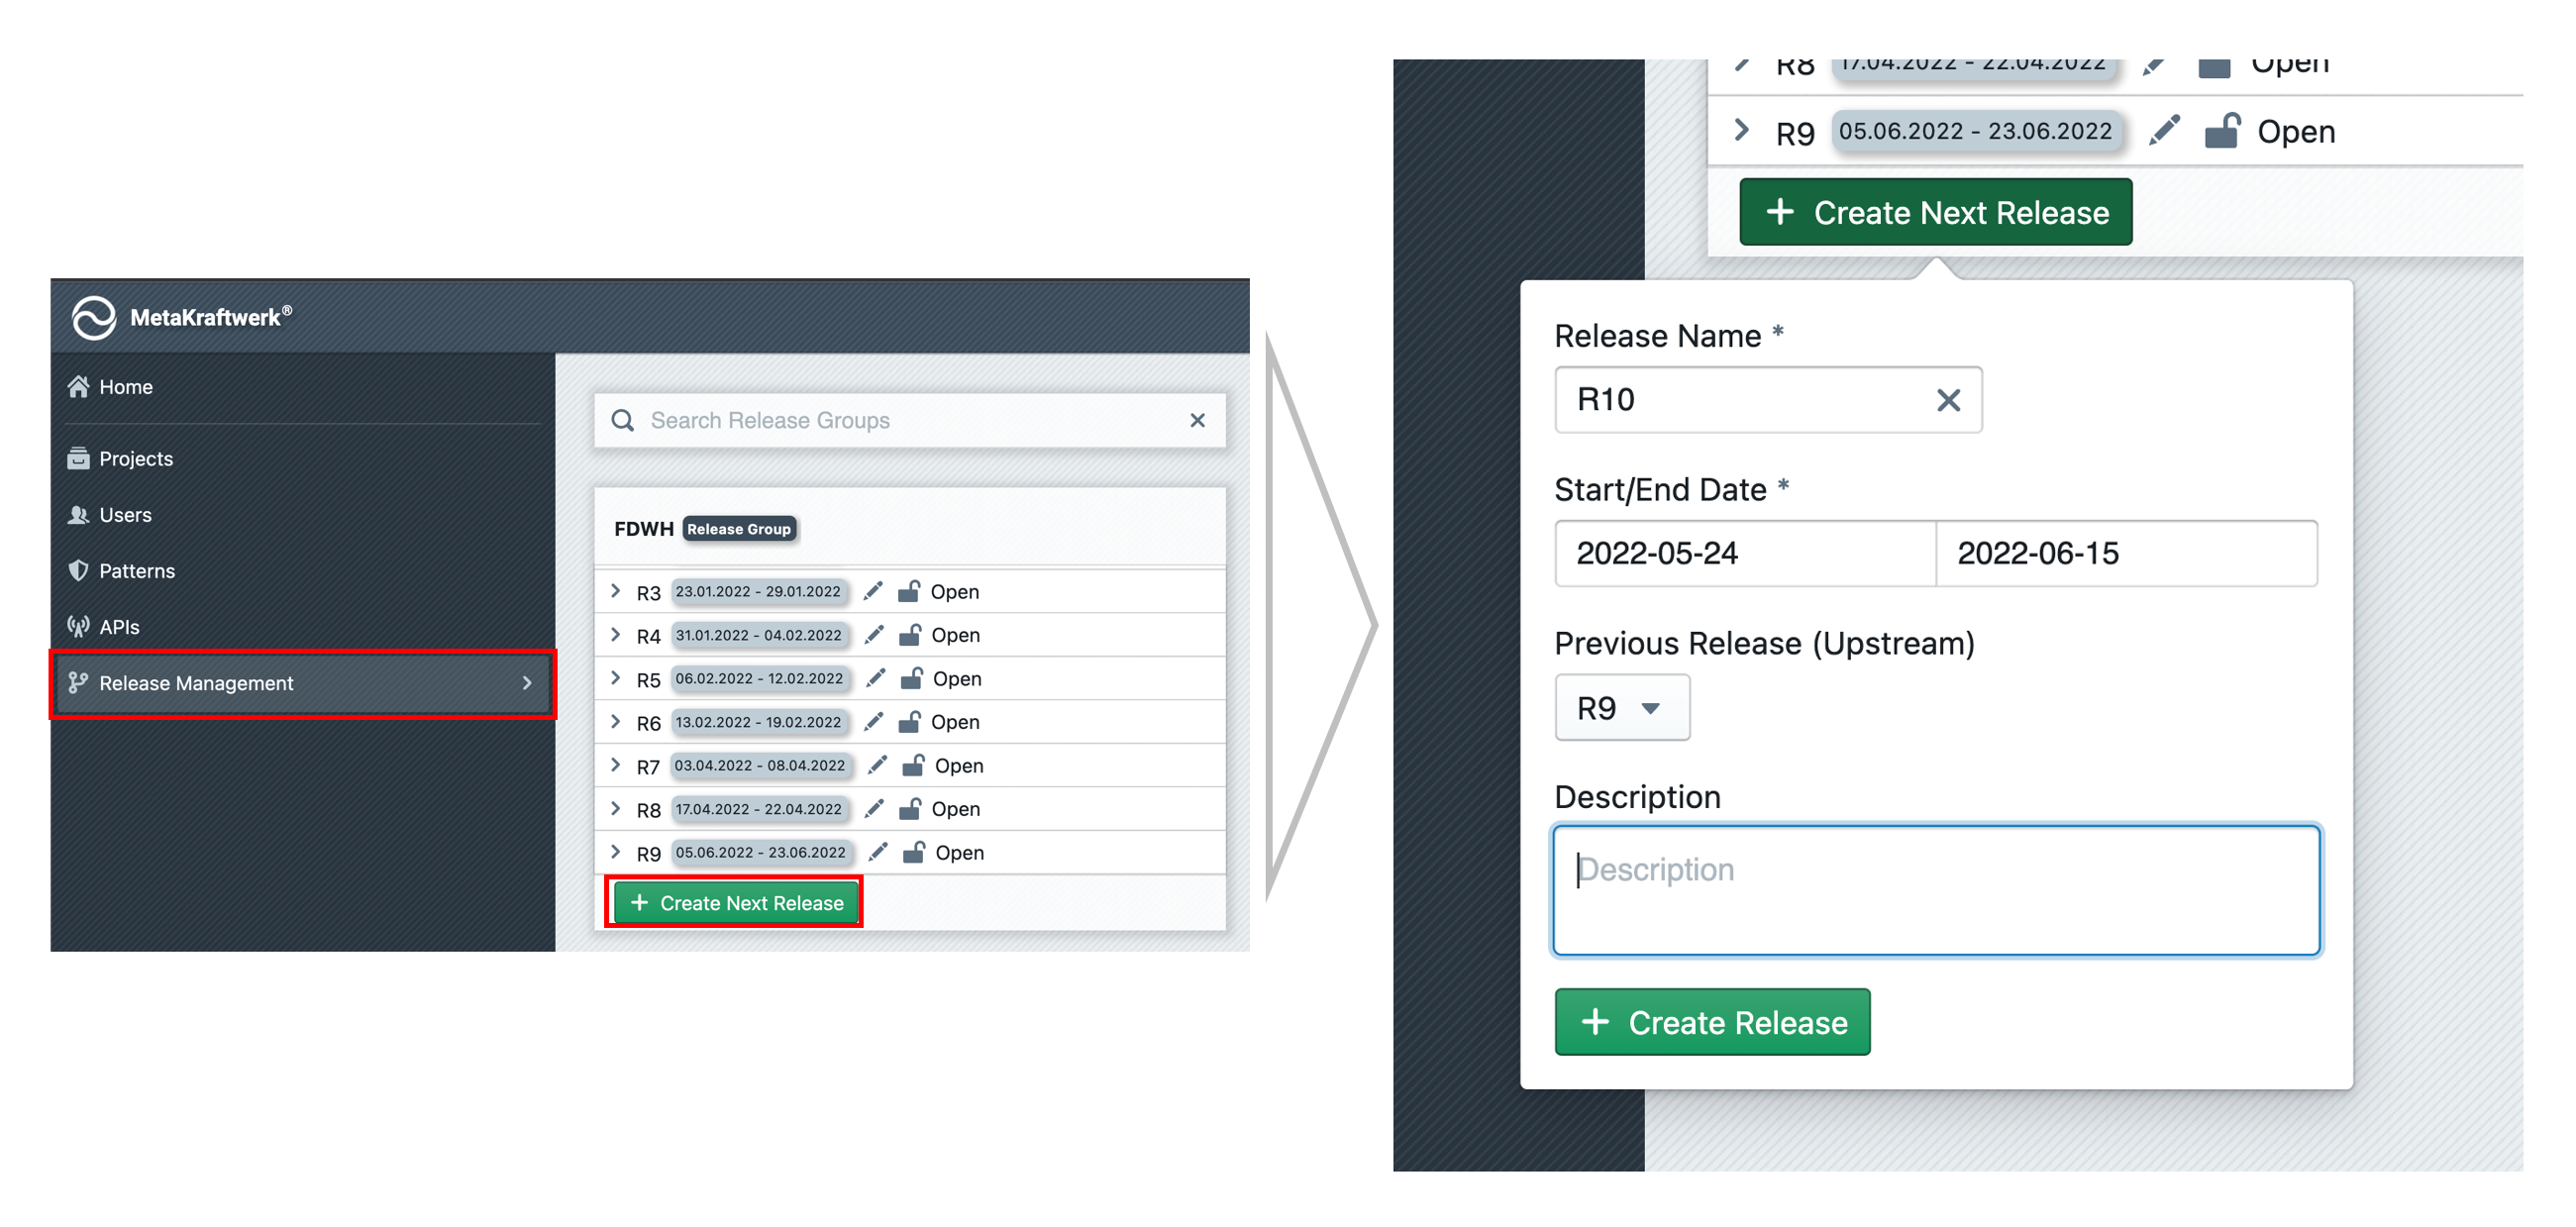
Release Creation
New releases are created using the + Create Next Release button, requiring:
- Release Name: Descriptive identifier for the release
- Date Range: Start and end dates for release planning
- Previous Release: Reference to upstream release for branching (defaults to most recent)
The previous release selection is crucial as MetaKraftwerk uses it to determine the base state when adding instances to new releases.
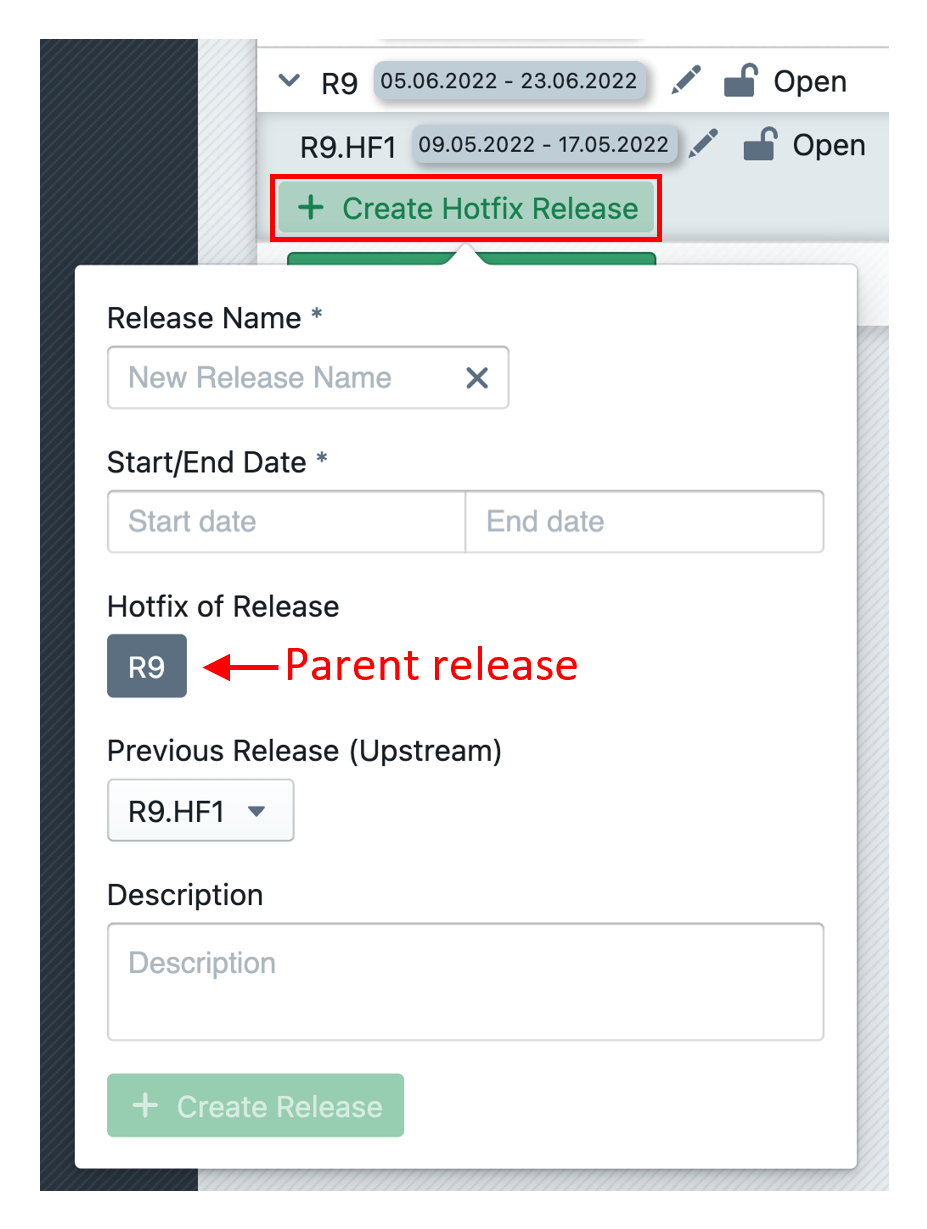
Hotfix Releases
Special hotfix releases can be created as subordinates to main releases:
- Only parent release or other hotfixes under the same parent can be selected as previous release
- Creates logical subgroups for organized hotfix management
- Enables structured handling of urgent fixes
Pattern Assignment
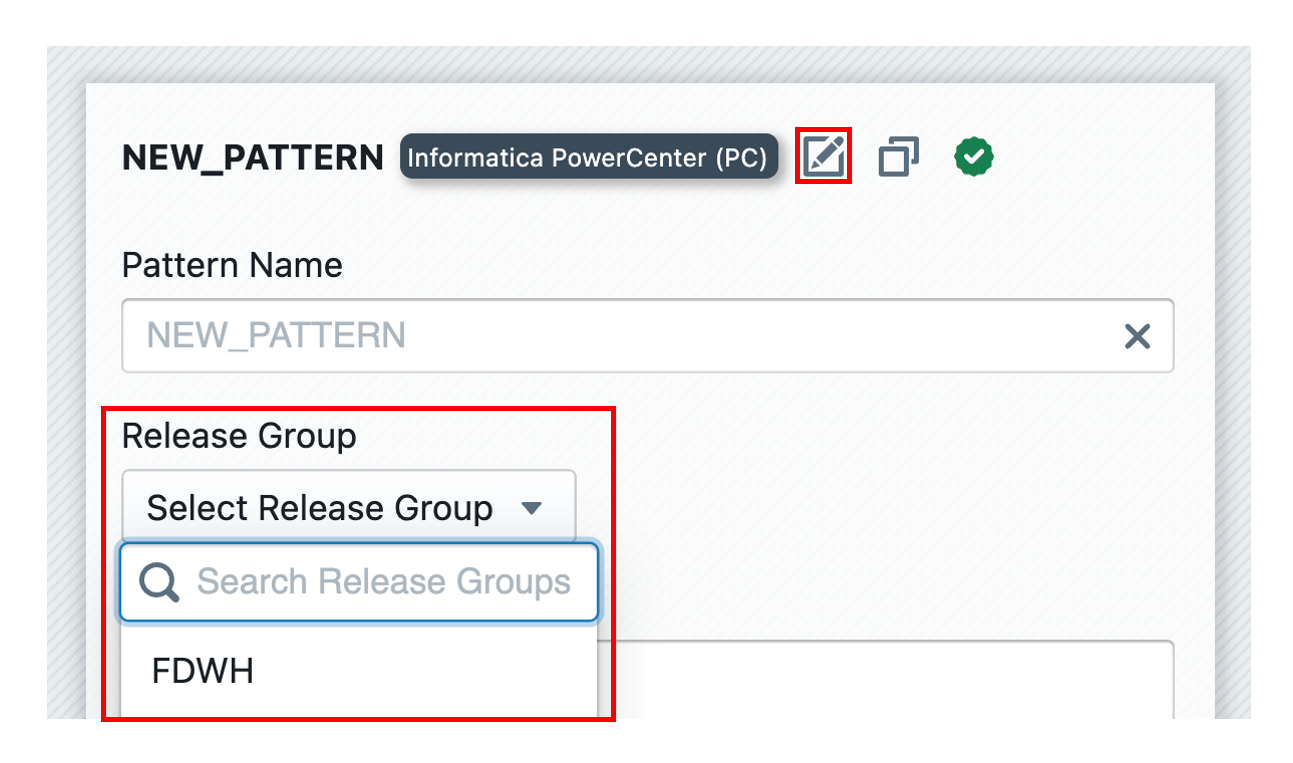
After creating release groups and releases, each pattern must be assigned to a release group:
- One release group can be used for all patterns (recommended when possible)
- Assignment is configured in pattern settings
- Completes the basic Release Management configuration
Release Management Features
1. Release Selection Within Projects
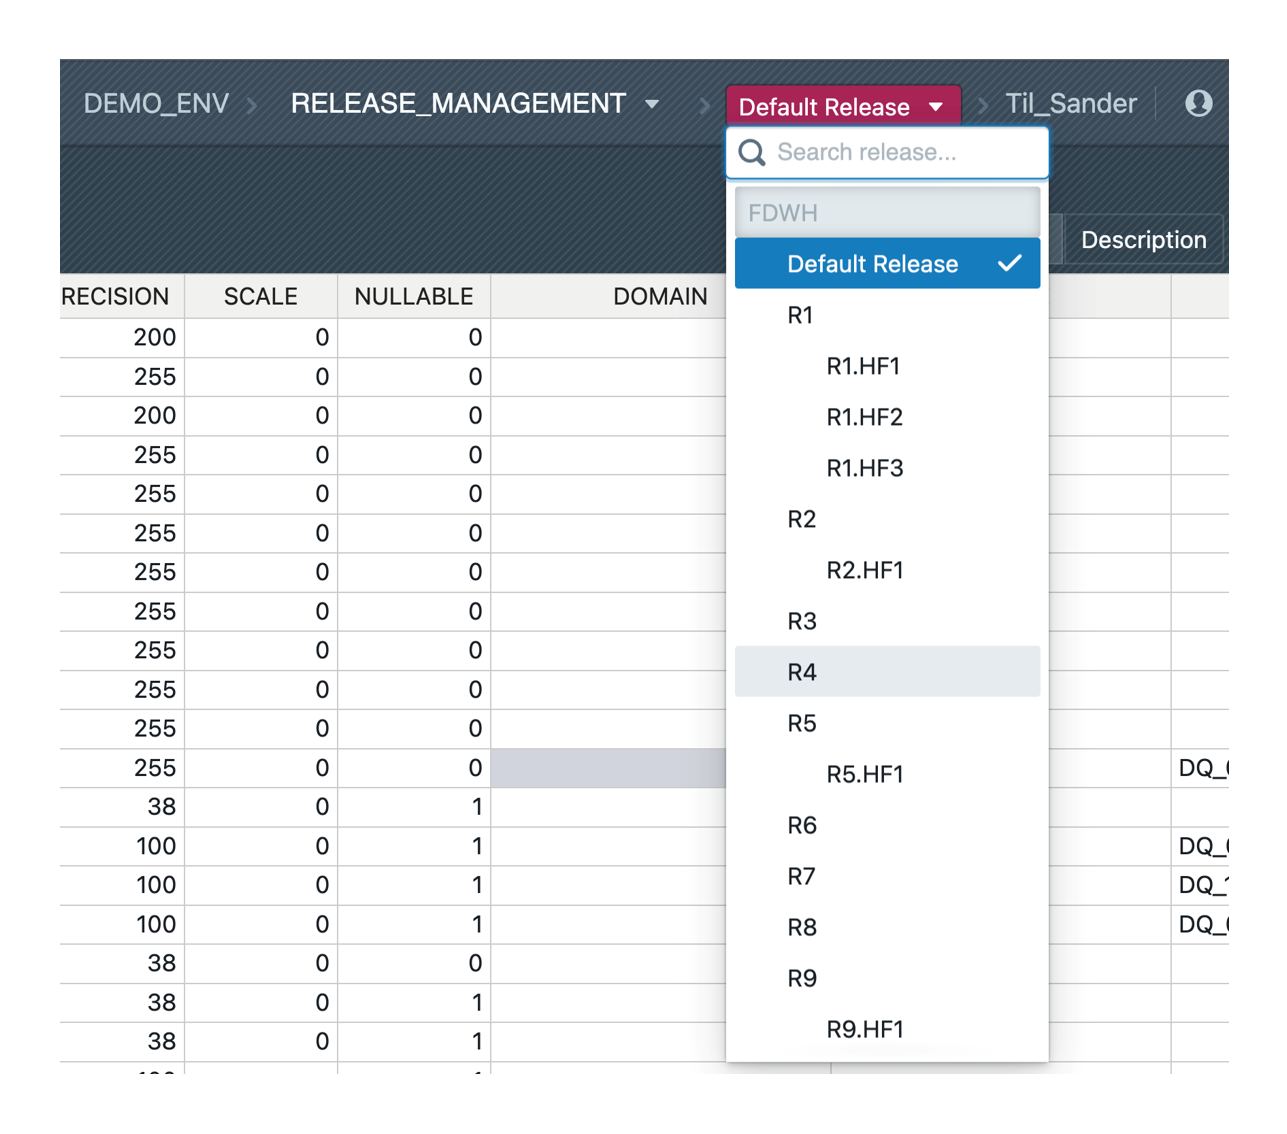
When working within a project, a pink-colored selection appears next to the project selection, initially set to "Default Release":
Selection Behavior
- Only visible if patterns exist with configured release management
- Click to switch between available releases
- Lists all releases in the release group with status flags for closed releases
- Shows instances in their state as they existed in the selected release
Important Considerations
- Switching releases may cause confusion if recent changes aren't visible
- Users must develop awareness of concurrent development across releases
- Choose the correct release for intended instance modifications
- Restrictive release organization (keeping only necessary releases open) prevents unwanted changes
2. Instance Versioning
Without Release Management

- Linear history of instance metadata
- Commits created with each build or manual action
- Chronological sequence of commits
- No concurrent development capability
With Release Management
- Instances can have different states simultaneously in different releases
- Non-linear commit history with branches and merges
- Commits are sequential within each release
- Supports concurrent development through branching
- Merge operations bring different states together
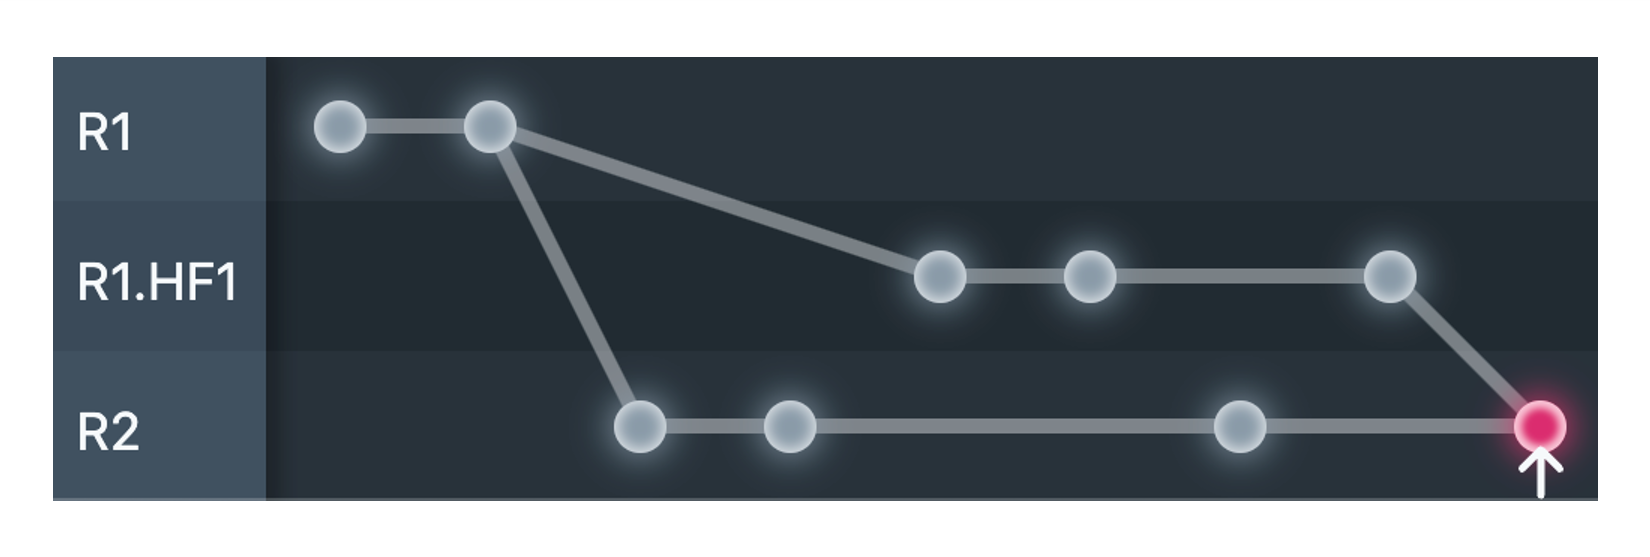
Commit Graph Representation Visual representation shows:
- Branch points where concurrent development starts
- Merge points where states are combined
- Parent-child relationships between commits
- Development flow across releases
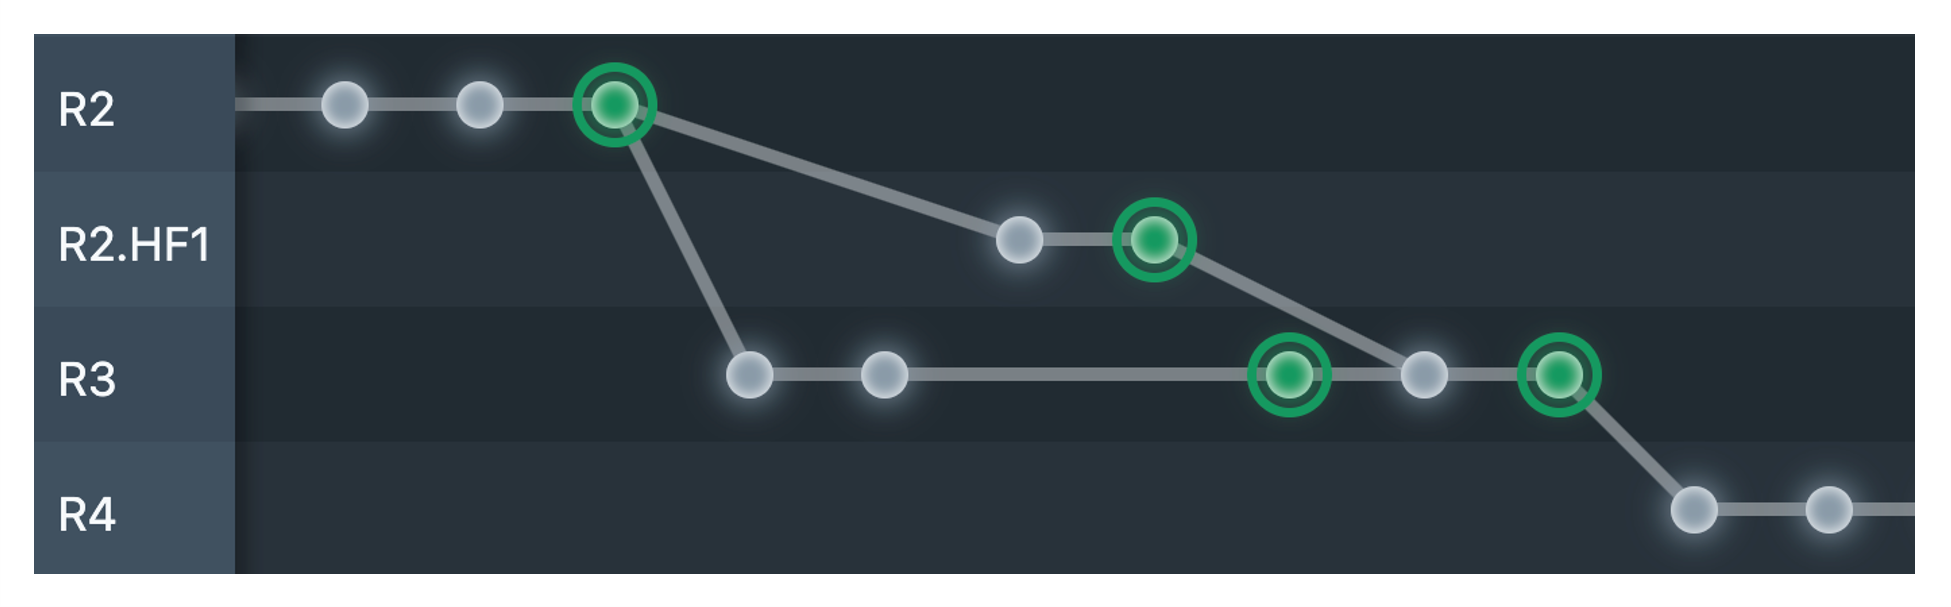
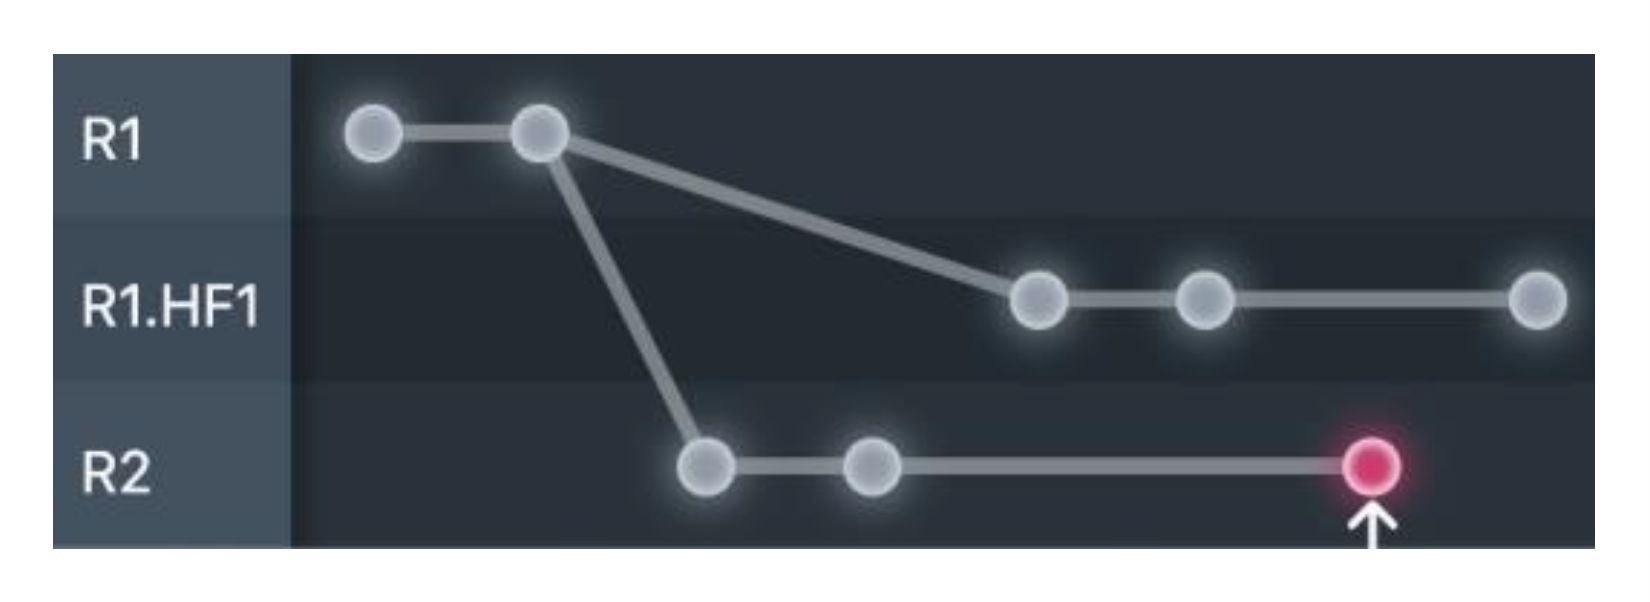
3. Commit-Graph Visualization
The commit graph provides an intuitive visual representation of instance version history across releases, similar to Git's commit visualization.
Graph Structure
- Dots: Each dot represents a commit in the instance history
- Gray connections: Lines showing predecessor/successor relationships between commits
- Row organization: Each row represents one release; cross-release connections indicate branches or merges
- Two locations: Available in instance "History" view and displayed below instance data in builds
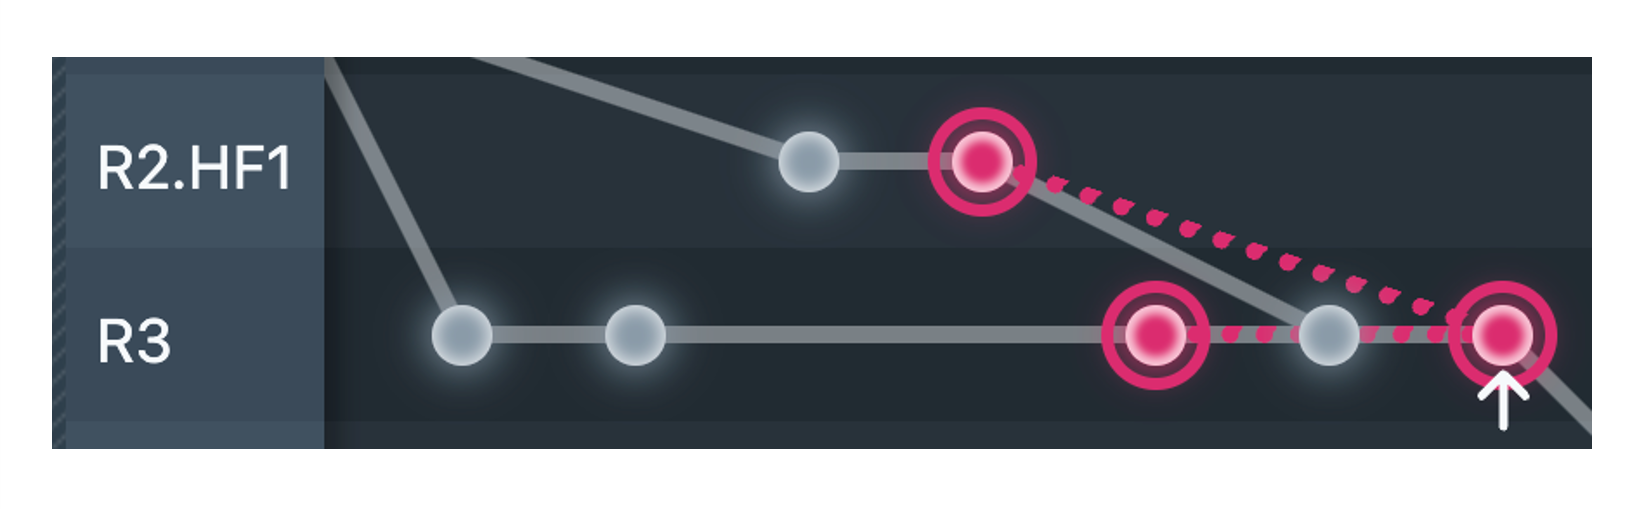
Color Coding
- Gray commits: Normal commits and failed/aborted builds
- Green commits: Successful build commits (created automatically for every built instance)
- Pink commits: Commits used for delta comparison in the table above the graph
- White arrow: Marks the comparison basis commit
Interactive Features
- Hover information: Shows commit time, user, description, and type (build vs. commit)
- Left click: Selects a commit for comparison (only commits before the comparison basis can be selected)
- Right click: Changes the comparison basis (moves white arrow to clicked commit)
- Scrolling: Navigate large graphs horizontally and vertically
- Dashed lines: Connect comparison basis to relevant commits when multiple comparisons are needed
Delta Comparison
The graph supports billing-relevant change analysis by comparing commits across releases. When determining changes for billing, the system checks previous builds to avoid double-billing changes that already existed, showing these relationships through dashed line connections to multiple commits when necessary.
4. Working with Instances
Initial Instance Setup
After uploading an instance for the first time:
- Instance is available in currently selected release
- No commit exists yet (no history)
- Must create initial commit to establish version control
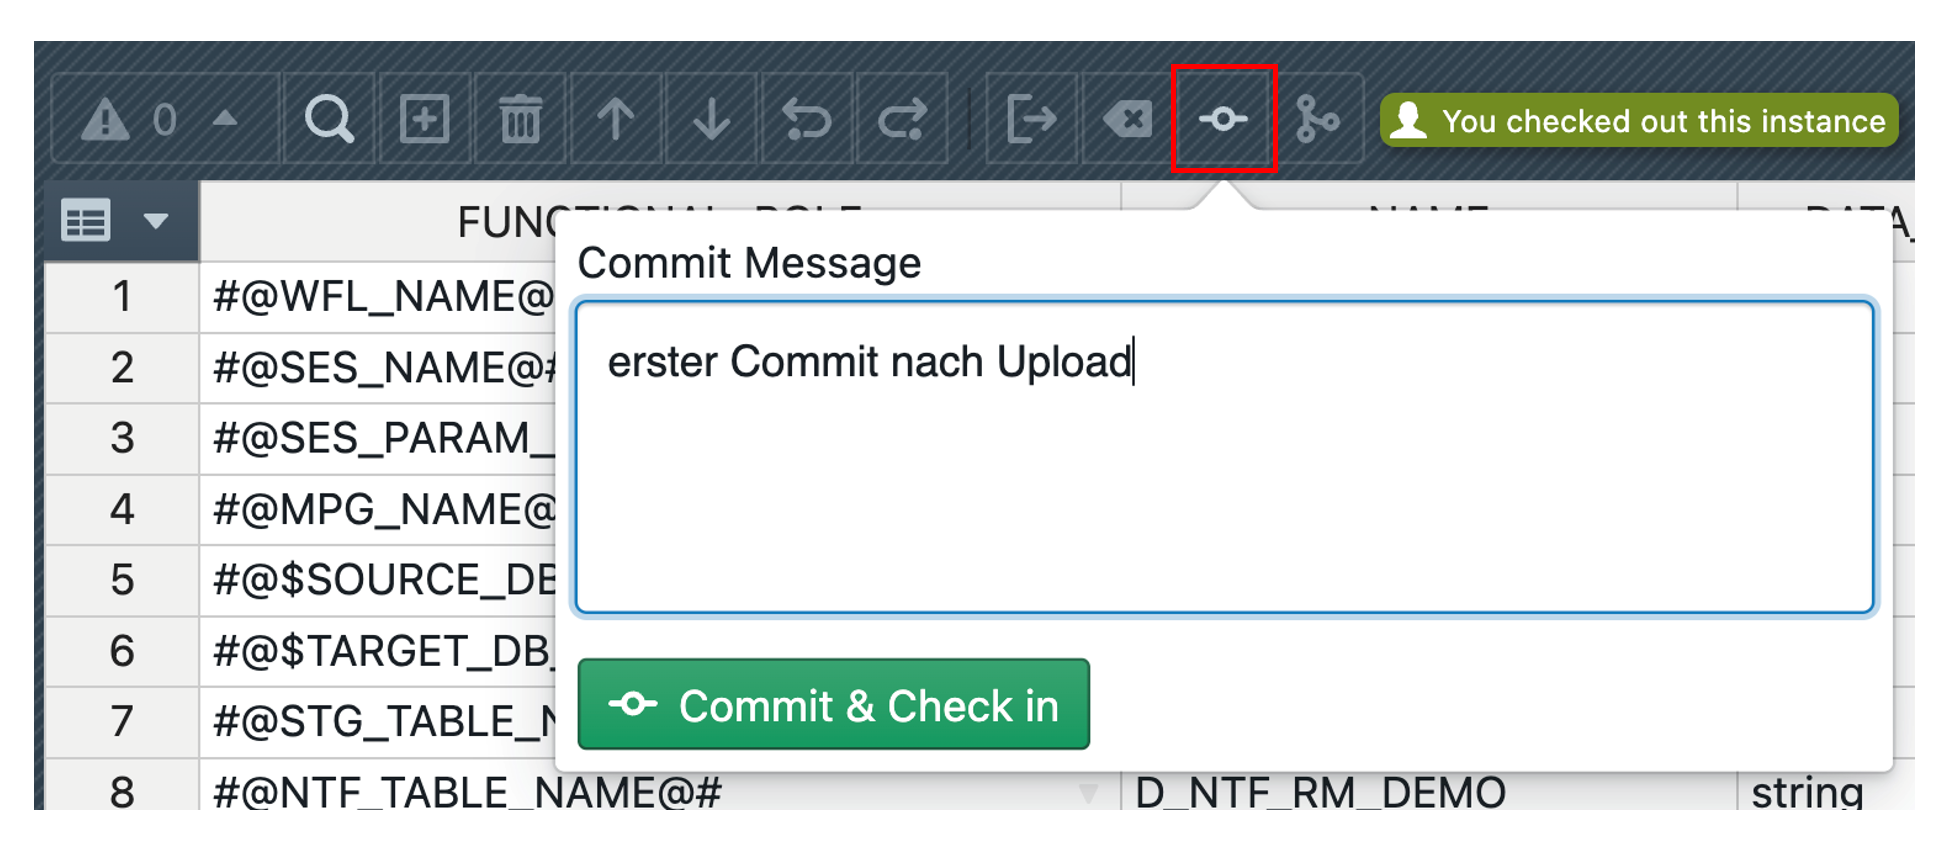
Commit Process
Creating First Commit
- Click on instance, then "Commit" button in toolbar
- Provide commit description
- Click Commit & Check in to save and lock instance
- Commit is created within currently selected release
Check-out for Editing

- Click checkout button in toolbar to edit checked-in instances
- Instance becomes editable after checkout
- Green label indicates checked-out status in instance list
- Completing Changes After modifications, two options are available:
- Commit & Check in: Save changes and create new commit
- Revert: Undo all changes since last commit and check in

Release-Specific States
- Instances can be checked out in one release while checked in another
- State always refers to specific release
- Simultaneous changes possible in different releases with different base commits
- Visual indicators show checkout status per release

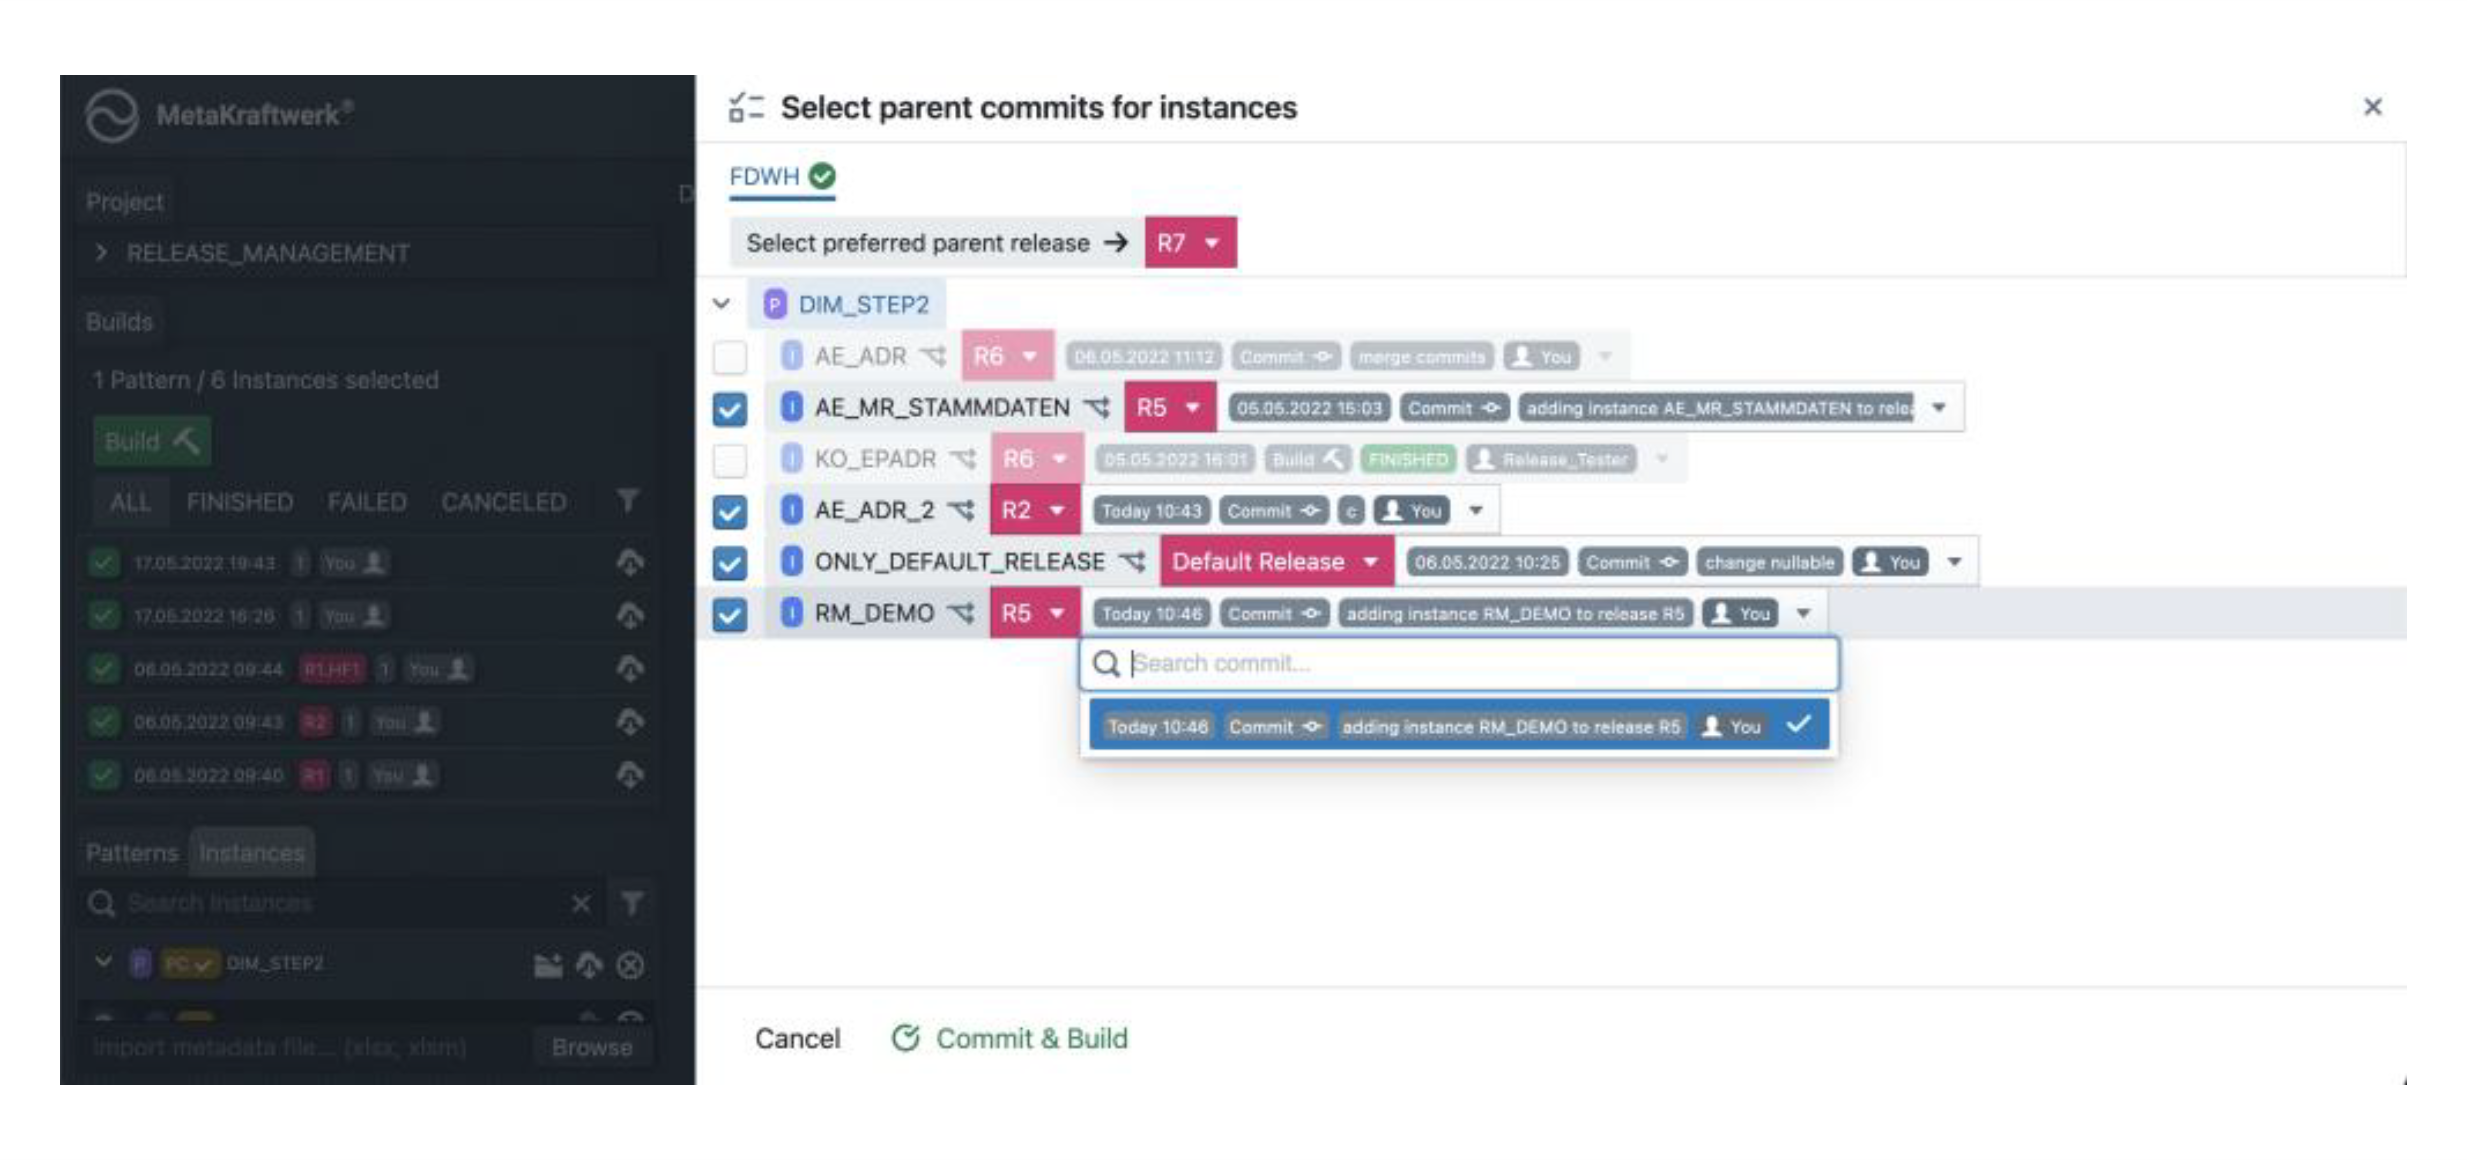
5. Adding Instances to Releases
Standard Addition Process
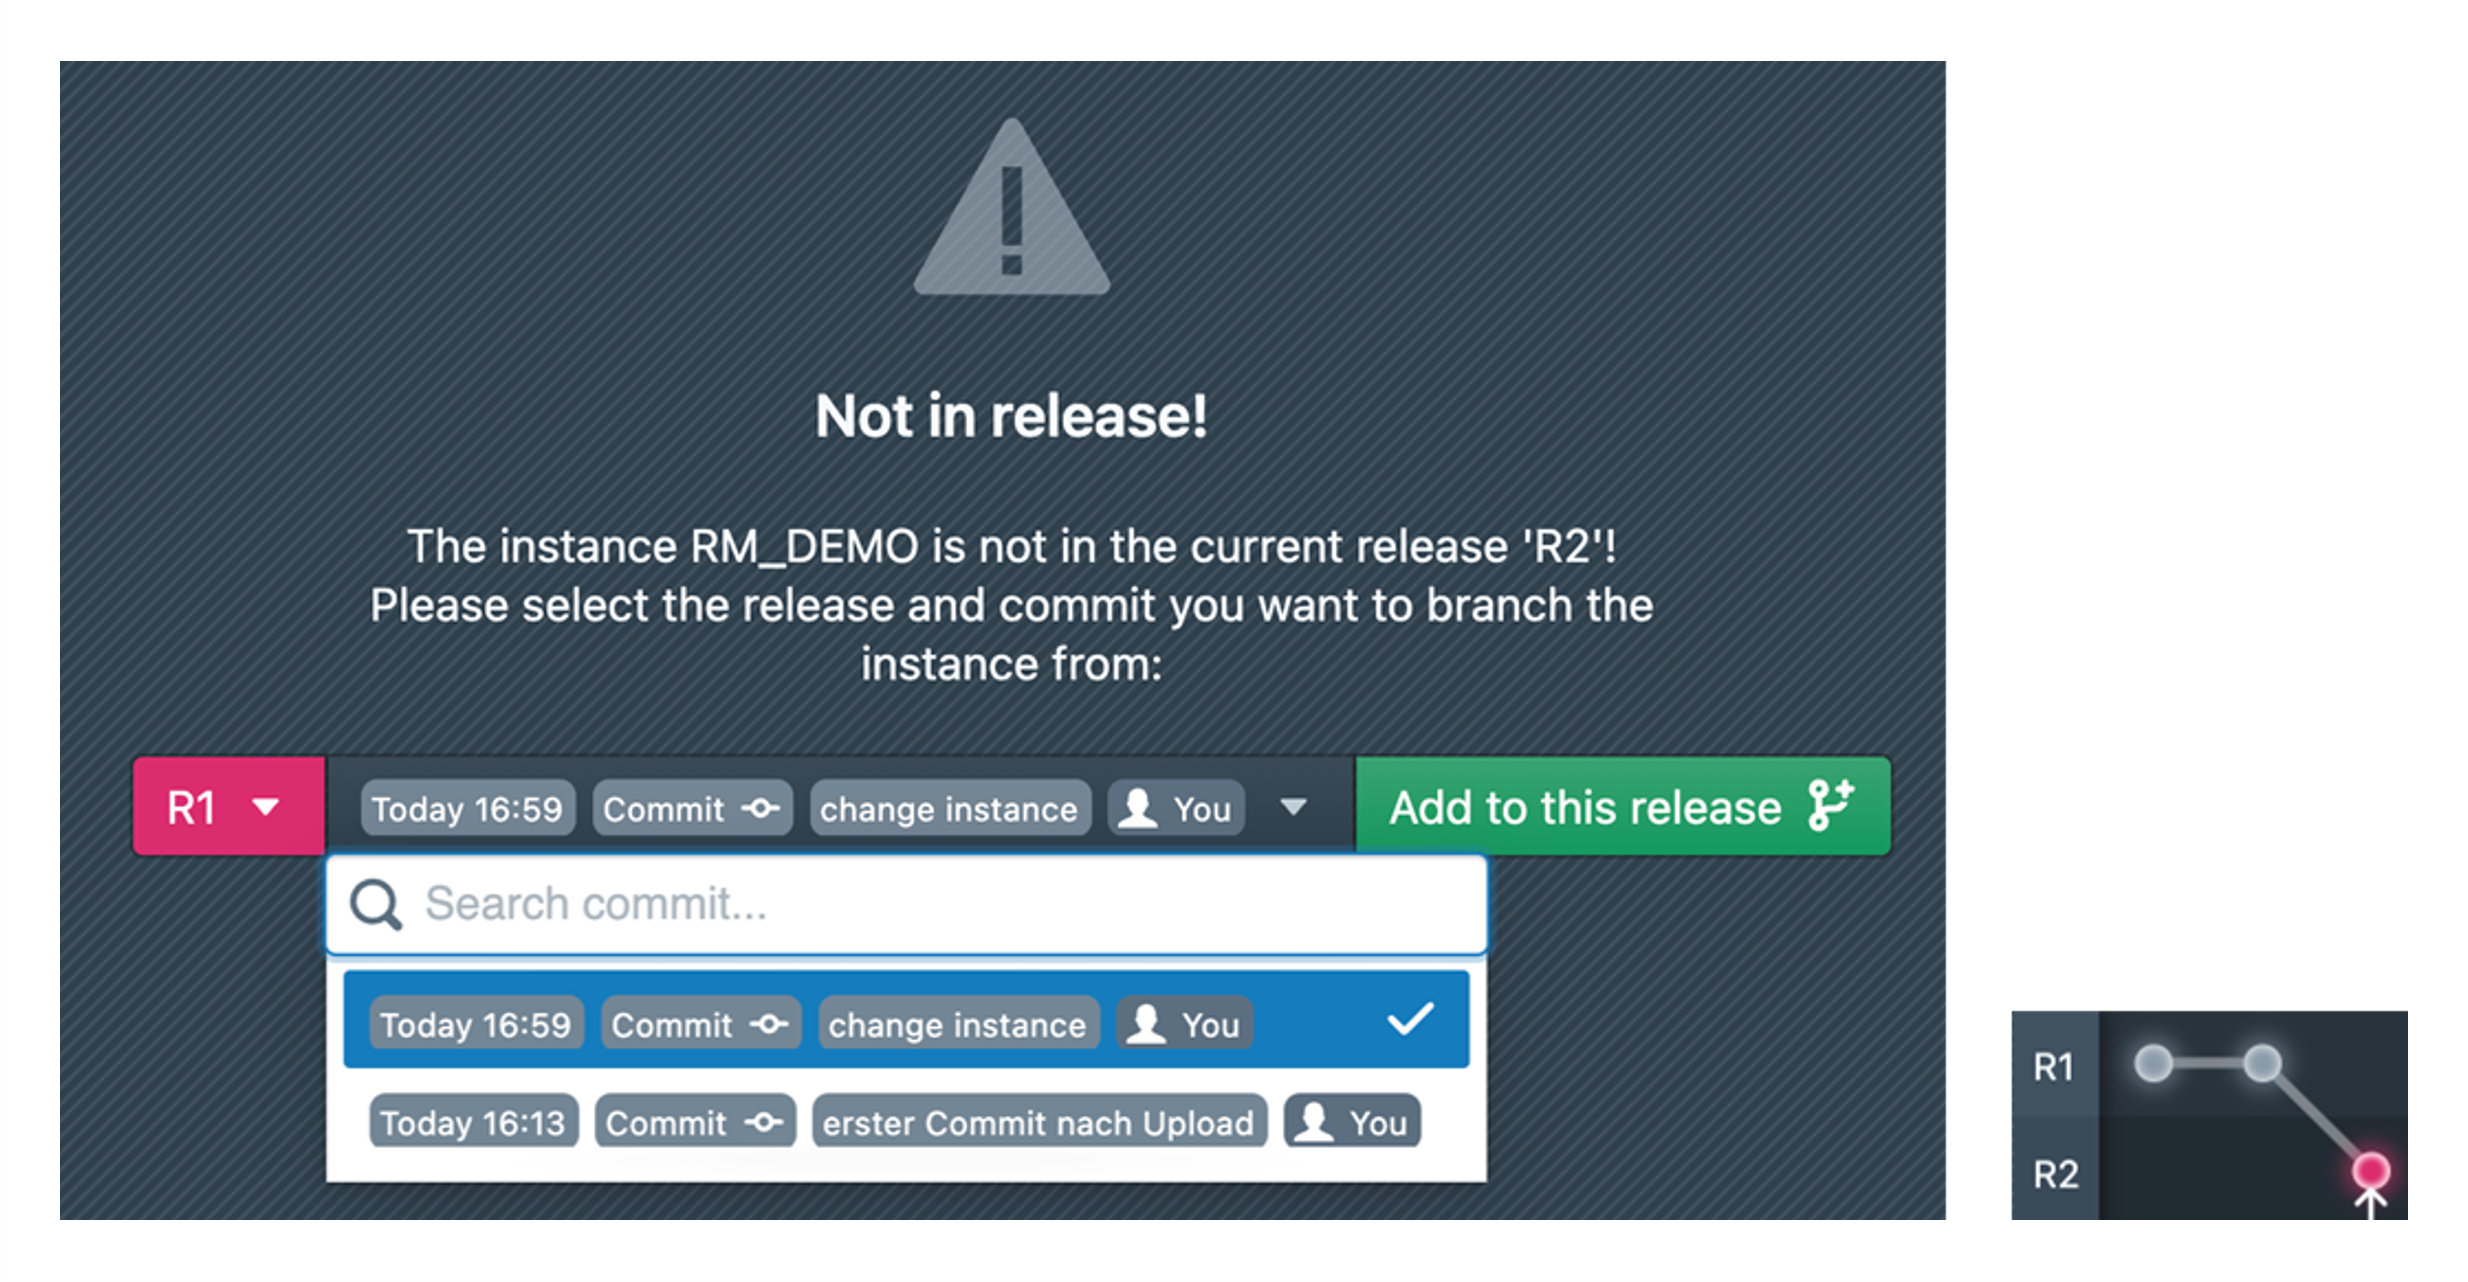
When an instance exists in one release but not others:
Gray dot indicator
 shows instance not available in current release
Dialog appears when switching to release without the instance
Select source release and specific commit as basis
Click "Add to this release" to create initial commit in current release
Special Case: Uncommitted Uploads
Instances uploaded but not yet committed:
Marked with dark gray dot
Cannot be added to other releases until initial commit
Dialog lists releases where upload exists
Use "Go to Release" to switch to upload release for initial commit
Implicit Addition During Build
When building instances not yet added to current release:
- Dialog opens for all instances in this situation
- Must select source release/commit for each instance
- All instances can be added to current release simultaneously
- Analogous to manual addition process but for multiple instances
6. Instance Deletion and Restoration
Deletion Process
- Click delete icon in instance list
- Logical deletion (not permanent removal)
- Instance no longer visible in normal view
- History remains saved for restoration

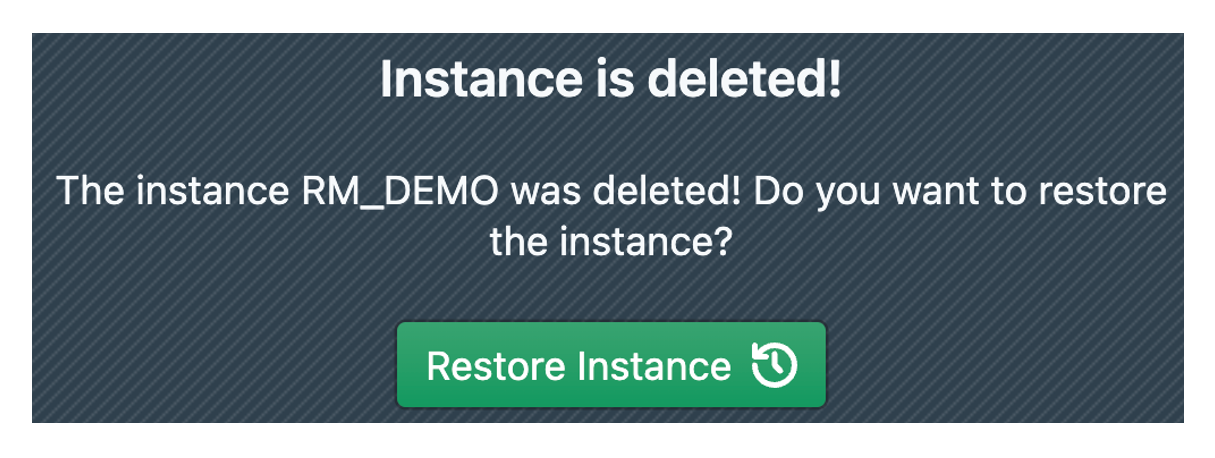
Restoration Process
- Enable "Show deleted instances" in instance filter
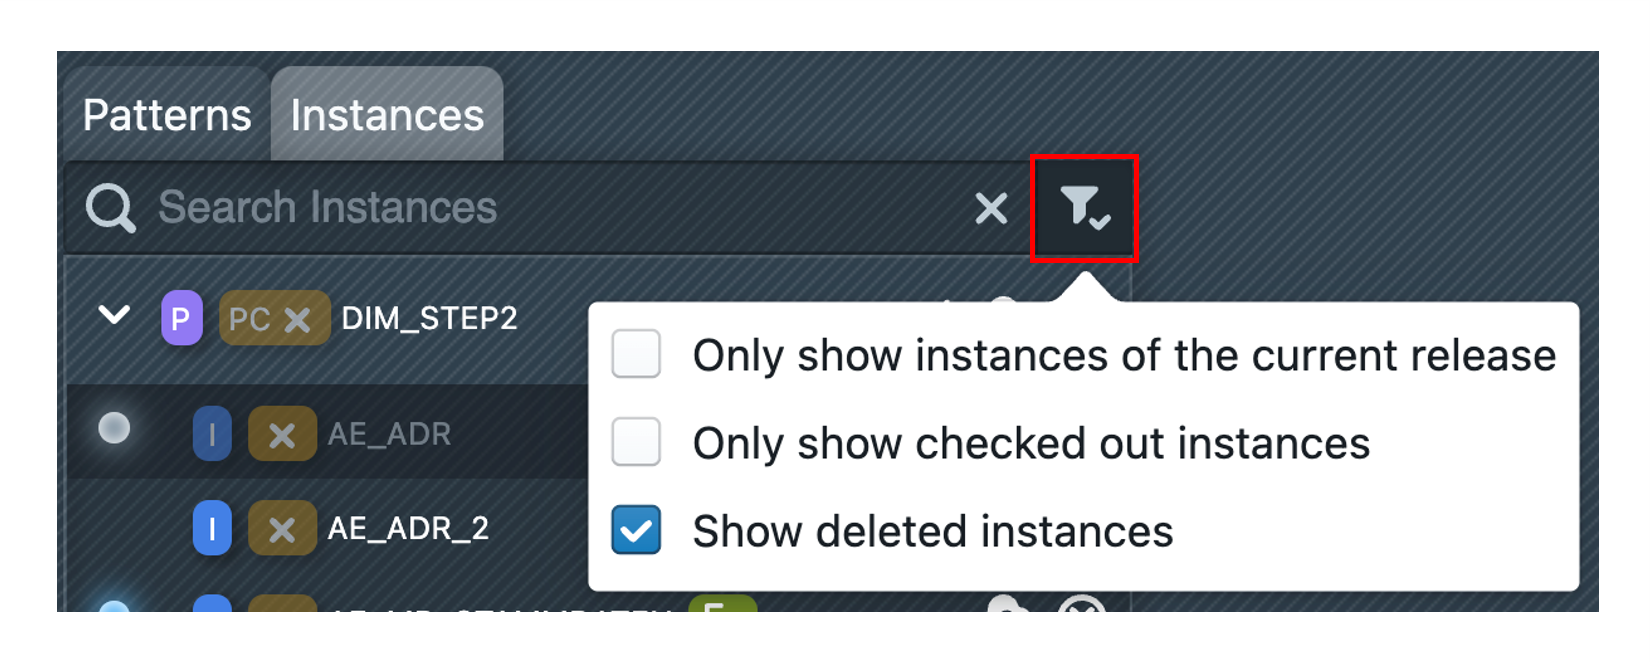
- Locate deleted instance (marked with red dot
 )
) - Open deleted instance
- Click "Restore Instance" to completely restore to pre-deletion state
7. Merging Instance Commits
When Merging is Needed
Parallel development in multiple releases can cause instance states to diverge:
- Fields added in hotfix releases need inclusion in next release
- Same fields modified differently across releases (e.g., precision changes)
- Re-establishing common consensus for continued development
Merge Process Overview
MetaKraftwerk uses a merge editor to combine commits from different releases:
- Merges commit from another release with last commit of current release
- User selects changes from either current commit (left) or merged commit (right)
- Creates new commit with both previous commits as parent nodes
- Updates commit graph to reflect merge relationship
The following diagram shows a typical situation: Development is actually already taking place in Release R2, but changes had to be made subsequently in Release R1, and a hotfix release was created for this purpose (R1.HF1) in order to incorporate the fixes there. Now these changes are to be taken over in R2.
Best Common Ancestor
Similar to Git, MetaKraftwerk determines relevant changes using:
- "Best common ancestor" or "merge base"
- Automatic selection of closest common parent commit
- Transparent to user, handles complexity automatically
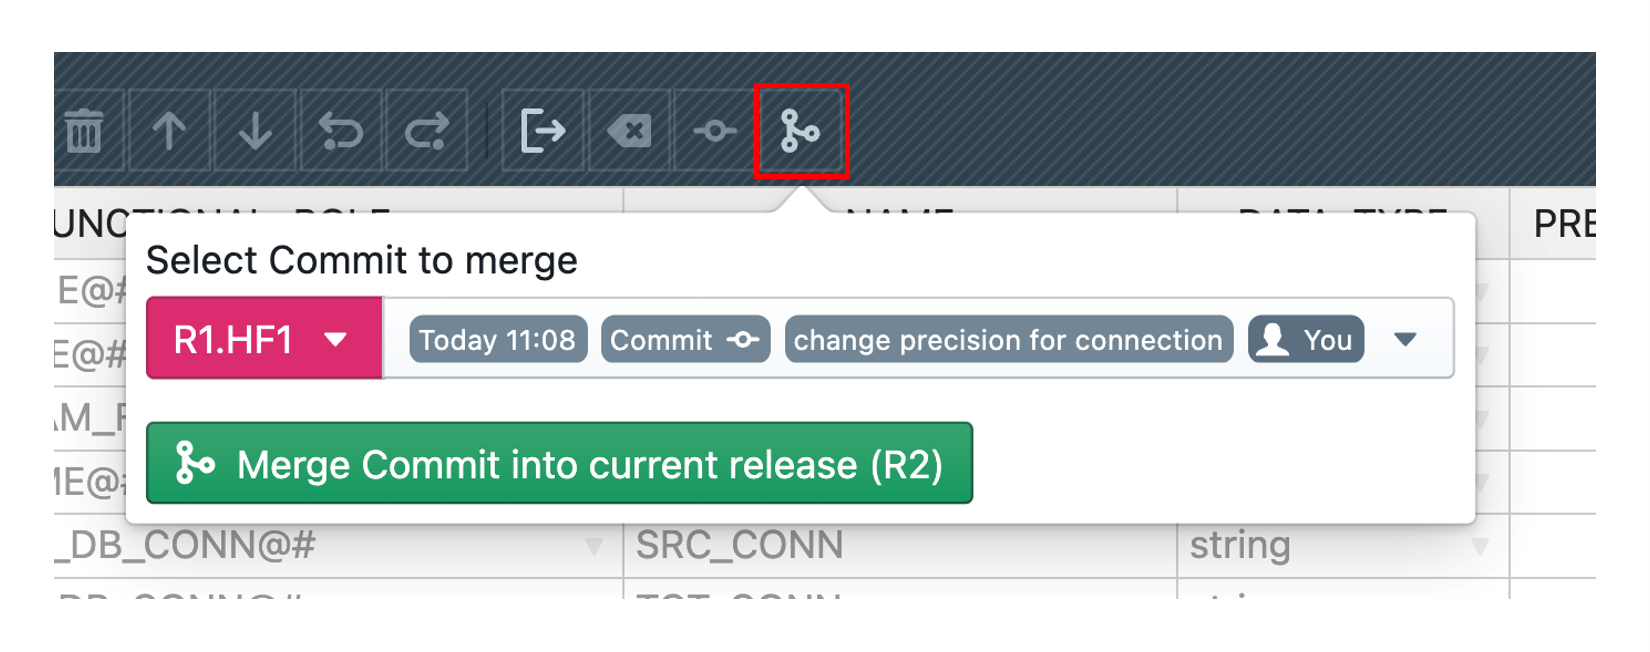
Starting a Merge
- Switch to Target Release: Navigate to release where merged result will be saved
- Open Instance: Select instance for merging
- Click Merge Button: Access merge functionality in toolbar
- Select Source: Choose another release and specific commit to merge
- Execute Merge: Click Merge Commit into current release
In the example this is the last commit of R1.HF1. After clicking on Merge Commit into current release the merge view is opened, which is explained in the next section.
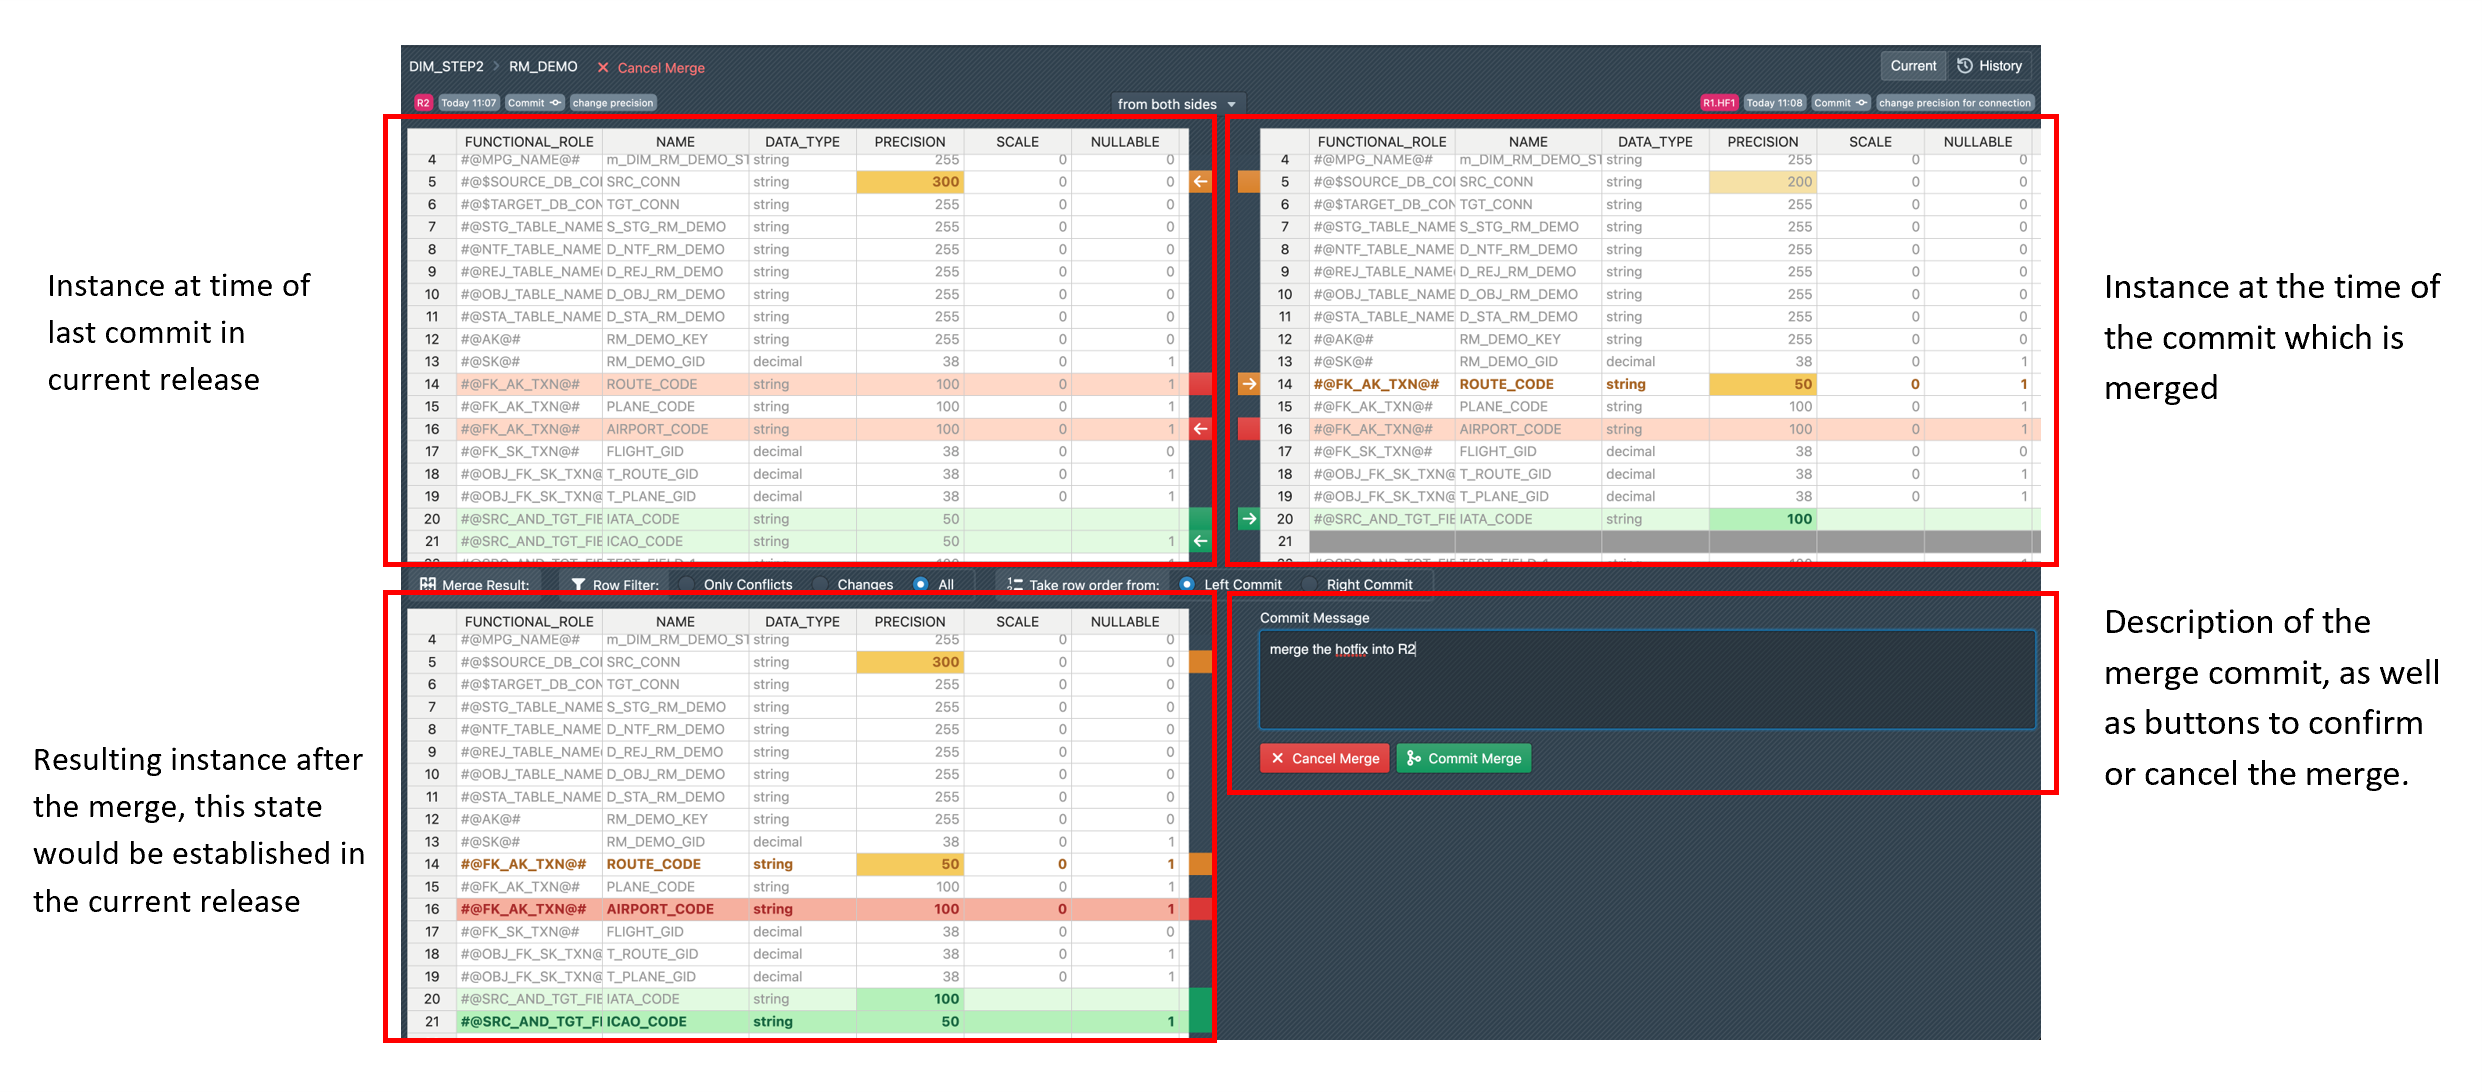
Merge View Interface
The merge view provides four distinct areas:
Upper Left: Changes in current release since merge base
Upper Right: Changes in selected commit since merge base
Lower Left: Preview of merged result based on user selections
Lower Right: Description field and completion/cancellation buttons
Visual Coding:
- Green lines: Added content
- Red lines: Deleted content
- Orange cells: Modified content
- Blue lines: Only row order changed
User Selection Options
Three levels of granularity for merge decisions:
Global Selection: Top-center buttons for complete left/right preference
- Located in top center above the tables
- Allows global decision for left or right side
- Overwrites previous selections for all changed rows
Row-level Selection: Line-by-line decisions using middle arrows
- More fine-grained control for individual lines
- Click corresponding arrows located vertically in middle of each line
- Apply selection to entire row at once
Cell-level Selection: Individual cell value selection for fine-grained control
- Most granular selection possible
- Click directly in specific cells of the table
- Example: Select DATA_TYPE value from left side and PRECISION value from right side for same row
- Creates new row from combination of individual values
Automatic Resolution: User input only required for actual conflicts; non-conflicting changes applied automatically. If a line has no changes in both commits, or only in one commit, the change is automatically applied. Therefore, some merges may require no user specification except for the mandatory description.
Row Filter Options
Since not all lines of an instance are relevant for the merge process, the merge view provides filtering options to focus on pertinent information:
Row Filter Selection:
- Only Conflicts: Displays only merge conflicts requiring user selection
- Changes: Shows all changed lines, including those with canonical merges
- All: Displays all lines of the instance regardless of change status
This filtering capability helps users focus on the most relevant information during the merge process, reducing visual complexity and improving merge efficiency.

Row Order Management
The merge view accounts for changes in row/field ordering between releases, as ordering can change independently of field values.
Take Row Order From:
- Left Side: Uses row ordering from current release
- Right Side: Uses row ordering from merged commit
- Direct Impact: Selection immediately affects table display organization
- Merge Result: Chosen ordering is preserved in the final merged instance
This feature ensures that structural changes to instance organization are properly handled during merge operations, maintaining consistency in field presentation across releases.

Merge Completion and Result
After the merge is committed, the instance enters a new state reflecting the successful integration of changes from both sources. A new merge commit is created, which is composed of the two merged commits, establishing a clear lineage in the commit graph that shows both parent commits contributing to the final result. This merge commit becomes the new baseline for future development in the current release, incorporating all selected changes and maintaining full traceability of the merge operation.
Conclusion
MetaKraftwerk's Release Management provides a comprehensive framework similar to Git/SVN for managing concurrent development of instance metadata. The system enables teams to handle complex development scenarios including hotfixes, parallel development, and controlled merging of changes across releases.
Key capabilities include:
- Version Control: Full historical tracking with commit-based versioning
- Concurrent Development: Multiple release branches with independent development
- Merge Management: Sophisticated merge editor for conflict resolution
- State Management: Open/closed release states with temporary reopening capability
- Instance Restoration: Recovery of deleted instances from historical data
The integration of check-out/check-in processes, visual change tracking, and automatic conflict detection creates a robust environment for enterprise-scale development while maintaining data integrity and development traceability.